Table of Contents
Advertisement
Quick Links
Dynamic Water Pressure
Max: 5.0 bar
Min: 0.1 bar
2.0
3.0
1.0
4.0
0
5.0
Pressure
BAR
Maximum Static Pressure: 10.0 bar
Pack Contents
Single Function
Handset
x2
Olives
x2
Nuts
x2
Slider
Plinths
Riser
Long
Rail
Elbows
x2
Hose
Retainer
x1
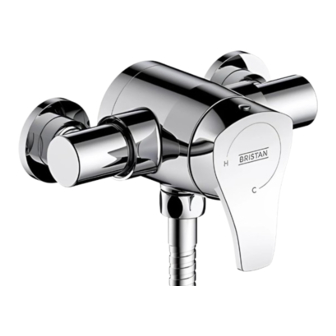
Shower Valve
All products manufactured and supplied by Bristan are safe to use provided that they are installed, operated and receive regular
maintenance in accordance with these instructions.
This product needs to be installed in accordance with, and meet the requirements of The Water Supply (Water Fittings) Regulations
(Northern Ireland) 2009 and The Water Supply (Water Fittings) (Scotland) Byelaws 2014. For full Installation Requirements & Notes
(IRN) please visit www.wrasapprovals.co.uk/approvals-directory
Before installing this product the water supply must be thoroughly flushed in order to remove any swarf, solder etc. Full access must be
made available for future maintenance/servicing purposes. Isolation valves must be fitted to the inlet water supplies to ensure ease of
future maintenance.
Before drilling into walls, check that there are no hidden electrical wires, cables or water supply pipes. This can be checked with the aid of
an electronic detector. If power tools are used do not forget to:
This product must not be modified in any way as this will invalidate the guarantee.
Specifications
Inlet Water Temperature
Min 5°C; Max 25°C
IMPORTANT
The inlet hot water must
be at least 10°C above the
required blend temperature.
x1
x1
Cone
to
Nut
x1
Hose
x1
x1
To replace any
Screw
spare parts for
x1
your shower, why
Pack
not scan the
QR Code or visit
www.bristan.com
and search for
your product.
Prior to Installation
Installation Instructions
Please leave these instructions
25°C
5°C
Recommended 60°C;
Max 65°C
Factory
pre-set 42°C
Operation
Increase
Temperature
and Flow
Off
Spares
- Wear eye protection
& User Guide
with the end user
CAP3 SHXAR C (D1)
Inlet Connections
65°C
60°C
Inlet Dimensions
TMV2 Designation
HP-SE & LP-SE
Tools Required
Pipe Cutter
Adjustable Spanner
Flat Head
Cross Head
Screwdriver
Screwdriver
Long Nosed Pliers Electronic Detector
Drill
2.5mm
10mm
Hexagonal Keys
- Unplug equipment after use
15mm
Compression
110-155mm
Centres
30mm
Socket Spanner
Safety Goggles
Advertisement
Table of Contents

Related Manuals for Bristan CAP3 SHXAR C (D1)


Summary of Contents for Bristan CAP3 SHXAR C (D1)
- Page 1 Prior to Installation All products manufactured and supplied by Bristan are safe to use provided that they are installed, operated and receive regular maintenance in accordance with these instructions. This product needs to be installed in accordance with, and meet the requirements of The Water Supply (Water Fittings) Regulations (Northern Ireland) 2009 and The Water Supply (Water Fittings) (Scotland) Byelaws 2014.
- Page 2 Installation Instructions and User Guide Exposed Sequential and Concentric Mini Valve Showers Please keep this booklet for future reference. Installer, when you have read these instructions please ensure you leave them with the user.
-
Page 3: Table Of Contents
Contents Thank you for choosing Bristan, the UK’s leading taps and showers expert. We have designed this product with your enjoyment in mind. To ensure that it works to its full potential, it needs to be fitted correctly. These fitting instructions have been created to give you all of the information you need and, if you need any further help, please do not hesitate to give us a call on 0330 026 6273. -
Page 4: Important Safety Information
Important Safety Information Please make sure you read these instructions and retain for future use. All products manufactured by Bristan are safe, providing they are installed and used correctly and also receive maintenance when needed. These fittings, including the connecting water and waste system need to be installed in accordance with and meet the requirements of the Water Supply Regulations 1999 (Water Fittings) and current by-laws. -
Page 5: Installation Requirements
These showers are designed to be used a ratio of 5:1 - see Specification section) in conjunction with the kit supplied, or Bristan shower kits where not supplied. • Gravity Fed Hot and Mains Cold We cannot guarantee compatability or... - Page 6 Installation Requirements Gravity Fed Hot and Cold Gravity Fed Hot and Mains Cold 1m min. min. cold mains supply cold mains supply Isolating Reducing Key: Shower Essex Pump Valve Valve Valve Flange Need help? Give us a call on 0330 026 6273 and speak to one of our trained advisors.
- Page 7 Installation Requirements Instantaneous Water Heater Unvented System cold mains supply cold mains supply Pumped System Pumped System (with Essex flange) 1m min. 1m min. If less than 1m see note. 50mm cold mains supply cold mains supply Isolating Reducing Shower Key: Essex Pump...
- Page 8 Installation Requirements This fitting needs to be installed in Size of tap or Vertical distance accordance with the following Installation combination of outlet above Requirements and Notes (IRN) to ensure fitting spill-over level they meet the requirements of the Water 1.
-
Page 9: Prior To Installation
Prior to Installation Flow regulators have been pre-fitted to this product for water efficiency. If you have low water pressure, or certain water supply systems these may need to be removed in order to achieve adequate flow. Please see the table to check whether the flow regulators need to be removed. - Page 10 Prior to Installation To Remove/Replace Flow Regulators: 1. Unscrew both inlet elbows anti-clockwise from the valve body. 2. Remove the flow regulators using long-nosed pliers if required. Flow Regulator 3. Screw the inlet elbows clockwise to fit back into the valve body. Configuring the Inlet Elbows: The shower valve is supplied with two small and two large elbows that can...
-
Page 11: Installation
Installation 110-155mm 1. Check your shower’s specification page and check the pack contents for completeness. 2. Prepare the 15mm water pipework, leaving sufficient pipe protruding Cold from the finished wall to fit REMEMBER Backplate into the elbows. Fit isolation 42.5mm Fixing valves to pipe- Holes... -
Page 12: General Cleaning
General Cleaning Bristan products are made from Spare Parts premium materials, with hand polished, PVD, EPD or electroplated finishes. Your product should be regularly cleaned with warm water, a mild pH-neutral liquid soap, and polished with a soft cloth. Any residues from soap,... -
Page 13: Maintenance
Maintenance Replace/Clean Cartridge: Sequential Shower Valves: Use a 30mm socket spanner to unscrew Undo the grub screw to the cartridge from the valve body. remove the handle. This can Carefully remove the cartridge and spring. be located at the top or underneath the handle. - Page 14 Maintenance Replace/Clean Cartridge: Concentric Shower Valves: IMPORTANT Isolate the water supply before starting! Remove the circlip and pull the flow handle off of the valve Use a 30mm socket spanner to unscrew the cartridge from Undo the indice housing and the valve body.
- Page 15 Maintenance Maximum Temperature Setting: Sequential Shower Valves: The shower has been pre-set to 42°C as per TMV standards. This is based on being fitted with nominally balanced pressures with the hot water inlet supply at 65°C. If your operating conditions are different to the above your maximum outlet temperature may differ.
- Page 16 Maintenance Maximum Temperature Setting: Concentric Shower Valves: The shower has been pre-set to 42°C as per TMV standards. This is based on being fitted with nominally balanced pressures with the hot water inlet supply at 65°C. If your operating conditions are different to the above your maximum outlet temperature may differ.
- Page 17 Maintenance Servicing the Elbows: Remove the filters from both elbows and set aside. Unscrew the elbows completely from the shower valve. IMPORTANT Isolate the water supply before starting! Disconnect your shower kit. Undo the compression nuts and grub screw at the bottom of the shower valve to remove Use a 10mm hex key from the wall.
-
Page 18: Troubleshooting
Troubleshooting Symptom Cause Remedy Partially closed isolation valve. Open isolation valve. Instantaneous water heater cycles on and Increase water flow rate or off as flow rate or pressure is too low. pressure through system. Head of water is below the Refer to the specification for the minimum distance required. -
Page 19: Notes
Notes 18 Need help? Give us a call on 0330 026 6273 and speak to one of our trained advisors. - Page 20 Notes Need help? Give us a call on 0330 026 6273 and speak to one of our trained advisors.
- Page 21 A Masco Company At Bristan, we want to make things as easy as possible for our customers. That’s why we offer solid guarantees on all our products, effective from the date of purchase, to give you peace of mind.
Need help?
Do you have a question about the CAP3 SHXAR C (D1) and is the answer not in the manual?
Questions and answers