Table of Contents
Advertisement
Quick Links
Advertisement
Table of Contents

Related Manuals for Zmotion Teach Pendant HMI ZHD400X


Summary of Contents for Zmotion Teach Pendant HMI ZHD400X
-
Page 2: Table Of Contents
ZHD400X Teach Pendant User Manual V2.0.0 Content Chapter I Production Information..................3 1.1. What is ZHD400X ....................3 1.2. ZHD400X Specification Parameters ..............4 1.3. ZHD400X Size ....................5 1.4. System Configuration..................6 1.5. Order Information ....................6 Chapter II ZHD400X Appearance ..................7 2.1. - Page 3 Thank you for choosing our Zmotion products. Please be sure to read this manual carefully before use so that you can use this product correctly and safely. Zmotion is not responsible for any direct or indirect losses caused by the use of this product.
-
Page 4: Chapter I Production Information
ZHD400X Teach Pendant User Manual V2.0.0 Chapter I Production Information 1.1. What is ZHD400X ZHD400X is one touch screen teach pendant that can show by network. Please note it must be used together with the controller that support ZHMI function. Programmable teach pendant, it can show all kinds of interfaces through script programs. -
Page 5: Zhd400X Specification Parameters
ZHD400X Teach Pendant User Manual V2.0.0 1.2. ZHD400X Specification Parameters --Product Parameters-- Item Description Resolution 800*480 Touch Screen Size 7” TFT LCD Brightness 320 cd/m Color 24-bit Touch Screen Resistive touch screen EtherNET 100 Base-T --Other Parameters-- Item Description Power Supply DC24V Max Power Consumption 1.3W... -
Page 6: Zhd400X Size
ZHD400X Teach Pendant User Manual V2.0.0 1.3. ZHD400X Size Unit: mm... -
Page 7: System Configuration
ZHD400X Teach Pendant User Manual V2.0.0 1.4. System Configuration 1.5. Order Information Item Model Specification Description ZHD400X 3-meter connecting line (standard) ZHD400X-L50 5-meter connecting line (special) ZHD400X-L100 10-meter connecting line (special) -
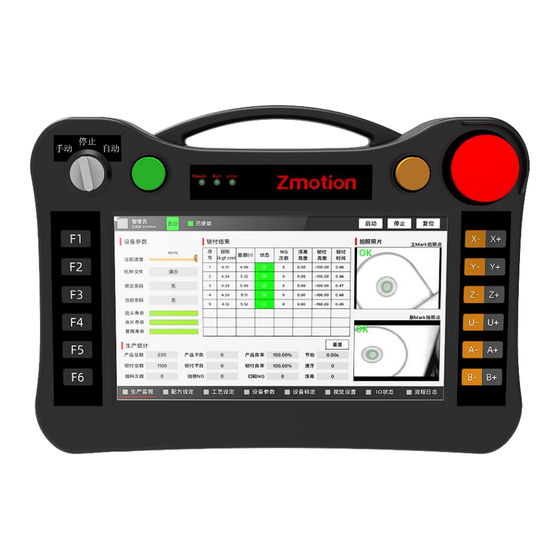
Page 8: Chapter Ii Zhd400X Appearance
ZHD400X Teach Pendant User Manual V2.0.0 Chapter II ZHD400X Appearance 2.1. Whole Layout Interface Description Mode selection Manually switch “manual” / “stop” / “auto”. ① ON button Press “ON” to run program ② Pause button Press “Pause” to pause the program ③... -
Page 9: Touch Screen Points Coordinates
ZHD400X Teach Pendant User Manual V2.0.0 2.2. Touch Screen Points Coordinates It is 800*480, the coordinate origin is at upper left corner. 2.3. Hardware Interfaces --Power Interface-- ZHD400X uses 24V DC power. There are 3 cables on the network crystal head, HMI power cable, and emergency stop signal cable. - Page 10 ZHD400X Teach Pendant User Manual V2.0.0 --RJ45 Crystal Head-- A. Specification PIN Definition Item Description Communication MODBUS_TCP protocol Communication 100Mbps velocity Default IP 192.168.0.10 Communication Category 5e cable Cable length Best <10m B. How to do Wiring HMI can be connected to controller (point to point) by one category 5e STP (shielded ⚫...
-
Page 11: Physical Key Buttons
ZHD400X Teach Pendant User Manual V2.0.0 2.4. Physical Key Buttons ZHD400X has 18 buttons, which are used together with physical button encoded. And functions can be customized. You can view “Chapter III” or HMI Programming manual. --Mode Selection Switch-- You can rotate the button to switch the mode, it locates in upper left. Modes are manual, stop, auto. -
Page 12: Emergency Stop
ZHD400X Teach Pendant User Manual V2.0.0 --Emergency Stop-- This button is located at upper right corner of HMI. When some emergency situations happen, you can press it to protect the program, axis will stop immediately. When all is normal, you can rotate the button clockwise to cancel it. Note: please consider the “Circuit Design”, which must be safe and reliable, otherwise, hard to achieve emergency stop. -
Page 13: Chapter Iii Usage & Operations
ZHD400X Teach Pendant User Manual V2.0.0 Chapter III Usage & Operations 3.1. Physical Key Codes Encodes of button consist of row and column combination. When the button is pressed, HMI will automatically send the physical button to the controller, then controller can detect the physical button. If you need to use virtual keys, there is one Key transformation list in RTSys –... -
Page 14: Touch Correction
ZHD400X Teach Pendant User Manual V2.0.0 Global Const key_f5 = 15 'functional key F5 Global Const key_f6 = 16 'functional key F6 Global Const key_X-- = 24 'axis shift key X- X+ Global Const key_X+ = 25 'axis shift key Global Const key_Y-- = 34 'axis shift key Y- Y+ Global Const key_Y+ = 35... -
Page 15: Operation Steps
ZHD400X Teach Pendant User Manual V2.0.0 button at the same time. Follow the English instructions on the display (Touch crosshair to calibrate), trace the "cross" icon on the screen and click on it one by one. 3.3. Operation Steps --Connect to Power-- Please refer to above power interface, red &... -
Page 16: How To Use Physical Encodes
ZHD400X Teach Pendant User Manual V2.0.0 ➢ Method 2: connect HMI to PC at first, then do connection of HMI and controller. 1) Use interchanger to connect HMI, controller, and PC (you can view “system configuration”, make sure their IP addresses are in same segment. 2) Connect controller to RTSys / ZDevelop, then download the program into ROM. - Page 17 ZHD400X Teach Pendant User Manual V2.0.0 ➢ Example 1 1) Bind “run” control with “ON” physical button. In HMI file, click “run” control, then in its property window, bind it with “3” (3 is HMI “ON” button). Bind “pause” control with “pause” physical button. In HMI file, click “pause” control, then in its property window, bind it with “4”...
- Page 18 ZHD400X Teach Pendant User Manual V2.0.0 Bind “-” control with “X-” physical button. Click “motion control” window “-” of manual, then in its property window, bind it with “25” (25 is HMI “X-” button). 2) Download the program again to run it. Set “custom parameter”, and after selecting the axis, you can use “X+”...
-
Page 19: Chapter Iv Maintain
ZHD400X Teach Pendant User Manual V2.0.0 Chapter IV Maintain The correct operation and maintenance of the device can not only guarantee and extend the life cycle of the equipment itself, but also take technical management measures according to the pre-specified plan or the corresponding technical conditions to prevent equipment performance degradation or reduce equipment failure. -
Page 20: Common Problems
ZHD400X Teach Pendant User Manual V2.0.0 vibration or shock vibration resistance impact resistance Keep good ventilation and Is the heat dissipation good heat dissipation The mounting screws should Whether the basic unit and the tightened without expansion unit are installed firmly loosening Whether the connecting cables of the The connection cable cannot...
Need help?
Do you have a question about the Teach Pendant HMI ZHD400X and is the answer not in the manual?
Questions and answers