Advertisement
Quick Links
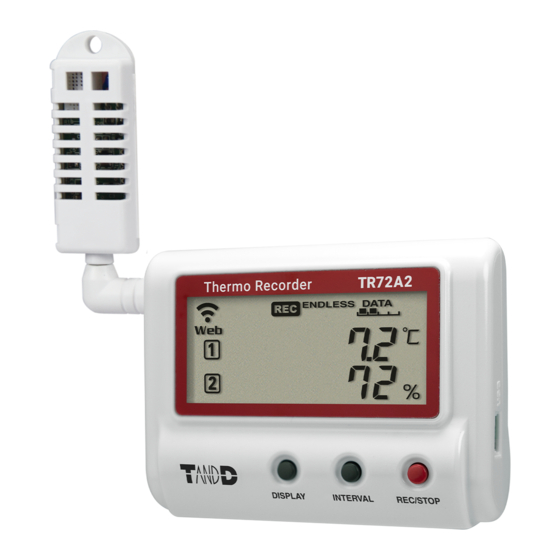
Thermo Recorder
TR7A2
series
tandd.com
2024.08 16508230028 (1st Edition) © Copyright T&D Corporation. All rights reserved.
TR71A2, TR72A2, TR72A2-S and TR75A2 are cloud-based data loggers for measuring
and recording temperature and humidity. By using our free cloud service, you can access
your data on mobile devices and PCs anywhere, anytime. Also, the TR71A2 and TR75A2
have a vaccine mode that is useful for managing vaccine temperature.
T&D Thermo: App for Setup, Data Download and Graph View
Setup and Data Download
Bluetooth
Access Point
TR71A2
Wireless LAN (auto-upload of data)
TR72A2
USB (Optional Cable)
TR72A2-S
TR75A2
Bluetooth
TR7 for Windows: Software for Setup and Download
T&D Graph: Software for Graph View, Storage and Analysis
* TR71A2, TR72A2, TR72A2-S and TR75A2 are hereinafter collectively referred to as TR7A2. Also,
there are some places that TR7A2 is referred to as "logger" or "device".
Operational Differences by Measurement Mode (TR71A2, TR75A2)
Normal Mode
Max / Min
Max/Min temperature reading
Values
since the start of recording or reset
(via buttons or software/app)
Warning
30 sec to 60 min (9 selections)
Judgment Time
A warning will be issued when
a measurement exceeds the set
threshold value or a sensor error
occurs for longer than the set
judgment time.
Warning
Warning alarms for exceeding a set
Display
upper and lower limit and for sensor
[ALM] Icon
errors will both disappear when the
warning condition is resolved.
Free Cloud Storage "T&D WebStorage Service"
"T&D WebStorage Service" enables you to access the uploaded recorded data from a
web browser and check the current readings, remaining battery life of the device, and
alert status. You can also receive warning notifications by email.
In order to use the service, user registration and device registration are required. Follow
the steps below.
User and Device Registration Procedures
1. Access T&D WebStorage Service from the web browser.
https://www.webstorage-service.com/
2. Click [Create Account] to go to the registration page, and follow the directions to
complete the registration.
3. Login by entering the registered User ID and Password.
4. Click [Devices] in the left menu to open the Device Settings window.
5. Clicking the [+Device] button will take you to the Add a Device page.
6. Enter the serial number and registration code for the device, then click [Add].
Marks on LCD Screen
Wireless LAN
ON : Connected to the wireless network. (Signal strength: 1 to 3 bars)
BLINKING : Unable to connect to the wireless network.
OFF : Wireless LAN Settings are not made or Auto-Upload is "OFF".
ON : Connected to the server.
BLINKING : Unable to connect to the server.
OFF : Wireless LAN Settings are not made or Auto-Upload is "OFF".
ON : Wireless LAN Setup using WPS Possible
User's Manual
Change Settings / Data View
Change Settings / Data View
Download Data
Vaccine Mode
Max/Min recorded value since the start
of recording or reset (via buttons or
software/app)
0 sec (Same as recording interval)
If a recorded value exceeds the set
threshold value or if a sensor error
occurs, a warning will be issued.
Warning alarms for exceeding a set
upper and lower limit will not disappear
even after a value returns to within the
threshold range.
Warning alarms for sensor errors will
disappear upon return to normal.
ON : Connected via LAN, Bluetooth or USB
BLINKING: Communicating via LAN, Bluetooth or USB
ON: Recording in progress
BLINKING: Waiting for programmed start
OFF: Recording stopped
ENDLESS : Upon reaching the logging capacity of 30,000 readings, the oldest
data is overwritten and recording continues.
ONETIME : Upon reaching the logging capacity of 30,000 readings, recording
automatically stops.
*
Amount of Recorded Data in Device
Battery Warning Mark
BLINKING: Battery is low.
ON: Battery is very low and Auto-Upload will stop. (Recording will continue.)
RAPID BLINKING (3 sec): An external power supply has been connected.
*
*
*
Auto Upload Interval Indicator
*
Cloud
Recording Interval Indicator
Displayed Measurement Channel
BLINKING : Indicates either upper/lower limit error or sensor error
Maximum and minimum values since the start of measurement or reset
Messages on LCD Screen
About Battery Replacement
Three stages of diminishing battery life are described below. It is recommended to replace
the batteries at stage 1.
1. When it is time for the battery to be replaced, a battery life warning mark will appear.
After Battery Replacement :
・Recording will continue as it was before the battery replacement.
・It is possible to download all saved recorded data.
2. If you continue to use the device without replacing the
batteries, the display will show this message and recording will stop.
After Battery Replacement :
・Recording will remain stopped until you start recording. However,
if the device communicates with the "T&D WebStorage Service" and
the recorded data is successfully uploaded, recording will resume.
・It is still possible to download all saved recorded data. Please note
that if you start recording before the recorded data is downloaded
to a computer or uploaded to the server, all recorded data in the device will be lost.
3. If the batteries are further left unchanged, the device will then turn off the LCD display
and reset the internal clock.
After Battery Replacement :
・Recording will remain stopped until you start recording. However, if the device
communicates with the "T&D WebStorage Service" and the
recorded data is successfully uploaded, it will automatically
synchronize the clock with the server and resume the recording.
・If auto-upload is set to OFF, you will need to set the clock again.
・It is still possible to download all saved recorded data. Please note
that if you start recording before the recorded data is downloaded
to a computer or uploaded to the server, all recorded data in the device will be lost.
Factory Default Settings
Recording Mode
Recording Interval
Auto-Upload
Upload Destination
Warning Settings
Max/Min Auto Reset
Power Saving Setting
: UTC+1:00 for Serial Number "No.4XXXXXXX" / UTC-8:00 for Serial Number "No.3XXXXXXX"
Time Zone
Cannot be set or changed using buttons on the logger
Replacing the batteries while this is displayed will allow recording to continue
uninterrupted. Please change the batteries as soon as possible when you see this mark.
If + (plus) and – (minus) are mistaken, or if the battery terminals + and – are shorted, the
recorded data that is stored in the device will be lost.
Measurement and recording will cease approximately 3 minutes after removing batteries,
so change as quickly as possible.
Will blink while Auto-Upload is in pause mode (See "Power Saving Settings")
Indicates a sensor error (No sensor connected, improper connection,
damaged, etc.)
Recording Full (Recording Stopped)
This appears when the logging capacity (30,000 readings) is reached in
"ONETIME" mode.
Low Battery (Recording Stopped)
This appears if, after the battery warning mark is displayed, no action is taken
and the batteries run out. Please refer to "About Battery Replacement" below,
and change the batteries.
If the dead batteries are not changed, the display will automatically shut off.
The previously recorded data will remain saved. The logger will then turn off
the LCD display and reset the internal clock. Please refer to "About Battery
Replacement" below, and change the batteries.
Firmware Version
This appears immediately after the power is turned on.
:Endless
:10min
:OFF
: T&D WebStorage Service
:OFF
:ON / every day at 0:00
:OFF
Advertisement

Subscribe to Our Youtube Channel
Related Manuals for T&D TR7A2 Series


Summary of Contents for T&D TR7A2 Series
- Page 1 ON : Connected via LAN, Bluetooth or USB BLINKING: Communicating via LAN, Bluetooth or USB Thermo Recorder ON: Recording in progress TR7A2 User's Manual series BLINKING: Waiting for programmed start OFF: Recording stopped ENDLESS : Upon reaching the logging capacity of 30,000 readings, the oldest data is overwritten and recording continues.
- Page 2 Recording Intervals & Estimated Maximum Recording Times Auto-Upload Intervals & Corresponding Estimated Battery Life Recording Intervals & Estimated Maximum Recording Times In general, the shorter the upload interval, the shorter the battery life. Also, it is possible to reduce battery consumption by setting time to pause auto-upload in [Power Saving Settings]. Recording 10 min 1 sec...
- Page 3 Via Bluetooth®: Device Settings and Data Download using Mobile App The following explanations are based on the iOS version of T&D Thermo. Install the batteries and sensor(s) in the logger, and make sure the LCD is displaying measurements. “T&D Thermo” App Preparation Auto-Upload Settings 1.
-
Page 4: Software Installation
Via USB or Bluetooth® : Device Settings using Windows Software Software Installation Network and Auto-Upload Settings 1. Download “TR7 for Windows” from the T&D Website and install it to your computer. To automatically send recorded data to “T&D WebStorage Service” or to use the warning mail https://tandd.com/software/tr7win.html function, configure these settings in [Network Settings] and [Auto-Upload Settings] tab. -
Page 5: Checking Connection Status
Via Cloud: Viewing Data in a Browser You can access “T&D WebStorage Service” to view the uploaded data and check and/or change the various settings. Items that can be set or changed in individual Device Settings: Device Name, Group Name, Rec Interval, Rec Mode, Time Difference, Temperature Unit, Channel Name, Auto-Upload Interval, Power Saving Settings, Warning Settings, Max/Min Auto Reset Note that the setting changes will not be actually applied until communication occurs between the logger and “T&D WebStorage Service”.
Need help?
Do you have a question about the TR7A2 Series and is the answer not in the manual?
Questions and answers