Advertisement
Quick Links
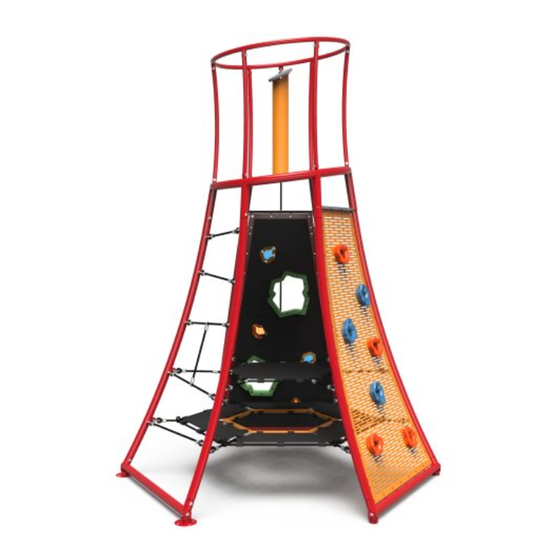
Freestanding
Elements of Nature Burst
IMPORTANT!
Prior to installation of any components, refer to the "Owner/Operator Manual". This
manual will provide important information pertaining to site preparation, footings, system stabilization and
other necessary information vital to the success of your installation.
I500103
200203907
Elements of Nature Burst
Model #
200203907
ELEMENTS OF NATURE BURST
Notes: Model is available in 40mm surface mount, 305mm surface mount, and inground
footing options.
An (*) by a part number (Code) indicates: Color Code Required.
Installation Guide
Product
Ground
Protective
Space
Area
7'-6" x 9'-7"
20' x 22'
16SEP24
Rev. A
Page 1 of 69
Advertisement

Related Manuals for Little Tikes PlayStructures ELEMENTS OF NATURE BURST


Summary of Contents for Little Tikes PlayStructures ELEMENTS OF NATURE BURST
- Page 1 16SEP24 Installation Guide Rev. A Freestanding Elements of Nature Burst IMPORTANT! Prior to installation of any components, refer to the "Owner/Operator Manual". This manual will provide important information pertaining to site preparation, footings, system stabilization and other necessary information vital to the success of your installation. I500103 200203907 Elements of Nature Burst...
- Page 2 16SEP24 Rev. A Freestanding Elements of Nature Burst ELEMENTS OF NATURE BURST (40mm surface mount) Model 200203907 CODE DESCRIPTION 931842* EON BURST DECK WLDMNT 931841* EON BURST HANDRAIL WLDMNT 931811* EON BURST RUNG 931843* EON BURST LEG WLDMNT 931824* EON BURST FLEXTREAD PLATE TOP 931825* EON BURST FLEXTREAD PLATE SIDE 931826*...
- Page 3 16SEP24 Rev. A Freestanding Elements of Nature Burst ELEMENTS OF NATURE BURST (40mm surface mount) Model 200203907 (continued) CODE DESCRIPTION HW203907-3 HRDW PKG EON BURST F/LEGS M3/10 HW203907-4 HRDW PKG EON BURST F/DECK L4/10 HW203907-5 HRDW PKG EON BURST F/DRUM S5/10 HW203907-6 HRDW PKG EON BURST F/PERF L6/10 HW203907-7...
- Page 4 16SEP24 Rev. A Freestanding Elements of Nature Burst ELEMENTS OF NATURE BURST (305mm surface mount) Model 200203907 CODE DESCRIPTION 931842* EON BURST DECK WLDMNT 931841* EON BURST HANDRAIL WLDMNT 931811* EON BURST RUNG 931843* EON BURST LEG WLDMNT 931824* EON BURST FLEXTREAD PLATE TOP 931825* EON BURST FLEXTREAD PLATE SIDE 931826*...
- Page 5 16SEP24 Rev. A Freestanding Elements of Nature Burst ELEMENTS OF NATURE BURST (305mm surface mount) Model 200203907 (continued) CODE DESCRIPTION HW203907-3 HRDW PKG EON BURST F/LEGS M3/10 HW203907-4 HRDW PKG EON BURST F/DECK L4/10 HW203907-5 HRDW PKG EON BURST F/DRUM S5/10 HW203907-6 HRDW PKG EON BURST F/PERF L6/10 HW203907-7...
- Page 6 16SEP24 Rev. A Freestanding Elements of Nature Burst ELEMENTS OF NATURE BURST (inground) Model 200203907 CODE DESCRIPTION 931842* EON BURST DECK WLDMNT 931841* EON BURST HANDRAIL WLDMNT 931811* EON BURST RUNG 931843* EON BURST LEG WLDMNT 931824* EON BURST FLEXTREAD PLATE TOP 931825* EON BURST FLEXTREAD PLATE SIDE 931826*...
- Page 7 16SEP24 Rev. A Freestanding Elements of Nature Burst ELEMENTS OF NATURE BURST (inground) Model 200203907 (continued) CODE DESCRIPTION HW203907-3 HRDW PKG EON BURST F/LEGS M3/10 HW203907-4 HRDW PKG EON BURST F/DECK L4/10 HW203907-5 HRDW PKG EON BURST F/DRUM S5/10 HW203907-6 HRDW PKG EON BURST F/PERF L6/10 HW203907-7 HRDW PKG EON BURST F/FLEX CLIMB L7/10...
- Page 8 16SEP24 Rev. A Freestanding Elements of Nature Burst EON BURST ROPE KIT 931791* CODE DESCRIPTION 931795* EON BURST BOTTOM STEP ROPE 931796* EON BURST TOP STEP ROPE 931797* EON BURST CLIMBING ROPE 931798* EON BURST ROPE LEGS ROPE 1 931799* EON BURST ROPE LEGS ROPE 2 931800* EON BURST ROPE LEGS ROPE 3...
- Page 9 16SEP24 Rev. A Freestanding Elements of Nature Burst HRDW PKG EON BURST F/DECK L4/10 HW203907-4 CODE DESCRIPTION 200002018 SCREW MACH BUTTONHEAD M10 X 1.50 X 25MM 200002079 WASHER FLAT M11 23 X 12 X 1.6MM 200001945 NUT LOCK HEX NYLON INSERTED M10 X 1.5 HRDW PKG EON BURST F/DRUM S5/10 HW203907-5 CODE...
- Page 10 16SEP24 Rev. A Freestanding Elements of Nature Burst HRDW PKG EON BURST F/HDPE M9/10 HW203907-9 CODE DESCRIPTION 304272 BOLT M8 X 1.25 MALE 20MM Torx w/patch 200002145 BOLT M8 X 1.25 FEMALE 10.3 X 30MM 200002030 SCREW MACH BUTTONHEAD M10 X 1.50 X 30MM 200002079 WASHER FLAT M11 23 X 12 X 1.6MM 200001945...
- Page 11 16SEP24 Rev. A Freestanding Elements of Nature Burst FOOTING LAYOUT - SURFACE MOUNT 949mm 969mm [37 3/8"] [38 1/8"] CLIMBING ROPE FOOTING PLATE 2196mm 2002mm [86 1/2"] [78 3/4"] 1103mm [43 3/8"] 1262mm 637mm [49 3/4"] [25 1/8"] 1899mm [74 3/4"] CLIMBING ROPE FOOTING...
- Page 12 16SEP24 Rev. A Freestanding Elements of Nature Burst FOOTING LAYOUT - INGROUND 305mm [12"] 949mm 969mm diameter, 610mm CLIMBING [38 1/8"] [37 3/8"] [24"] deep footings ROPE FOOTING 2196mm 2002mm [86 1/2"] [78 3/4"] 1103mm [43 3/8"] 637mm 1262mm [49 3/4"] [25 1/8"] 1899mm [74 3/4"] CLIMBING...
- Page 13 16SEP24 Rev. A Freestanding Elements of Nature Burst 3268mm 3417mm 3417mm 3268mm 128.67in 134.53in [134 1/2"] [128 5/8"] FINISHED GRADE SIDE VIEW Page 13 of 69...
- Page 14 16SEP24 Rev. A Freestanding Elements of Nature Burst FOOTING INFORMATION PN 200001776 FINISHED ANCHOR CONCRETE WEDGE GRADE M10 X 1.50 X 100MM (SEE NOTE BELOW) GROUND COVER (UNDERSURFACING) 40mm [1 1/2"] CONCRETE PAD GROUND LEVEL (4" minimum) OR CONCRETE FOOTING NOTE: (4) REQ'D PER PLATE (12"...
- Page 15 16SEP24 Rev. A Freestanding Elements of Nature Burst FOOTING INFORMATION FINISHED GRADE LOOSE-FILL CUSHIONING 305mm MATERIAL [12"] GROUND LEVEL 610mm CONCRETE [24"] FOOTING COMPACTED SOIL BLOCK (see note) Ø 305mm [12"] NOTE: Block at bottom of footing hole is optional, and recommended for installation of posts.
- Page 16 16SEP24 Rev. A Freestanding Elements of Nature Burst FOOTING INFORMATION FINISHED GRADE LOOSE-FILL CUSHIONING 305mm MATERIAL [12"] GROUND LEVEL 686mm [27"] CONCRETE FOOTING 610mm [24"] COMPACTED SOIL BLOCKS Ø 305mm [12"] inground - ROPE FOOTING Page 16 of 69...
- Page 17 16SEP24 Rev. A Freestanding PARTS IDENTIFICATION Elements of Nature Burst 931791* EON BURST ROPE KIT 931795 TITLE: EON BURST BOTTOM STEP ROPE 931795* TOLERANCES: NAME DATE SHEET: PREVIOUS PART # 1 OF 1 FRACTIONAL 1/16 THE INFORMATION CONTAINED IN 11/30/2023 CREATED BY M.
- Page 18 16SEP24 Rev. A Freestanding PARTS IDENTIFICATION Elements of Nature Burst 931791* EON BURST ROPE KIT 931797* EON BURST CLIMBING ROPE 931798 TITLE: EON BURST CLIMBING ROPE 931800 TOLERANCES: SHEET: NAME DATE PREVIOUS PART # 1 OF 1 FRACTIONAL 1/16 THE INFORMATION CONTAINED IN 12/1/2023 CREATED BY M.
- Page 19 16SEP24 Rev. A Freestanding Elements of Nature Burst PARTS IDENTIFICATION 931842* EON BURST DECK WLDMNT TITLE: Enter Description DIMENSIONS ARE IN MM UNLESS STATED OTHERWISE MAT'L: THE INFORMATION CONTAINED IN Material <not specified> TOLERANCES UNLESS OTHERWISE STATED THIS DRAWING IS THE SOLE PROPERTY OF PLAYPOWER.
- Page 20 931824 16SEP24 Rev. A Freestanding Elements of Nature Burst PARTS IDENTIFICATION 931825 931824* EON BURST FLEXTREAD PLATE TOP 931826 TITLE: EON Burst flextread plate top 931825* DIMENSIONS ARE IN MM UNLESS STATED OTHERWISE MAT'L: THE INFORMATION CONTAINED IN SHST 11GA GALV A653 CS-B G90 TOLERANCES UNLESS OTHERWISE STATED THIS DRAWING IS THE SOLE PROPERTY EON BURST FLEXTREAD PLATE SIDE...
- Page 21 931846 16SEP24 Rev. A Freestanding Elements of Nature Burst PARTS IDENTIFICATION 931846* EON BURST ROPE LEG WLDMNT BOTTOM TITLE: EON Burst rope leg wldmnt bottom DIMENSIONS ARE IN MM UNLESS STATED OTHERWISE MAT'L: THE INFORMATION CONTAINED IN Material <not specified> THIS DRAWING IS THE SOLE PROPERTY TOLERANCES UNLESS OTHERWISE STATED OF PLAYPOWER.
- Page 22 16SEP24 Rev. A Freestanding Elements of Nature Burst PARTS IDENTIFICATION 931838DGY EON BURST LEG CONNECTION HDPE TITLE: Enter Description DIMENSIONS ARE IN MM UNLESS STATED OTHERWISE MAT'L: THE INFORMATION CONTAINED IN Material <not specified> TOLERANCES UNLESS OTHERWISE STATED THIS DRAWING IS THE SOLE PROPERTY OF PLAYPOWER.
- Page 23 16SEP24 Rev. A Freestanding 931849 Elements of Nature Burst PARTS IDENTIFICATION 931849* 931793 EON BURST TOP FLEXTREAD TITLE: EON Burst top flextread EON BURST TOP STEP FLEXTREAD TITLE: EON Burst top step flextread DIMENSIONS ARE IN MM UNLESS STATED OTHERWISE MAT'L: THE INFORMATION CONTAINED IN THIS DRAWING IS THE SOLE PROPERTY...
- Page 24 16SEP24 Rev. A Freestanding Elements of Nature Burst PARTS IDENTIFICATION 931827 with holes TITLE: ROCK HANDLE CASTING DIMENSIONS ARE IN MM UNLESS STATED OTHERWISE MAT'L: THE INFORMATION CONTAINED IN 319 Aluminum 931827* TOLERANCES UNLESS OTHERWISE STATED THIS DRAWING IS THE SOLE PROPERTY OF PLAYPOWER.
- Page 25 DO NOT SCALE 16SEP24 Rev. A Freestanding Elements of Nature Burst PARTS IDENTIFICATION 40mm surface mount. 932031* EON BURST 40MM SM FOOTING WLDMNT 200315355 PLATE FOOTING F/NFS NET SM40 DBW TITLE: CHAIN FOOTING F/N DIMENSIONS ARE IN MM UNLESS STATED OTHERWISE MAT'L: THE INFORMATION CONTAINED IN AS INDEXED...
- Page 26 16SEP24 DO NOT SCALE Rev. A Freestanding Elements of Nature Burst PARTS IDENTIFICATION 305mm surface mount 932032* EON BURST 305MM SM FOOTING WLDMNT SM40 927128DBW GS FOOTING SINGLE ROPE TITLE: CHAIN FOOTING F/NFS NET SM40 UNP 12" SM WLDMNT DIMENSIONS ARE IN MM UNLESS STATED OTHERWISE MAT'L: THE INFORMATION CONTAINED IN AS INDEXED...
- Page 27 16SEP24 Rev. A Freestanding Elements of Nature Burst PARTS IDENTIFICATION inground 932033* TITLE: EON Burst 40MM SM footing wldmnt DIMENSIONS ARE IN MM UNLESS STATED OTHERWISE MAT'L: THE INFORMATION CONTAINED IN EON BURST ING FOOTING Material <not specified> TOLERANCES UNLESS OTHERWISE STATED THIS DRAWING IS THE SOLE PROPERTY OF PLAYPOWER.
- Page 28 16SEP24 Rev. A Freestanding Elements of Nature Burst STEP 1 DIG FOOTINGS 1a. Dig footings (if applicable) per Footing Layout and Construction Drawings for surface mount and inground footing criteria for installation. Refer to footing details in Installation Manual, and see pages 11 - 16.
- Page 29 16SEP24 Rev. A Freestanding Elements of Nature Burst STEP 2 IDENTIFY FRAME PARTS (continued) 2b. Identify the frame parts shown in the exploded views below. PN 931842* EON BURST DECK WLDMNT PN 931843* EON BURST LEG WLDMNT PN 931845* (2) REQ'D EON BURST ROPE LEG WLDMNT RH...
- Page 30 16SEP24 Rev. A Freestanding Elements of Nature Burst STEP 2 IDENTIFY FRAME PARTS (continued) 2c. Identify the frame parts shown in the exploded views below. PN 931842* EON BURST DECK WLDMNT PN 931843* EON BURST LEG WLDMNT PN 931845* (2) REQ'D EON BURST ROPE LEG WLDMNT RH...
- Page 31 16SEP24 Rev. A Freestanding Elements of Nature Burst STEP 3 ATTACH FOOTINGS TO LEG WELDMENTS 3a. Loosely attach the six footing weldments to the two leg weldments PN 931843* and the leg weldment bottom PN 931846* with hardware shown below. Surface mount 40mm footing option is shown, refer to customer specific model for correct type of footing.
- Page 32 16SEP24 Rev. A Freestanding Elements of Nature Burst STEP 4 ATTACH BOTTOM LEG WELDMENT TO LH AND RH LEG WELDMENTS 4a. Loosely attach the leg weldment bottom PN 931846* to the LH and RH leg weldments with hardware shown below. Orient LH and RH leg weldments so that the five rope blocks on each leg are facing each other.
- Page 33 16SEP24 Rev. A Freestanding Elements of Nature Burst STEP 5 ATTACH LH AND RH LEG WELDMENTS TO DECK WELDMENT 5a. Loosely attach the LH and RH leg weldments to the deck weldment PN 931842* with hardware shown below. PN 931842* EON BURST DECK WLDMNT PN 931844*...
- Page 34 16SEP24 Rev. A Freestanding Elements of Nature Burst STEP 6 ATTACH LEG WELDMENTS TO DECK WELDMENT 6a. Locate the two plastic connections PN 931838DGY that are used to connect the leg weldments to the deck weldment. The plastic connections have 2 large holes and 3 small holes. 6b.
- Page 35 16SEP24 Rev. A Freestanding Elements of Nature Burst STEP 6 ATTACH LEG WELDMENTS TO DECK WELDMENT (continued) 6c. Loosely attach the two leg weldments to the deck weldment in five places each with the two plastic connections and hardware as shown below. Note that there are two different types of hardware connections - one for the two large holes and one for the three small holes on each plastic connection.
- Page 36 16SEP24 Rev. A Freestanding Elements of Nature Burst STEP 7 IDENTIFY TOP DECK PARTS 7a. Identify top deck parts shown in the exploded view below. The round flextread will attach to the deck weldment with the top ring. PN 932353* EON BURST PN 931849* TOP RING...
- Page 37 16SEP24 Rev. A Freestanding Elements of Nature Burst STEP 8 ATTACH ROUND FLEXTREAD TO DECK WELDMENT 8a. Place the round flextread on top of the deck weldment and align the holes. Place the top ring on top of the flextread and align the holes. See step 8b for the sixteen outer ring connections.
- Page 38 16SEP24 Rev. A Freestanding Elements of Nature Burst STEP 8 ATTACH ROUND FLEXTREAD TO DECK WELDMENT (continued) 8b. Loosely attach the round flextread to the deck weldment with the top ring, with hardware in sixteen places as shown below. PN 200002018 SCREW MACH BUTTONHEAD M10 X 1.50 X 25MM PN 932353*...
- Page 39 16SEP24 Rev. A Freestanding Elements of Nature Burst STEP 8 ATTACH ROUND FLEXTREAD TO DECK WELDMENT (continued) 8c. Loosely attach the round flextread to the deck weldment, with hardware in sixteen places as shown below. Do not place hardware in center holes - they will be used for drum post attachment.
- Page 40 16SEP24 Rev. A Freestanding Elements of Nature Burst STEP 9 IDENTIFY DRUM POST PARTS 9a. Identify the drum post parts shown in the exploded view below. The bottom of the drum weldment post will attach to the round flextread and the deck weldment. PN 931840DGY PN 931847* EON BURST DRUM...
- Page 41 16SEP24 Rev. A Freestanding Elements of Nature Burst STEP 10 ATTACH DRUM TO TOP OF DRUM WELDMENT 10a. Place the drum on top of the drum weldment and align the holes. Loosely attach with hardware in four places as shown below. PN 200002018 SCREW MACH PN 931840DGY...
- Page 42 16SEP24 Rev. A Freestanding Elements of Nature Burst STEP 11 ATTACH DRUM WELDMENT TO DECK WELDMENT 11a. Place the drum weldment on top of the round flextread. Rotate drum weldment so that low/high side of drum top is same as low/high side of top ring (see SIDE VIEW below). Align holes in bottom plate with holes in flextread.
- Page 43 16SEP24 Rev. A Freestanding Elements of Nature Burst STEP 12 IDENTIFY TOP HANDRAIL PARTS 12a. Identify top handrail parts shown in the exploded view below. The handrails will attach to the six vertical stub tubes welded on the top and on the bottom rings. See next page for hardware detail.
- Page 44 16SEP24 Rev. A Freestanding Elements of Nature Burst STEP 13 ATTACH HANDRAILS TO TOP OF FRAME 13a. Orient the top ring so that rope block is in location shown below. ROPE BLOCK ROPE BLOCK FOR CLIMBING ROPE IN HIGH SIDE THIS LOCATION FLEX- PERF...
- Page 45 16SEP24 Rev. A Freestanding Elements of Nature Burst STEP 13 ATTACH HANDRAILS TO TOP OF FRAME (continued) 13b. Loosely attach the six handrails to the top and bottom rings with hardware as shown below. Orient handrails so that they curve inwards toward the center of the frame. PN 200002145 BOLT M8 X 1.25 FEMALE 10.3 X 30 MM PN 200008483...
- Page 46 16SEP24 Rev. A Freestanding Elements of Nature Burst STEP 14 IDENTIFY CLIMBING FLEXTREAD PARTS 14a. Identify the climbing flextread parts as shown in the exploded view below. The rock handle casting assembly is used in four places, the plastic handle assembly is used in two places. Note the correct orientation of the flextread - the upper large hole is on the left side, and the lower large hole is on the right side when looking at the outer face of the flextread.
- Page 47 16SEP24 Rev. A Freestanding Elements of Nature Burst STEP 15 ATTACH ROCK HANDLE CASTINGS TO FLEXTREAD 15a. Rotate the casting and back plate to align with the holes in the flextread. The KODA plate PN 931827* will fit into a recess on the bottom side of the casting. Loosely attach with hardware in four places as shown below.
- Page 48 16SEP24 Rev. A Freestanding Elements of Nature Burst STEP 16 ATTACH PLASTIC HANDLE TO FLEXTREAD 16a. Rotate the front and back plastic handles to align with the holes in the flextread. Loosely attach with hardware in four places as shown below. PN 931839* PN 931804* EON BURST HDPE...
- Page 49 16SEP24 Rev. A Freestanding Elements of Nature Burst STEP 17 ATTACH FLEXTREAD TO LEG WELDMENT 17a. Place the climbing flextread assembly on leg weldment. Make sure that flextread is attached to the leg weldment that is directly below the rope block for the climbing rope. ROPE BLOCK FOR CLIMBING ROPE...
- Page 50 16SEP24 Rev. A Freestanding Elements of Nature Burst STEP 17 ATTACH FLEXTREAD TO LEG WELDMENT (continued) 17b. Place the six metal trim plates over the flextread and line up holes. Side plates should line up with side of flextread. See next page for hardware detail.
- Page 51 16SEP24 Rev. A Freestanding Elements of Nature Burst STEP 17 ATTACH FLEXTREAD TO LEG WELDMENT (continued) 17c. Loosely attach the flextread to the leg weldment with the metal trim plates, with hardware shown below. PN 200001945 PN 200002018 NUT LOCK HEX NYLON INSERTED SCREW MACH M10 X 1.5...
- Page 52 16SEP24 Rev. A Freestanding Elements of Nature Burst STEP 18 IDENTIFY PERF PANEL PARTS 18a. Identify the perf panel parts as shown in the exploded view below. The rock handle casting assembly is used in seven places. Note the correct orientation of the perf panel - the upper hole is on the left side when looking at the outer face of the flextread.
- Page 53 16SEP24 Rev. A Freestanding Elements of Nature Burst STEP 19 ATTACH ROCK HANDLE CASTINGS TO PERF PANEL 19a. Rotate the casting and back plate to align with the holes in the perf panel. The KODA plate PN 931827* will fit into a recess on the bottom side of the casting. Loosely attach with hardware in four places as shown below.
- Page 54 16SEP24 Rev. A Freestanding Elements of Nature Burst STEP 20 ATTACH PERF PANEL TO LEG WELDMENT 20a. Place the perf panel over the leg weldment and line up the holes. Loosely attach with hardware as shown below. PN 200002014 SCREW MACH BUTTONHEAD M10 X 1.50 X 20MM PN 200002079...
- Page 55 16SEP24 Rev. A Freestanding Elements of Nature Burst STEP 21 ATTACH CENTER RING WELDMENT TO BOTTOM STEP ROPE 21a. Loosely attach the center ring weldment to the bottom step rope in six places with hardware shown below. Insert bushing into rope block. Screw in bolt, align holes in bolt and clevis, and install set screw.
- Page 56 16SEP24 Rev. A Freestanding Elements of Nature Burst STEP 22 TYPICAL ROPE D-SHACKLE TO ROPE BLOCK CONNECTION 22a. All ropes with D-shackles that connect to rope blocks will attach in the same manner, with the same hardware. Install bushings first by inserting bushings into holes in rope blocks. Align holes in D-shackle with hole in rope block and install bolt.
- Page 57 16SEP24 Rev. A Freestanding Elements of Nature Burst STEP 23 ATTACH BOTTOM STEP ROPE ASSEMBLY TO FRAME 23a. Loosely attach the bottom step rope assembly to the six welded-on rope blocks on the frame with hardware shown in step 22a. All ropes that connect to rope blocks will attach in the same manner, with the same hardware.
- Page 58 16SEP24 Rev. A Freestanding Elements of Nature Burst STEP 24 ATTACH TOP STEP ROPE ASSEMBLY TO FRAME 24a. Loosely attach the top step rope assembly to the six welded-on rope blocks on the frame with hardware shown in step 22a. All ropes that connect to rope blocks will attach in the same manner, with the same hardware.
- Page 59 16SEP24 Rev. A Freestanding Elements of Nature Burst STEP 25 ATTACH ROPES BETWEEN LH AND RH LEG WELDMENTS 25a. Loosely attach the four ropes shown below to the welded-on rope blocks on the LH and RH leg weldments, with hardware shown in step 22a. All ropes that connect to rope blocks will attach in the same manner, with the same hardware.
- Page 60 16SEP24 Rev. A Freestanding Elements of Nature Burst STEP 26 ATTACH ROPES AT TOP OF FRAME 26a. Loosely attach the three ropes shown below to the welded-on rope blocks on the top of the frame, with hardware shown in step 22a. All ropes that connect to rope blocks will attach in the same manner, with the same hardware.
- Page 61 16SEP24 Rev. A Freestanding Elements of Nature Burst STEP 27 ATTACH CLIMBING ROPE TO FRAME 27a. TOP OF ROPE: Loosely attach the top of the climbing rope (end with D-shackle) to the welded-on rope block on the top handrail ring, with hardware shown in step 22a. All ropes that connect to rope blocks will attach in the same manner, with the same hardware.
- Page 62 16SEP24 Rev. A Freestanding Elements of Nature Burst STEP 28 ATTACH CLIMBING ROPE TO FOOTING 28a. BOTTOM OF ROPE FOR 40mm SURFACE MOUNT: Loosely attach the bottom of the climbing rope (end with clevis) to the footing weldment with the chain. See next page for hardware details.
- Page 63 16SEP24 Rev. A Freestanding Elements of Nature Burst STEP 28 ATTACH CLIMBING ROPE TO FOOTING (continued) 28b. BOTTOM OF ROPE FOR 40mm SURFACE MOUNT: Loosely attach the bottom of the climbing rope (end with clevis) to the footing weldment with the chain. Tension the rope and remove chain links as needed to achieve desired rope tension.
- Page 64 16SEP24 Rev. A Freestanding Elements of Nature Burst STEP 28 ATTACH CLIMBING ROPE TO FOOTING (continued) 28c. BOTTOM OF ROPE FOR 305mm SURFACE MOUNT: Loosely attach the bottom of the climbing rope (end with clevis) to the footing weldment with the chain. See next page for hardware details.
- Page 65 16SEP24 Rev. A Freestanding Elements of Nature Burst STEP 28 ATTACH CLIMBING ROPE TO FOOTING (continued) 28d. BOTTOM OF ROPE FOR 305mm SURFACE MOUNT: Loosely attach the bottom of the climbing rope (end with clevis) to the footing weldment with the chain. Tension the rope and remove chain links as needed to achieve desired rope tension.
- Page 66 16SEP24 Rev. A Freestanding Elements of Nature Burst STEP 28 ATTACH CLIMBING ROPE TO FOOTING (continued) 28e. BOTTOM OF ROPE FOR INGROUND: Loosely attach the bottom of the climbing rope (end with clevis) to the footing weldment with the chain. See next page for hardware details. CLEVIS CONNECTOR PN 200313173...
- Page 67 16SEP24 Rev. A Freestanding Elements of Nature Burst STEP 28 ATTACH CLIMBING ROPE TO FOOTING (continued) 28f. BOTTOM OF ROPE FOR INGROUND: Loosely attach the bottom of the climbing rope (end with clevis) to the footing weldment with the chain. Tension the rope and remove chain links as needed to achieve desired rope tension.
- Page 68 16SEP24 Rev. A Freestanding Elements of Nature Burst STEP 29 ATTACH FLEXTREAD TO BOTTOM AND TOP ROPES 29a. Loosely attach the bottom and top flextread to the bottom and top ropes (with textured side UP). Bend tabs around ropes and attach with hardware as shown below. PN 931793 EON BURST TOP STEP FLEXTREAD...
- Page 69 16SEP24 Rev. A Freestanding Elements of Nature Burst FINAL STEP Proceed with Final Assembly installation. Check footing weldments for level and plumb. Tighten all hardware. If applicable, pour concrete and let cure; back fill. Install resilient ground cover. Page 69 of 69...
Need help?
Do you have a question about the PlayStructures ELEMENTS OF NATURE BURST and is the answer not in the manual?
Questions and answers