Table of Contents
Advertisement
Quick Links
Advertisement
Table of Contents

Related Manuals for O2matic HOT 100


Summary of Contents for O2matic HOT 100
- Page 1 Model: HOT 100 2024.08.16...
-
Page 2: Table Of Contents
Warnings, Cautions and Symbols Warnings Cautions Disclaimer Label and Symbols Safety and low power mode Setup Overview of icons and buttons Setup of HOT 100 device Using the device Session Performing a session Smart device connection Cleaning and Support Cleaning Support and Contact... -
Page 3: Warnings, Cautions And Symbols
1 Warnings, Cautions and Symbols This section contains information regarding how to safely use this device, which should be read by the user before use. Only oximeter(s) approved by O2matic can be used. For more information regarding approved pulse oximeters please contact your service provider. - Page 4 Portable RF (Radio frequency) communications equipment (including peripherals such as antenna cables and external antennas) should be used no closer than 30 cm (12 inches) to any part of the HOT 100 device, including cables specified by the manufacturer. Otherwise, this could result in degradation of the performance of this equipment.
-
Page 5: Cautions
HOT 100 device. • Extended exposure to the HOT 100 device may cause irritation to the skin, pyrogenicity or trigger allergies. • Depending on configuration the HOT 100 can spend up to five minutes after turning on only to measure and does NOT adjust the oxygen flow. -
Page 6: Disclaimer
Any unintended use of the product as described in this IFU in which case all liability is discontinued. • Use of a HOT 100 device which has not been set up specifically for that patient. HOT 100 end user manual... -
Page 7: Label And Symbols
1.4 Label and Symbols Figure 1: HOT 100 label found on the bottom Manufacturers label is situated on the bottom of the device. The optimal reading condition of the labelling is at the same reading distance and angle, as a person would hold and read the cover of a book in a well-lit room. - Page 8 Pure SAT Temperature On/Off limits Not for general Class II waste equipment Direct current: Alternating current 5 VDC For use in altitudes 0 - 2000 Table 1: Symbols on labels and packaging HOT 100 end user manual...
-
Page 9: Safety And Low Power Mode
Upon intended shutdown, or unintended shutdown, such as total loss of power, the HOT 100 device maintains its last settings. If the HOT 100 device has not been used for two weeks leave the HOT 100 device on and charging for at least an hour before using/configuring it. -
Page 10: Setup
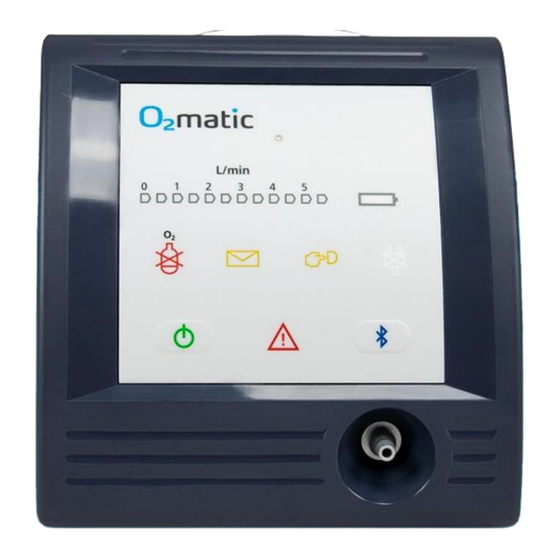
2 Setup The HOT 100 will already have been customized to you by the responsible medical service providers. 2.1 Overview of icons and buttons Figure 2: Front of HOT 100 HOT 100 end user manual... -
Page 11: Flow Indicator
1. FLOW INDICATOR Shows the amount of oxygen currently being delivered. Upon start-up of the device, the values of the flow range are lit for 3 seconds, indicating the flow limitations without pulse oximeter for current device configuration. The flow indicator displays 0 – 5.5 l/min on the foil. If the device is delivering more than 5.5 l/min the 5,5 (far right) mark will be blinking. -
Page 12: On/Off Button
10. BLUETOOTH On: Device is connected to smart device. Blinking: Not connected. Off: Bluetooth is turned off. Table 2: Device icons The Bluetooth® word mark and logos are registered trademarks owned by Bluetooth SIG, Inc. HOT 100 end user manual... -
Page 13: Power Input
Figure 3: Back of HOT 100 11. POWER INPUT Power supply connection. When connected and device is turned on, it will recharge its batteries and avoid running out of power. 12. OXYGEN INPUT Connect your oxygen source to this socket to ensure the device can receive and regulate the oxygen flow. -
Page 14: Setup Of Hot 100 Device
2.2 Setup of HOT 100 device To setup HOT 100: Place the HOT 100 on a flat surface, such as a table, in a distance so you can hear the notifications. Connect the AC power adapter to the wall outlet and to the HOT 100 power input. - Page 15 Connect the oxygen hose to the oxygen input of the HOT 100. Figure 4: Connection of oxygen hose to the oxygen input on the HOT 100 device and connection of oxygen mask or nasal catheter to oxygen output on the HOT 100 device. Note that connecting tubes provided to you might differ in appearance from the ones depicted.
- Page 16 Figure 5: Close-up of connection of oxygen hose to the oxygen input on the HOT 100 device and connection of oxygen mask or nasal catheter to oxygen output on the HOT 100 device. Note that connecting tubes provided to you might differ in appearance from the ones depicted.
- Page 17 Connect the oxygen output to your oxygen mask or nasal cannula and put it on yourself. Figure 6: Oxygen mask and nasal catheter application The nasal catheter needs to be placed in the correct position during treatment. Contact your service provider if you are in doubt. Warnings Only use accessories such as masks, catheters and hoses approved •...
-
Page 18: Using The Device
Before using the HOT 100 device follow section 2 to set it up to your needs. 3.1 Session For the HOT 100 device to calculate the suitable level of oxygen flow for the user, it will require the user to do a session at certain time intervals. From the time the pulse oximeter is placed on the finger, until it is taken off, the HOT 100 device receives measurements of SpO2 and pulse. - Page 19 The time until next session is calculated by the HOT 100 device. The lower or more varying the measurements of a session, the more frequently the HOT 100 device will ask the user to perform a session.
-
Page 20: Performing A Session
HOT 100 device is turned on. The HOT 100 will once turned on provide flow of oxygen within 5 seconds. Note: If battery charge is below 15%, the HOT 100 device will start up in charging state, see section 1.5. - Page 21 When a new session is required, the saturation measurement icon on the HOT 100 device starts to blink. If the session is not started within one hour, then an acoustic notification will be played.
- Page 22 Do not use in an explosive atmosphere or in the presence of • flammable anesthetics or gases. If the HOT 100 is dropped down from above 30 cm, then the • device shall be checked by the installer, before it can be safely used.
-
Page 23: Smart Device Connection
The HOT 100 can be used without connection to a smart device. However, for more information on the treatment, it is possible to connect to the HOT 100 device to a tablet or smartphone with the “O2matic – HOT” app found in the Google Play Store. - Page 24 Figure 9: "O2matic - HOT" app - treatment screen If the Error or Notification icon on the device is lit, a message will be displayed on this page, which will include an explanation of the notification and instruct you going forward.
-
Page 25: Cleaning And Support
Equipment (WEEE) 2012/19/EU, do not dispose of this product as unsorted municipal waste. This device contains WEEE materials. Contact your service provider regarding take-back or recycling of the HOT 100 device. 4.1 Cleaning Disconnect the AC power adaptor from the device before cleaning it. Do not clean device in any other manner than described in this user manual. -
Page 26: Support And Contact
4.2 Support and Contact For general support and questions contact your local service provider. Manufacturer O2matic Address Nørrelundvej 10 DK-2730 Herlev Denmark Contact information Tel: +45 5052 9810 info@o2matic.com www.o2matic.com HOT 100 end user manual... -
Page 27: Specifications
5 Specifications Physical Weight 700 g Dimensions 150x150x100 mm Connection Bluetooth Alarm volume 56 dB – Always on Electrical Main 120-240 VAC, 50/60 Hz DC input 12 VDC Power consumption 10 VA Battery type Lithium Ion Battery capacity 4 hours Classifications Type of protection Class ll and internally powered... - Page 28 Expected service life HOT 100 device 5 years Battery 2 years Power supply 5 years Pulse oximeter Refer to sensor IFU HOT 100 end user manual...
-
Page 29: Troubleshooting
6 Troubleshooting The acoustic sounds from the HOT 100 all follow a basic system, which makes it easy to distinguish between actions needed to be taken. There is one type of notification sound and one type of alarm sound (with two phases). - Page 30 ‘No stable power source’ icon is blinking (Charging state) HOT 100 device has less than 15% charge and is currently in charging state. In this charging state the HOT 100 device is not providing oxygen treatment.
- Page 31 If you are using an oxygen concentrator and the concentrator is alarming check if the HOT 100 device is running. If not; turn HOT 100 device on. If HOT 100 device is already on and alarming, turn HOT 100 device off and If the HOT 100 device is running normally, turn off the oxygen concentrator, disconnect the oxygen hose for 20 seconds.
- Page 32 Notes...
- Page 33 Notes...
- Page 34 Notes...
- Page 35 Notes...
- Page 36 This user manual booklet is current as of August 2024. For more information on device updates and news please visit www.o2matic.com...
Need help?
Do you have a question about the HOT 100 and is the answer not in the manual?
Questions and answers