O2matic OMC PC-100 User Manual
Hide thumbs
Also See for OMC PC-100:
- User manual (77 pages) ,
- Quick manual (4 pages) ,
- Quick manual (4 pages)
Table of Contents
Advertisement
Quick Links
Advertisement
Table of Contents

Related Manuals for O2matic OMC PC-100


Summary of Contents for O2matic OMC PC-100
- Page 1 2024.02.12...
-
Page 2: Table Of Contents
2.4 Importing settings 2.5 Changing codes and resetting Starting Treatment 3.1 Assign a new patient to device Treatment and Operation 4.1 Treatment modes 4.2 Patient assessment 4.3 Critical profiles 4.4 Walking tests 4.5 Shutdown D 8.4.1.27 O2matic User Manual - IFU... - Page 3 6.2 Immunity test levels Maintenance 7.1 Cleaning 7.2 Exporting data 7.3 Changing battery Service and Support 8.1 Warranty 8.2 Service 8.3 Training 8.4 Support and Contact Specifications Appendix A – Detailed Specifications Appendix B – Accessories D 8.4.1.27 O2matic User Manual - IFU...
- Page 4 Disclaimer PRO 100 O2matic uses pulse oximetry to automatically adjust oxygen flow to the patient which can help reduce manual intervention of oxygen flow to the patient. When providing oxygen treatment with PRO 100, a desired SpO2 range as well as a flow range must be defined for each individual patient.
-
Page 5: Introduction, General Warnings And Cautions
PRO 100 must not be used with devices which deliver a fixed fraction of • oxygen (FiO ) regardless of oxygen flow, such as the Venturi masks, as PRO 100 would not be able to increase FiO in response to a low SpO with such systems. D 8.4.1.27 O2matic User Manual - IFU... - Page 6 Administrators will have access to some of the backend functions such as paring devices with pulse oximeters, changing a mac address, export data from the device or perform a basic functionality test on the device. D 8.4.1.27 O2matic User Manual - IFU...
- Page 7 The device is also connected to the power supply. Included in box Item UDI-DI/GTIN-14 O2matic PRO 100 incl. power adapter, power connectors 05715081101014 and user manual 8000AA-3 - Adult articulated internal spring finger clip 0 0833166 000191...
-
Page 8: Warnings
Portable RF communications equipment (including peripherals such as antenna cables and external antennas) should be used no closer than 30 cm (12 inches) to any part of the O2matic PRO device, including cables specified by the manufacturer. Otherwise, degradation of the performance of this equipment could result. -
Page 9: Cautions
In compliance with the European Directive on Waste Electrical and Electronic Equipment (WEEE) 2012/19/EU, do not dispose of this product as unsorted municipal waste. This device contains WEEE materials. Contact your distributor regarding take-back or recycling of PRO 100. D 8.4.1.27 O2matic User Manual - IFU... -
Page 10: Symbols
Manufacturing Serial number date Do not use if the Bell can be package is temporarily damaged cancelled For use in Not for general oxygen rich waste environtm-ent Alternating Type BF current Applied part D 8.4.1.27 O2matic User Manual - IFU... -
Page 11: Essential Performance
These should normally be physicians. PRO 100 has a failsafe rechargeable battery that keeps the device running upon short power breaks. The device has two power related buttons, Main power and D 8.4.1.27 O2matic User Manual - IFU... -
Page 12: Button Functionality
If the device is not interacted with it will eventually display the pause screen. To disable or change the time before the pause screen is shown or which information is shown on it, choose “Admin” followed by “Settings” and finally “Pause Screen”. D 8.4.1.27 O2matic User Manual - IFU... -
Page 13: Installation And Setup
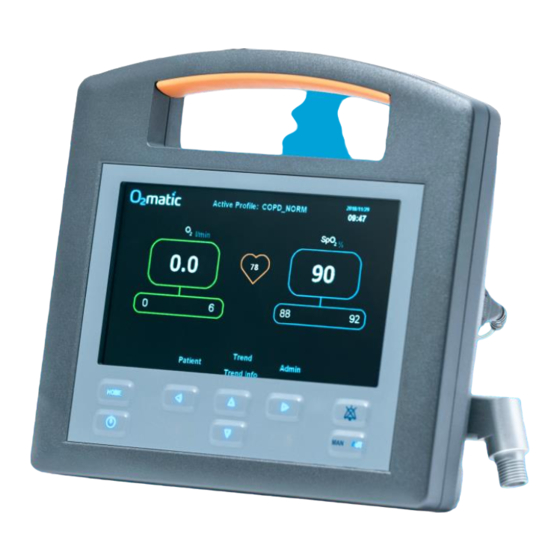
Overview Figure 1: PRO 100 from the front Front Buttons A: Power E: Battery indicator B: Home F: (Manual / Automatic) Mode C: Power warning G: Mute (alarms) D: Navigation H: Handle D 8.4.1.27 O2matic User Manual - IFU... - Page 14 I: Pulse oximeter M: Power switch connection J: USB connection hatch N: Power connection K: Oxygen output O: Oxygen input connection connection L: Slider P: Battery / ventilation hatch Figure 3: Bottom of PRO 100 D 8.4.1.27 O2matic User Manual - IFU...
-
Page 15: Installation
Warning Only use the AC power adaptor provided by O2matic. Any other power supply may interfere with the proper operation of the device. Connect the oxygen hose to the source of oxygen in the wall or an oxygen cylinder. - Page 16 When these pages are opened PRO 100 automatically returns to home screen after 1 minute of inactivity. Note: If above steps have been followed correctly and there is no visible home screen, see the Service and Support section. D 8.4.1.27 O2matic User Manual - IFU...
-
Page 17: Setting Up The Device
From the home screen select Admin and select Profiles Move to New Profile and select Create. Enter the profile name by using the buttons. When finished, press to save and continue. Navigate to the desired parameters and adjust them as needed. D 8.4.1.27 O2matic User Manual - IFU... - Page 18 From the home screen select Admin and choose Profiles. Move to the desired profile and press Select. Navigate to the desired parameters and adjust them as needed. Save the adjustment. Return to home screen by pressing (B). D 8.4.1.27 O2matic User Manual - IFU...
- Page 19 Figures 7 and 8: PRO 100 Edit Profile menu (COPD) D 8.4.1.27 O2matic User Manual - IFU...
-
Page 20: Importing Settings
For more information about the physical tool, visit contact us at info@o2matic.com. Warning The exported files should only be edited by an administrator that has extensive knowledge of the device. Ignoring this can result in dangerous situations for the patient. D 8.4.1.27 O2matic User Manual - IFU... -
Page 21: Changing Codes And Resetting
To change the USB pin code: Enter the admin menu. Select Settings. Select Security. Select Set PIN (default is 1111) Input the old USB pin. Press Submit. Input the new USB pin. Press Submit. D 8.4.1.27 O2matic User Manual - IFU... - Page 22 After confirming the device will begin to reset all settings and data on the device. Do not turn off the device while the device is displaying the “Formatting” or “Clearing” messages on the home screen. D 8.4.1.27 O2matic User Manual - IFU...
-
Page 23: Starting Treatment
Upon startup the device resumes in the latest selected profile. If the device was switched off while in Manual mode, it will regardless, for safety reasons, start up in Automatic mode. Figures 9: PRO 100 Home Screen D 8.4.1.27 O2matic User Manual - IFU... -
Page 24: Assign A New Patient To Device
This can be done either by incrementing the patient ID by 1 OR by typing a specific patient ID to accommodate for a hospital's existing ID system. Selecting “Accept” to increment patient ID by 1. Select “Edit” and use buttons to manually enter desired D 8.4.1.27 O2matic User Manual - IFU... - Page 25 Input the location. Select “Edit” and use buttons to manually select each letter for the location. Press to continue to the next letter. D 8.4.1.27 O2matic User Manual - IFU...
- Page 26 However, the active profile can also be customized if needed. The actual active profile is stated at the top of the screen. Note: Table A.4 in appendix A shows default factory set profiles. D 8.4.1.27 O2matic User Manual - IFU...
- Page 27 NOTE: Nail polish can cause impaired reading functionality of the pulse oximetry sensor. Warning Never smoke during treatment. This can inflict serious injuries. Warning Never use any flammable products on the patient as this can cause serious injuries. D 8.4.1.27 O2matic User Manual - IFU...
-
Page 28: Treatment And Operation
Manual mode The manual mode works like a standard digital flow meter, where the oxygen flow can be controlled via buttons, while the SpO is still displayed. D 8.4.1.27 O2matic User Manual - IFU... - Page 29 Flow range Increments 0 – 5 l/min 0,1 OR 0,5 l/min 5 – 10 l/min 0,5 l/min 10 – 15 l/min 1 l/min 15 – 15+ l/min Fully open valve D 8.4.1.27 O2matic User Manual - IFU...
-
Page 30: Patient Assessment
, pulse, and oxygen dosage. It is possible to “zoom” in and out on the chart to view trends from the last 12 minutes – last 24 hours, with Figure 14: PRO 100 trend screen – last hour D 8.4.1.27 O2matic User Manual - IFU... - Page 31 The dotted vertical line indicates that the patient has been altered or changed. The downward facing triangle indicates that the profile has been altered or changed to another profile. Figure 15: Extract from figure 14 focusing on the legends D 8.4.1.27 O2matic User Manual - IFU...
- Page 32 HH:MM at MIN and MAX show how long ago the MIN or MAX occurred. For example, in the below info screen, the lowest O supply of 2 liters per minute occurred at T-00:18 that is 18 minutes ago Figure 16: PRO 100 info screen D 8.4.1.27 O2matic User Manual - IFU...
-
Page 33: Critical Profiles
85%, but not under 80%. If cancelled, the value stays at 85%. Figure 17 - SpO2 outside safe range prompt D 8.4.1.27 O2matic User Manual - IFU... - Page 34 If confirmed, the Active Profile name will appear in orange font on the Home screen. The user is also prompted in the same way when the device is turned on with a Critical Profile set from before the device was turned off. D 8.4.1.27 O2matic User Manual - IFU...
-
Page 35: Walking Tests
PRO 100 can perform both pre-defined Walking Tests and user defined tests. A log file of the tests performed are stored on the device. Test results can be seen on the screen or reviewed by extracting logs. D 8.4.1.27 O2matic User Manual - IFU... - Page 36 Actual test – shown as test name and TIME LEFT • Recovery – shown as RECOVERY • To see a ‘6-minute walking test’: From the Home Screen select Admin Screen. Select Tests. Select “6_MWT”. D 8.4.1.27 O2matic User Manual - IFU...
- Page 37 Figure 20 - Test Selection When a test has been selected the Test Setup Screen appears and the test can be customized by the user. D 8.4.1.27 O2matic User Manual - IFU...
- Page 38 Now the test will start with the first phase (warm-up), and the screen returns to the Home Screen, with a countdown in the left bottom corner displaying the remaining warm-up time. D 8.4.1.27 O2matic User Manual - IFU...
- Page 39 Note: If the User has changed a value from the pre-defined test profile which is actively used, the profile name will turn yellow while the test is running to indicate that the test is customized. D 8.4.1.27 O2matic User Manual - IFU...
- Page 40 The device beeps twice • Test log finishes recording • The TIME LEFT countdown is replaced with RECOVERY • When the RECOVERY countdown concludes, the device returns to the previously active profile. D 8.4.1.27 O2matic User Manual - IFU...
- Page 41 The following figures show an appropriate setup for performing tests involving walking as an example. Caution The test setup chosen by the medical staff must protect: The patient from falling • The device from physical impacts • D 8.4.1.27 O2matic User Manual - IFU...
- Page 42 Figure 24 - Appropriate setup side view Note: Check how oxygen bottle and hoses are placed to avoid the wheels or the patient’s legs being entangled. D 8.4.1.27 O2matic User Manual - IFU...
- Page 43 ‘Battery Fail’ will blink in a red font on the screen. If this state occurs, stop the test and re-connect the device to external power at once. D 8.4.1.27 O2matic User Manual - IFU...
-
Page 44: Shutdown
This is not the intended shutdown, but instead a forced shutdown mainly used for service situations. A forced shut down will trigger an alarm, that can only be disengaged by turning the device on and shutting it off in the proper manner. D 8.4.1.27 O2matic User Manual - IFU... -
Page 45: Warnings And Alarms
10 meters away. NOTE: When navigating in menus, the device still operates however alarms are muted. Upon no operator activity for 60 seconds the home screen will reappear, and the alarm will sound if triggered. D 8.4.1.27 O2matic User Manual - IFU... -
Page 46: Alarm Level Indicators
Below this zone there is a zone for the “check status” indication. See section 5.3 for further information on possible alarm events and a description of these. D 8.4.1.27 O2matic User Manual - IFU... - Page 47 Figure 27: PRO 100 alarm zones In figure 27 three alarms are present, Flow Error alarm, Pulse alarm, and SpO alarm. D 8.4.1.27 O2matic User Manual - IFU...
- Page 48 Figure 28: PRO 100 alarm zones 2 Figure 28 shows Battery Mode alarm pop-up and red top and bottom. D 8.4.1.27 O2matic User Manual - IFU...
- Page 49 Pulse higher/lower than Verify patient Pulse Alarm defined condition Pulse Critical Pulse higher than 200 BPM Verify patient condition Alarm Pulse Critical Pulse lower than 40 BPM Verify patient condition Alarm D 8.4.1.27 O2matic User Manual - IFU...
- Page 50 PRO 100. If the connected Alarm problem persists, send device for service *Adjustable between 0 and 30 minutes on devices with firmware version 1.26 or higher. Otherwise adjustable between 0 and 5 minutes. D 8.4.1.27 O2matic User Manual - IFU...
- Page 51 Critical Incorrect O2 flow into device Check oxygen source. If problem Alarm isn’t from source device needs service Oxygen control error Check oxygen Alarm source. If problem isn’t from source device needs service D 8.4.1.27 O2matic User Manual - IFU...
- Page 52 No power Connect power adapter to power symbol source and to alarm O2matic PRO blinking *Battery capacity warnings are outside general alarm indication terminology as they are indicated with red symbols but without audio. D 8.4.1.27 O2matic User Manual - IFU...
- Page 53 Check Alarm Valve Restart device, if alarm persist device status needs service Check Alarm Flowmeter Restart device, if alarm persist device status needs service D 8.4.1.27 O2matic User Manual - IFU...
-
Page 54: Possible Alarm Events
All pulse oximeter sensor related alarms share the same zone in the following prioritized showing order: Priority Alarm / visual Description indication Sensor error Internal functionality error Not connected Not connected to device No signal Not connected to patient D 8.4.1.27 O2matic User Manual - IFU... -
Page 55: Electromagnetic Emissions And Immunities
+/- 8 kV contact Electrostatic discharge EN 61000-4-2 immunity +/- 2, 4, 8 kV air 3 V/m Radiated RF electromagnetic field EN 61000-4-3 80 MHz to 2.7 GHz immunity 80 % AM 1 kHz D 8.4.1.27 O2matic User Manual - IFU... - Page 56 5240 MHz, 9 V/m, 217 Hz PM (50 % duty cycle square wave) 5500 MHz, 9 V/m, 217 Hz PM (50 % duty cycle square wave) 5785 MHz, 9 V/m, 217 Hz PM (50 % duty cycle square wave) D 8.4.1.27 O2matic User Manual - IFU...
- Page 57 *) The ISM (industrial, scientific and medical) bands between 0.15 MHz and 80 MHz are 6.765 MHz to 6.795 MHz; 13.553 MHz to 13.567 MHz; 26.957 MHz to 27.283 MHz; and 40.66 MHz to 40.70 MHz. D 8.4.1.27 O2matic User Manual - IFU...
-
Page 58: Maintenance
In the context of disinfecting the device after treating patients with the COVID-19 virus, it is advised to cleanse all surfaces using one of the following disinfection solutions: • 0.1% sodium hypochlorite (bleach) • 62% to 72% ethanol D 8.4.1.27 O2matic User Manual - IFU... -
Page 59: Exporting Data
USB device Enter the USB drive You will see the following files: Figure 29 – Root files Infection Control Today (Best Approach to Disinfecting Surfaces Amid Novel Coronavirus Outbreak, Diamond, Frank, February 10, 2020) D 8.4.1.27 O2matic User Manual - IFU... - Page 60 Go to the next row (row 5) and provide it with a Name, Duration, Warmup Cooldown (Recovery) and a valid Profile name (for instance ‘ACTIVITY’, ‘COPD’ or a user defined one). To change an existing test, modify values for Duration, Warmup or Cooldown. D 8.4.1.27 O2matic User Manual - IFU...
-
Page 61: Changing Battery
It is recommended to change batteries at least every second year to ensure optimal functionality. To ensure safety the battery must be changed by authorized personnel. Warning Only use rechargeable and approved Battery Warning Only Authorized Personnel allowed to change battery D 8.4.1.27 O2matic User Manual - IFU... -
Page 62: Service And Support
PRO 100 found to be defective in accordance with this warranty, free of charge. For this to be valid, O2matic must be notified by the purchaser of what serial number that belongs to the affected device. Furthermore, the provided notification shall occur within the applicable warranty period. -
Page 63: Support And Contact
Support and Contact For support or more information please contact us: Website: www.O2matic.com Manufacturer and Technical Support: O2matic ApS Nørrelundvej 10 2730 Herlev Denmark +45 5052 9810 Local distributor D 8.4.1.27 O2matic User Manual - IFU... - Page 64 40 – 240 ± 5 Flow rate 0 – 15 l/min Alarm delay < 20 secs Flow accuracy 0.1 l/min or 5% - Whichever is higher General Expected service life 5 years Language English D 8.4.1.27 O2matic User Manual - IFU...
-
Page 65: Specifications
* In manual mode flow it is possible to open up the valve at maximum. When doing this the O2matic device shows 15+ l/min and shows a warning of “inaccurate flow”. The actual output is based on current oxygen source. At 4 bars pressure input the O2matic PRO delivers 30 l/min. - Page 66 Table A4 – Factory set profiles Name Initial Flow SpO2 SpO2 Pulse response Flow Flow Flow rate COPD NORMAL HYPOXEMIA NORMAL ACTIVITY FAST Table A5 – Flow response settings Flow response Rate Normal Fast D 8.4.1.27 O2matic User Manual - IFU...
-
Page 67: Appendix B - Accessories
UNI-EX-3 - Universal Extension Cable (3m) 0 0833166 001051 6000CA – Cloth adult box 0 0833166 009965 6500SA - Disposable Durafoam Pulse Oximetry Sensors 0 0833166 001846 7000A – Flexi-Form III adult disposable box 0 0833166 001976 D 8.4.1.27 O2matic User Manual - IFU... - Page 68 PRO 100 can be used in combination with standard hoses designed for pure oxygen for hospital use. The inlet is a standard NIST connector and is designed in accordance to ISO 18082:2014 (EN). D 8.4.1.27 O2matic User Manual - IFU...
- Page 69 Notes D 8.4.1.27 O2matic User Manual - IFU...
- Page 70 Notes D 8.4.1.27 O2matic User Manual - IFU...
- Page 71 Notes D 8.4.1.27 O2matic User Manual - IFU...
- Page 72 Nørrelundvej 10 2730 Herlev Contact Mail: Info@O2matic.com Web: www.O2matic.com Tel: +45 5052 9810 This user manual booklet is current as of February 2024. For information of device updates and news please visit www.O2matic.com D 8.4.1.27 O2matic User Manual - IFU...
Need help?
Do you have a question about the OMC PC-100 and is the answer not in the manual?
Questions and answers