Table of Contents
Advertisement
Quick Links
Advertisement
Table of Contents

Related Manuals for TRENDnet TV-IP262P


Summary of Contents for TRENDnet TV-IP262P
- Page 1 Cover Page TRENDnet User’s Guide...
-
Page 2: Table Of Contents
Motion Detect ......................26 Event Config ......................27 Tools ........................29 SD Card ........................29 Device Info ......................31 How to setup/access the camera behind a Router ........ 32 Technical Specifications ................. 35 © Copyright 2012 TRENDnet. All Rights Reserved. -
Page 3: Product Overview
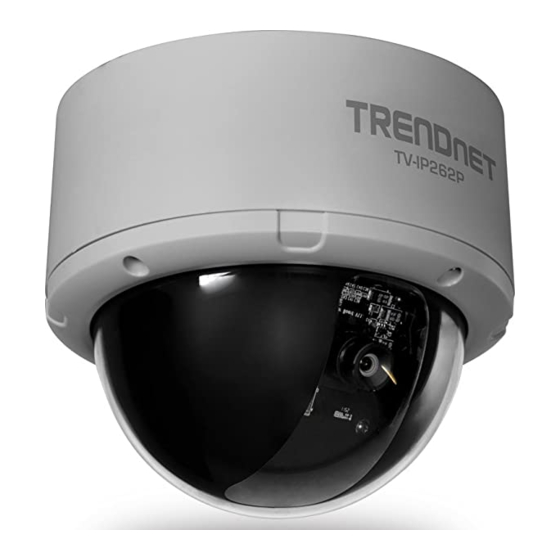
Features Product Overview The Megapixel PoE Dome Internet Camera (model TV-IP262P) is an indoor, enterprise class surveillance camera capable of transmitting H.264 video at up to 1280 x 1024 resolution. View and manage the tamper resistant dome IP camera from any computer with an internet connection. -
Page 4: Product Hardware Features
Power : Connect the provided AC power adapter to supply power to the camera. SD Card Slot: Insert a memory card for expansion of storage. Ethernet Cable Connector: Connect the provided network cable (RJ-45 type) © Copyright 2012 TRENDnet. All Rights Reserved. -
Page 5: Application Diagram
Lens assembly with LED indicators the adjustable base LED indicators Power: Indicate the camera is powered on with the steady amber light. Link: Indicate the camera’s network connectivity with the flashing green light. © Copyright 2012 TRENDnet. All Rights Reserved. -
Page 6: Installation
If the image quality is poor, you have to disassemble the Dome cover to adjust the lens focus until the desired image appears clearly. 5. Put the Dome cover back and secure with four screws. © Copyright 2012 TRENDnet. All Rights Reserved. -
Page 7: Camera Installation
4. Connect one end of the power adapter into the Power Connector, then click on Next. Please click Next if you are using the PoE injector or switch. 2. lick the Install Camera. © Copyright 2012 TRENDnet. All Rights Reserved. - Page 8 Network, you will need to identify the camera by the MAC 6. Wait while camera is searching. 8. Type in the Password. The password is “admin” by default. If you would like to change camera’s password, check the Change Password now. © Copyright 2012 TRENDnet. All Rights Reserved.
- Page 9 9. Type in the new and confirm the new password by entering the password 11. Click Finish to exit the program or click Home return to the main screen. twice. 10. Click TV-IP262P to access to the camera web page. © Copyright 2012 TRENDnet. All Rights Reserved.
-
Page 10: Starting Ipsetup
Installation CD-ROM, allowing you to search the camera on your network easily. 1. Insert the Installation CD-ROM into your computer’s CD-ROM drive to initiate the Auto-Run program. 3. When the Completing the IPSetup Setup Wizard appears, click Finish. © Copyright 2012 TRENDnet. All Rights Reserved. - Page 11 TV-IP262P TRENDnet User’s Guide 4. After installing the IPSetup utility, the application is automatically installed to your computer, and creates a folder in Start\Program\TRENDnet\IPSetup. Camera Display Area 5. Click Start>Programs>TRENDnet>IPSetup, and then click IPSetup. Camera Display Area: By default, the IP setting on the Camera is set to DHCP.
- Page 12 TV-IP262P TRENDnet User’s Guide Search: Click this button to search the connected camera in the same network Exit: Click this button to exit the program. © Copyright 2012 TRENDnet. All Rights Reserved.
-
Page 13: Configuration
Click Yes to proceed. Click the button to return to the Main screen to view the live view image. Compression Buttons: Select to transmit and record the video using H.264, MPEG4, or MJPEG compression. © Copyright 2012 TRENDnet. All Rights Reserved. -
Page 14: Configuring The Camera Setting
Security in the IE browser before recording a video file or taking a snapshot. Please follow the below steps: 1. Open IE Browser 2. Select ToolsInternet Options 3. Select Security 4. Uncheck the ”Enable Protected Mode” then press OK © Copyright 2012 TRENDnet. All Rights Reserved. -
Page 15: Smart Wizard
By default, the camera name is set as model number. Change the name if necessary. Enter the location and administrator password twice. IP Setting Select the IP setting according to your network: DHCP, Static IP, or PPPoE. © Copyright 2012 TRENDnet. All Rights Reserved. -
Page 16: Basic
Camera Name, Location, Date & Time, and User management. click Prev to go back to the previous step(s) and change the settings; or click Cancel to end the wizard and discard the changes. Basic >> System © Copyright 2012 TRENDnet. All Rights Reserved. - Page 17 Main screen of the Web Configuration.; the “Guest” can only view the live view image from the Main screen while accessing the camera. Only the “Administrator” is allowed to configure the camera through the Web Configuration. © Copyright 2012 TRENDnet. All Rights Reserved.
-
Page 18: Network
H.264 Mode http://camera_ip_address:port number/h264view.htm MPEG4 Mode http://camera_ip_address:port number/mpgview.htm MJPEG Mode http://camera_ip_address:port number/jpgview.htm NOTE This feature is enabled by default, and for security reason, it is recommended to have the feature enabled at all time. © Copyright 2012 TRENDnet. All Rights Reserved. - Page 19 NOTE: If the camera is behind an NAT router of firewall, the suggested to be used is from default setting is 255.255.255.0. 1024 to 65535. Default Enter the Default Gateway of the camera. The © Copyright 2012 TRENDnet. All Rights Reserved.
- Page 20 Bonjour, you can find the camera on your local network without knowing its IP address. The Apple Safari is already with Bonjour. You can download the complete Bonjour for Internet Explorer browser from Apple's web site by visiting http://www.apple.com/bonjour/. © Copyright 2012 TRENDnet. All Rights Reserved.
-
Page 21: Video & Audio
192.168.0.80 in End IP Address, the user whose IP address located within 192.168.0.50 ~ 192.168.0.80 will not be allowed to access the camera. - IPv6: Enter the IP Address that is allowed to access the camera. © Copyright 2012 TRENDnet. All Rights Reserved. - Page 22 - Video Resolution: Select the desired video resolution from the four formats: SXGA, VGA, QVGA, QVGA and 720P. The higher setting (SXGA) obtains better video quality while it uses more resource within your network. © Copyright 2012 TRENDnet. All Rights Reserved.
- Page 23 RTSP link: rtsp://(IP address of the camera)/3gp. This sub-menu is used to set the image overlay and mask feature of the camera. Image Overlay: This item allows you to set the image overlay. © Copyright 2012 TRENDnet. All Rights Reserved.
-
Page 24: Event Server
When you complete the required settings for HTTP Notify for Motion Trigger, FTP, Email, color. Network Storage, or Instant Message, click Test to test the related configuration is correct or not. Once the camera connects to the server successfully, click Apply. © Copyright 2012 TRENDnet. All Rights Reserved. - Page 25 Pre-event (0 ~ 3) seconds and Post-event (0 ~ 3) seconds. Result: http://192.168.10.1:80/cgi/event.cgi?status=#s&time=#t&model=modelname The Pre-Event or Post-Event only works when video resolution set NOTE: up to 720P or lower. It will not work with SXGA resolution. © Copyright 2012 TRENDnet. All Rights Reserved.
- Page 26 It offers a way to upgrade a plain text Network Storage connection to an encrypted (TLS or SSL) connection. - Samba Server Address: Enter the IP address of the Network Storage server. © Copyright 2012 TRENDnet. All Rights Reserved.
-
Page 27: Motion Detect
Threshold: Move the slide bar to adjust the level for detecting motion to record - Jabber ID: Enter your user ID to login into the Jabber IM service. video. - Jabber Password: Enter the password to login into the Jabber IM service. © Copyright 2012 TRENDnet. All Rights Reserved. -
Page 28: Event Config
After entering the profile name, click OK and the profile is added to the Schedule Profiles list. To delete the profile, select the profile in the list and click Delete. Event Configuration >> General Setting © Copyright 2012 TRENDnet. All Rights Reserved. - Page 29 - Schedule Profile: Select a schedule profile from the pull-down list. - Action: Select the destination that the captured images will be sent to: Record to SD Card, Record to Network Storage, Send Email, FTP Upload, or Instant Message. © Copyright 2012 TRENDnet. All Rights Reserved.
-
Page 30: Tools
- Backup: Click Get the backup file to save the current configuration of the camera. - Restore: Click Browse to locate the backup file and then click Restore. © Copyright 2012 TRENDnet. All Rights Reserved. - Page 31 Folder when the storage space on the SD card is full. - Encode Format: Select MPEG4 or H.264 as the encode format while recording. - File Format: Select MP4 or AVI as the file format while recording. © Copyright 2012 TRENDnet. All Rights Reserved.
-
Page 32: Device Info
Display the Basic, Video & Audio, and Network settings of the camera. The Information menu displays the current configuration and events log of the camera. Information >> System Log The Logs table displays the events log recorded by the system. © Copyright 2012 TRENDnet. All Rights Reserved. -
Page 33: How To Setup/Access The Camera Behind A Router
4. Open another web browser and go to your Router’s Web Configuration page. How to setup/access the camera behind a Router (In the example, TRENDnet’s TEW-651BR Wireless N router is used) You can either setup the Dynamic DNS connection via camera itself or your home router. - Page 34 * Please refer to your router’s user’s manual for detail Virtual Server setting. Some router might use Port Forwarding or Special applications for this function. The setup steps should be very similar. 2. Login to your router’s web configuration page. © Copyright 2012 TRENDnet. All Rights Reserved.
- Page 35 Some router might use Port Forwarding or Special applications for this function. The setup steps should be very similar. 6. Open another web browser and enter your DDNS domain and camera’s port number. http://yourDomainName:PortNumber 7. The camera login page will appear. © Copyright 2012 TRENDnet. All Rights Reserved.
-
Page 36: Technical Specifications
Encoding type: H.264, MPEG-4, MJPEG Consumption Compression: 5 levels Power Input: 100 ~ 240V AC , 0.5A, 50~60Hz Resolution/Frame Rate: Output: 12VDC 1.5A external power adapter (for non- PoE installations) SXGA (1280 x 1024) up to 15fps © Copyright 2012 TRENDnet. All Rights Reserved. - Page 37 The default router setting might be a possible reason. Check that the System Log 100 entries (max.) configuration of the router settings allow the Network Camera to be accessed outside your local LAN. © Copyright 2012 TRENDnet. All Rights Reserved.
- Page 38 ActiveX has been enabled in the Internet Options menu. You may also need to change the security settings on your browser to allow the ActiveX plug- in to be installed. 8. There is one © Copyright 2012 TRENDnet. All Rights Reserved.
- Page 39 TRENDnet products. Products that are sent to TRENDnet for RMA service must have the RMA number marked on the outside of return packages and sent to TRENDnet Governing Law: This Limited Warranty shall be governed by the laws of the state of prepaid, insured and packaged appropriately for safe shipment.
-
Page 40: Limited Warranty
Download section and look for the desired TRENDnet product to access to the GPL Code or LGPL Code. These codes are distributed WITHOUT WARRANTY and are subject to the copyrights of the developers. TRENDnet does not provide technical support for these codes. Please go http://www.gnu.org/licenses/gpl.txt...
Need help?
Do you have a question about the TV-IP262P and is the answer not in the manual?
Questions and answers