Advertisement
Quick Links
INSTRUCTION
MANUAL
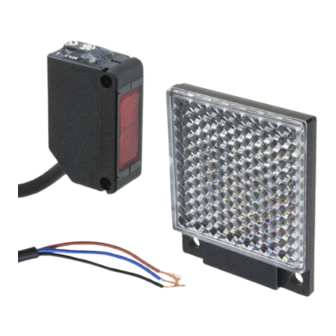
Amplifier Built-in Type Threaded Miniature Photoelectric Sensor
EX-30 Series
MJEC-EX30 No.0096-91V
Thank you very much for purchasing Panasonic products.
Read this Instruction Manual carefully and thoroughly for
the correct and optimum use of this product. Kindly keep
this manual in a convenient place for quick reference.
● Please refer to "users manual on our web site (https://
industry.panasonic.com/)" for more details (specifica-
tion, and operation etc.)
● Access method is "Download" → "Model no."
● If you could not visit our web site, contact our sales
office near your sight.
WARNING
● Never use this product as a sensing device for personnel protection.
● In case of using sensing devices for personnel protection, use
products which meet laws and standards, such as OSHA, ANSI or
IEC etc., for personnel protection applicable in each region or country.
1
PART DESCRIPTION
Operation indicator (Orange) (Note 1)
Stability indicator (Green) (Note 1)
Lights up when the sensing
Lights up under the stable light
output is ON
condition or the stable dark condition
Operation mode switch (Note 2)
Sensitivity adjuster (Note 3)
L: Light-ON
Sensing range be-comes
D: Dark-ON
longer when turned clockwise
Notes: 1) Not incorporated on the thru-beam type sensor emitter.
2) Incorporated on EX-33□. Not incorporated on the receiver
for EX-31□, and EX-32□.
3) Incorporated on the emitter for EX-33□, and EX-32□. Not
incorporated on EX-31□.
2
MOUNTING
● Mount the sensor on a mounting plate 3mm
or less thick and Use the enclosed nut and
toothed lock washer for mounting.
● When the nut is tightened, hold the the sensor
with hand or a spanner etc. and the tightening
torque should be 0.6N•m or less. (EX-32□:
Mounting plate
1N•m or less) Do not tighten the sensor itself.
(3mm or less thick)
3
WIRING DIAGRAMS
● NPN output type
● PNP output type
(Brown) +V
(Brown) +V
Load
(Black)
+
+
Output (Note)
(Black)
-
-
Output (Note)
Load
(Blue) 0V
(Blue) 0V
Note: The thru-beam type sensor emitter does not incorporate the output.
4
SENSITIVITY ADJUSTMENT
Step
1. Turn the sensitivity adjuster fully counterclockwise
to the minimum sensitivity position, MIN.
2. In the light received condition, turn the sensitivity
adjuster slowly clockwise and confirm the point A
where the sensor enters the "Light" state operation.
3. In the dark condition, turn the sensitivity
adjuster further clockwise until the sensor en-
ters the "Light" state operation and then bring
it back to confirm point B where the sensor
just returns to the "Dark" state operation.
If the sensor does not enter the "Light" state
operation even when the sensitivity adjuster is
turned fully clockwise, the position is point B.
4. The position at the middle of points A and
B is the optimum sensing position.
5
CAUTIONS
● This product has been developed / produced for industrial use only.
2
● The thin cable 0.1mm
is used for this product. Thus, take care that
if the cable is pulled with excessive force, it may cause cable break.
● Extension up to total 50m (emitter and receiver each for thru-
beam type), or less, is possible with 0.3mm
2
, or more, cable.
● Make sure that stress by forcible bend or pulling is not
applied directly to the sensor cable joint.
● Make sure to carry out wiring in the power supply OFF condition.
● Take care that wrong wiring will damage the sensor.
● Verify that the supply voltage variation is within the rating.
● If power is supplied from a commercial switching regu-
lator, ensure that the frame ground (F.G.) terminal of the
power supply is connected to an actual ground.
● In case noise generating equipment (switching regulator, inverter
motor, etc.) is used in the vicinity of this product, connect the
frame ground (F.G.) terminal of the equipment to an actual ground.
● Do not run the wires together with high-voltage lines or
power lines or put them in the same raceway. This can
cause malfunction due to induction.
● Do not use during the initial transient time (50ms) after
the power supply is switched ON.
● Take care that the sensor is not directly exposed to fluorescent
lamp from a rapid-starter lamp, a high frequency lighting de-
vice or sunlight etc., as it may affect the sensing performance.
● This sensor is suitable for indoor use only.
● Do not use this sensor in places having excessive vapor, dust,
etc., or where it may come in contact with corrosive gas, etc.
● Take care that the sensor does not come in contact with oil, grease,
organic solvents such as thinner, etc., strong acid, or alkaline.
● This sensor cannot be used in an environment contain-
ing inflammable or explosive gases.
● Never disassemble or modify the sensor.
● In case of using the sensor at a place where static electricity is generated,
use a metal mounting plate. Also, ensure to ground the mounting plate.
Panasonic Industry Co., Ltd.
1006, Oaza Kadoma, Kadoma-shi, Osaka 571-8506, Japan
https://industry.panasonic.com/
Please visit our website for inquiries and about our sales network.
Panasonic Industry Co., Ltd. 2024
PRINTED IN JAPAN
April, 2024
アンプ内蔵型ニューフォルムビームセンサ
EX-30シリーズ
A
このたびは、パナソニック製品をお買い上げいただき、
B
ありがとうございます。
ご使用の前にこの取扱説明書をよくお読みになり、正しく
最適な方法でご使用ください。
A
尚、この取扱説明書は大切に保管してください。
B
● 詳しい内容(操作方法や仕様など)につきましては、
「弊社Webサイト(https://industry.panasonic.com/)の
ユーザーズマニュアル」をご参照してください。
A
● 検索手順は、「ダウンロード」→「機種選択」です。
● 弊社Webサイトがご覧になれない場合は、最寄の営業
所までお問い合わせください。
警告
● 本製品は、人体保護用の検出装置としては使用しないでください。
● 人体保護を目的とする検出には、OSHA、ANSIおよび
IEC等の各国の人体保護用に関する法律および規格に
適合する製品をご使用ください。
1
各部の名称
動作表示灯(橙色)(注1)
出力ON時点灯
動作切換スイッチ(注2)
L : 入 光時ON
D : 非 入光時ON
(注1): 透 過型の投光器には、装備されていません。
(注2): E X-33□の受光器に装備されています。EX-31□および
EX-32□には、装備されていません。
(注3): E X-33□の投光器およびEX-32□に装備されています。
EX-31□には、装備されていません。
2
取り付け
● 本製品を取り付ける取付板の厚みは
3mm以下とし、付属のナットと歯付
座金を使用してください。
● ナットを締め付ける際、本製品を手または
スパナなどで固定し、ナットの締め付けト
ルクは0.6N・m以下(EX-32□:1N・m以下)
としてください。そのときに本製品をスパ
ナなどで締め付けないでください。
3
接続図
● NPN出力タイプ
(茶)+V
負荷
+
(黒)出力
-
(注1)
(青)0V
(注1): 出 力(黒)は、透過型の投光器には装備されていません。
4
感度調整
取 扱 説 明 書
手順
1. 感度ボリウムを反時計方向に回し切り、
最小感度位置にします。
2. "入光"状態で、感度ボリウムを徐々に時計
方向に回し、入光時の動作となる位置A点
を確認します。
3. "非入光"状態で、感度ボリウムを時計方向
に回し、一旦入光動作としてから反時計
方向に戻し、"非入光"時の動作となる位置
B点を確認します。
時計方向に回し切った状態で入光時の
動作とならない場合は、回し切った位
置がB点となります。
4. A点とB点の中間が最適位置となります。
5
注意事項
● 本製品は、工業環境に使用する目的で開発/製造された製品です。
● 本製品は、0.1mm
ケーブルを強い力で引っ張ると断線するおそれがあり
ますので、ご注意ください。
● ケーブル延長は、導体断面積が0.3mm
使用し、全長50m(透過型は投・受光器各)まで可能です。
● ケーブルの引き出し部に無理な曲げ、引っ張りなどの
ストレスが加わらないようにしてください。
● 配線作業は、必ず電源を切った状態で行なってください。
● 誤配線をしますと、故障の原因となります。
安定表示灯(緑色)(注1)
● 電源入力は、定格を超えないよう電源変動をご確認ください。
安定入光時、
● 電源に市販のスイッチングレギュレータをご使用にな
安定非入光時点灯
る場合には、必ず電源のフレームグランド(F.G.)端子
を接地してください。
● 本製品取り付け部周辺にノイズ発生源となる機器(スイッチン
感度ボリウム(注3)
グレギュレータ、インバータモータなど)をご使用の場合は、
時計方向に回すと検出
機器のフレームグランド(F.G.)端子を必ず接地してください。
距離が長くなります。
● 高圧線や動力線との並行配線や、同一配線管の使用は、
避けてください。誘導による誤動作の原因となります。
● 種類にもよりますが、ラピッドスタート式や高周波点灯式の
蛍光灯および太陽光などの光は、検出に影響を及ぼすことが
ありますので、直接入光しないようにご注意ください。
● 電源投入時の過渡的状態(50ms)を避けてご使用ください。
● 屋外で使用しないでください。
● 蒸気、ホコリなどの多い所、腐食性ガスなどの雰囲気
での使用は避けてください。
● シンナーなどの有機溶剤や強い酸、アルカリ、油、油脂
がかからないようにご注意ください。
● 引火性、爆発性ガスの雰囲気中での使用はできません。
● 製品の分解・修理・改造を絶対にしないでください。
● 静電気が発生する環境で使用する場合は、金属製の取
付板を使用し、必ず取付板を接地してください。
取付板
(厚み3mm以下)
● PNP出力タイプ
(茶)+V
(黒)出力
+
(注1)
パナソニック インダストリー株式会社
-
負荷
〒571-8506 大阪府門真市大字門真1006番地
https://industry.panasonic.com/
(青)0V
<FAデバイス技術相談窓口>
TEL:0120-394-205
受付時間:平日の9時~12時、13時~17時
(土日祝日、年末年始、当社休業日を除く)
Panasonic Industry Co., Ltd. 2024
2024年4月発行
A
B
A
最
B
適
位
置
A
2
の細いケーブルを採用しています。
2
以上のケーブルを
PRINTED IN JAPAN
Advertisement

Related Manuals for Panasonic EX-30 Series


Summary of Contents for Panasonic EX-30 Series
- Page 1 “Light” state operation. MJEC-EX30 No.0096-91V 方向に回し、入光時の動作となる位置A点 3. In the dark condition, turn the sensitivity このたびは、パナソニック製品をお買い上げいただき、 Thank you very much for purchasing Panasonic products. を確認します。 adjuster further clockwise until the sensor en- ありがとうございます。 Read this Instruction Manual carefully and thoroughly for 3.
- Page 2 (黑色) (※)∶ 外装部件包括外廓壳体、标牌类、光学系零件、电缆、连接器、 + + 输出(注1) 配线用螺丝、端子、安装支架等零件。 (黑色) <批号含义> - - ED1N(2014年4月生产) 输出(注1) 负荷 月[A(1月)、B(2月)、C(3月)······L(12月)] 每10年英 西历[A(*0年)、B(*1年)、C(*2年)······J(*9年)] 文和数字 (蓝色)0V (蓝色)0V [0('20年),1('21年), 2('22年)···9('29年)] 更换 (注1): 透过型传感器的投光器不装备输出。 松下机电株式会社 制造商: 地址∶日本大阪府门真市大字门真1006番地 https://industry.panasonic.com/ 松下电器机电(中国)有限公司 进口商: 中国(上海)自由贸易试验区马吉路88号7,8号楼二层全部位 有关联系方式及销售网络,请参阅本公司网站。 Panasonic Industry Co., Ltd. 2024 2024年4月发行 日本印刷...
Need help?
Do you have a question about the EX-30 Series and is the answer not in the manual?
Questions and answers