Advertisement
INSTALLATION
INSTRUCTIONS
PARTS LIST
1
2
10
9
3
4
5
No.
(1)
Flange bolt, 8 × 50 mm
(2)
Carriage bolt, 10 × 1.5 × 25 mm
(3)
Plain washer, 8 mm
(4)
Spring washer, 8 mm
(5)
Flange bolt, 8 × 25 mm
(6)
Flange bolt, 10 × 35 mm
(7)
Plain washer, 10 mm
(8)
Flange nut, 10 mm
(9)
Winch bracket
(10)
Lock nut, 10 × 1.5 mm
(11)
Flange nut, 8 mm
(12)
Winch Cable Cover
(13)
Mudguard Clip
(14)
Flange bolt, 6 × 12 mm
(15)
Lock nut, 6 mm
(16)
Contactor stay
(17)
5 mm Shoulder Bolt
(18)
Rubber Washer
(19)
5 mm Flange Nut
(20)
Wire tie (long)
(21)
Wire tie (medium)
(22)
Wire tie (short)
(23)
Winch switch
(24)
Winch switch sub-harness (not shown)
© 2020 American Honda Motor Co., Inc - All Rights Reserved.
WINCH MOUNT KIT
P/N 08L70-HL5-E60
11
19
12
13
6
7
8
Description
Accessory
17
18
16
15
Qty
No.
2
(25)
2
(26)
4
(27)
4
(28)
4
(29)
2
WINCH and ACCESSORY SUB-HARNESS
2
Sold separately
2
1
2
2
1
3
2
2
1
2
2
2
9
11
2
1
1
1 of 13
Application
SXS520M2
29
14
Description
Winch positive cable, Yellow (not shown)
Winch negative cable, Blue (not shown)
Winch battery cable, Red (not shown)
Winch ground cable, Black (not shown)
Installation Instructions URL
P/N 08L71-HL5-E61 & 08Z08-HL5-A00
ACCESSORY SUB-HARNESS
Publication No.
MII 17623
Issue Date
December 2020
20
21
22
23
Qty
1
1
1
1
1
08L70-HL5-E60_AH edi t s
Advertisement
Table of Contents

Related Manuals for Honda 08L70-HL5-E60


Summary of Contents for Honda 08L70-HL5-E60
- Page 1 Wire tie (long) (21) Wire tie (medium) (22) Wire tie (short) (23) Winch switch ACCESSORY SUB-HARNESS (24) Winch switch sub-harness (not shown) 1 of 13 © 2020 American Honda Motor Co., Inc - All Rights Reserved. 08L70-HL5-E60_AH edi t s...
-
Page 2: Customer Information
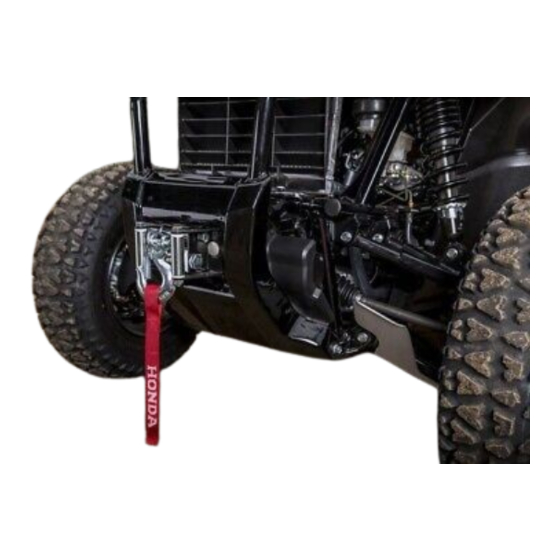
CUSTOMER INFORMATION USE AND CARE INFORMATION The information in these installation instructions is • Check the accessory mounts frequently and retighten intended for use only by skilled technicians who have if necessary. the proper tools, equipment, and training to correctly and •... - Page 3 WINCH MOTOR INSTALLATION 4. Install the winch onto the winch bracket using the 8 × 25 mm bolts, lock washers and plain washers. Refer to the Service Manual for the vehicle, remove Be sure that the lock washer is placed between the front bumper.
-
Page 4: Electrical Installation
Install a 10 mm plain washer onto each 10 × 35 mm 10. Feed the winch cable through the fairlead rollers flange bolt, then pass the bolts through the lower and install the clevis hook assembly using the bumper holes and tighten until the bolt emerges instructions provided in the Warn Winch Motor. - Page 5 Raise the cargo bed and release the following items from the back side of the battery box as shown: NOTE: Release the each item by releasing its anchor/clip from the battery box. • Parking brake cable clip • Gear position switch (8P Gray) connector •...
- Page 6 4. Disconnect the battery positive (+) cable from the 6. Remove the four bolts and the battery box. starter relay switch. Release the starter relay switch body holder from its clip. BATTERY POSITIVE CABLE BOLT Measure and mark a horizontal line 202 mm up from 5.
- Page 7 8. Using a 30 mm hole saw, cut a hole in the battery 11. Connect the Accessory Sub-Harness to the DLC (4P box at the marked point. Red) connector as shown. Install the rubber grommet with the sleeve oriented at the indicated angle as shown. <BATTERY BOX, VIEW FROM REAR>...
- Page 8 13. Using the molded template on the back side of 17. Install the Contactor Stay Assembly to the frame the instrument panel, make a starter hole with the crossmember with two 6 × 12 mm flange bolts and 5/8 inch step drill and then enlarge the cut-out for the two 6 mm lock nuts as shown.
-
Page 9: Connection Diagram
CONNECTION DIAGRAM 19. Connect the Winch Switch Sub-Harness to the Winch Switch as shown. WINCH BLACK BLUE YELLOW (W/B) WINCH SWITCH WINCH SWITCH SUB-HARNESS 20. Connect the Winch Switch Sub Harness to the Contactor as shown. 18. Connect the Winch Switch Sub-Harness to the green tape wire of the Accessory Sub-Harness as shown. - Page 10 21. Secure the Winch Switch Sub Harness with wire ties 24. Continue routing the yellow and blue power cables in the positions shown. as shown and secure them with wire ties in the positions shown. WIRE TIE (SHORT) 22. Route the yellow and blue power cables as shown and secure them with wire ties in the positions shown.
- Page 11 26. Install the wire tie at the position shown around the 28. Continue routing the red and black cables and main wire harness and all of the winch cables. secure them with wire ties in the positions shown. RED (BATTERY) CABLE BLACK (GROUND) CABLE RED (BATTERY) BLACK (GROUND)
-
Page 12: Starter Relay Switch
30. Route the red cable into the rubber grommet as 31. Install the battery positive (+) cable and the red shown. winch cable to the starter relay switch terminal and then tighten the terminal nut securely. SLIT STARTER RELAY RED WINCH TERMINAL BOOT RED (BATTERY) BATTERY BOX... -
Page 13: Check The System
CHECK THE SYSTEM 32. Route the black winch cable toward the chassis ground as shown. Before using the winch, verify the following: Remove the ground terminal bolt and pass it through • The wiring to all components is correct. All loose the terminal in the black winch cable.
Need help?
Do you have a question about the 08L70-HL5-E60 and is the answer not in the manual?
Questions and answers