Advertisement
Quick Links
Advertisement

Subscribe to Our Youtube Channel
Related Manuals for PowerPac PPT926


Summary of Contents for PowerPac PPT926
- Page 1 10 inch Instant Roti Maker / Chapati Maker / Fluffy Roti / Non-stick PPT926...
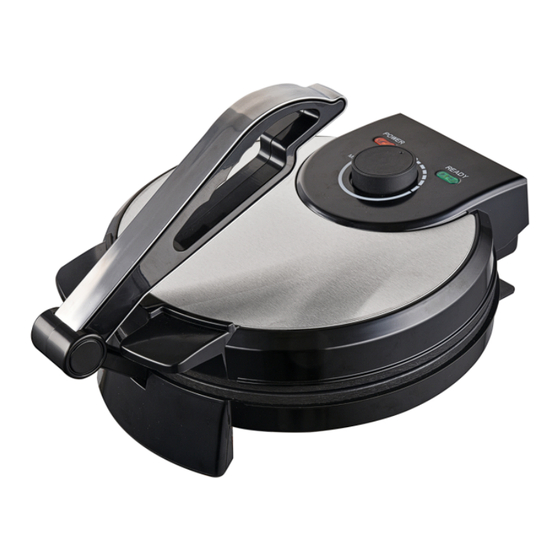
- Page 2 Parts & Description Power Light Ready Light (Red) (Green) – still heating – ready Temperature Knob Handle Base Lid Handles Top Heating Plate Handle Bottom Heating Plate...
- Page 3 Warnings ATTENTION : Read this booklet carefully as it contains important instructions for a safe installation, use and maintenance. Important instructions to be kept for future reference. The following basic precautions should always be followed when using electrical appliances: 1. Read all instructions before using the appliance. The Appliance 2.
- Page 4 9. The packing materials (plastic bags, expanded polystyrene, etc.) must be kept out of the reach of children or disabled persons since they represent potential sources of danger. Location 10. This appliance is NOT suitable to be used or stored near heat sources (open flame, ovens, heaters, stoves, etc.) and/or in an explosive environment (in the presence of flammable substances such as gas, vapour, mist or dust, in atmospheric conditions when, after ignition, the combustion is spread in the air).
- Page 5 c. (First use) • Set the Top Hinge down onto the Bottom Hinge by using the Lid Handles. You do not have to press the Handle down and clamp the Heating Plates together. • Attach the power cable to the appliance and then plug the power cable into the wall socket and switch on.
- Page 6 Do note that the roti and accompanying liquids & gases inside the appliance, and the appliance itself would still be very hot during heating, and for some time after the appliance had been switched off; • direct steam at any person or animal & one’s hands and face should be angled away from the Heating Plates at all times.
- Page 7 How to use Roti, also known as Chapati, is a staple food across the Indian subcontinent. Roti is a round, flat, unleavened bread made with finely ground whole-wheat flour, called atta chakka or chapatti flour, which is brown in color and gritty in texture Roti-dough Preparation 1.
- Page 8 3. Pour 150 ml of water into the mixing bowl and kneed by hand for 5 minutes by repeatedly picking the dough up, throwing it down and pressing it to ensure that air bubbles are eliminated and ingredients mixed thoroughly to provide a consistent texture and taste.
- Page 9 Baking the dough using the Roti Maker 1. Place and use the appliance on a dry, horizontal, stable and heat-resistant surface. 2. Set the Top Hinge down onto the Bottom Hinge by using the Lid Handles. You do not have to press the Handle down and clamp the Heating Plates together 3.
- Page 10 7. Press the Handle for 30 to 45 seconds, then release the Handle and flip back the Top Hinge using the Lid Handles. 8. Leave the roti to cook on the Bottom Heating Plate for 15 seconds. Rotate the roti every few seconds to keep it cooking evenly. 9.
- Page 11 10. Using the Lid Handles, very gently set the Top Hinge on the roti. Don’t press it down hard, and don’t use the Handle at all. With each side getting one final blast of heat, the roti should begin to puff up in the middle. The dough will spread out, creating a big, round ball, and then it will collapse down again into a flat pita shape 11.
- Page 12 How to clean 1. Set the Temperature Knob to the lowest position, switch the wall switch off and unplug the power cable from the wall socket. Allow sufficient time for the appliance to cool before cleaning. 2. Wipe the exterior of the appliance using a soft, damp cloth or sponge. Remove stubborn spots with a cloth moistened with mild liquid detergent.
-
Page 13: Problem Solving
PROBLEM SOLVING Problem Possible Causes How to Solve Insert one end of the power The appliance is not cable into the appliance and plugged in or the wall the plug into the wall socket switch is not turned ON. and switch the wall switch on. The appliance fails to get hot. - Page 14 DISPOSAL: Do not dispose this product as unsorted municipal waste. Collection of such waste separately for special treatment is necessary. SPECIFICATION FREQUENCY MODEL VOLTAGE POWER 50 – 60 Hz PPT926 220 – 240 V ~ 1200 W...
-
Page 15: Warranty
3. This warranty does not cover the repair or replacement of part/s damaged by misuse, accidents, negligence, alterations, or modifications in any way, or repairs done by any repair organisation without the prior consent of PowerPac Electrical Pte Ltd. 4. Repair and service are to be performed at: 5 Changi South Lane #03-01 Singapore 486045. - Page 16 In accordance with the terms and conditions of this limited warranty as stated above, PowerPac Electrical Pte Ltd, at its expense shall provide free services for the appliance within the warranty period from its date of purchase from our Authorised...
Need help?
Do you have a question about the PPT926 and is the answer not in the manual?
Questions and answers