Table of Contents
Advertisement
Available languages
Available languages
Quick Links
Technical Support and E-Warranty Certificate www.vevor.com/support
ROLLING HOT-DOG GRILL
MODEL: SC-5XD / SC-7XD / SC-11XD
We continue to be committed to provide you tools with competitive price.
"Save Half", "Half Price" or any other similar expressions used by us only
represents an estimate of savings you might benefit from buying certain tools
with us compared to the major top brands and does not necessarily mean to cover
all categories of tools offered by us. You are kindly reminded to verify carefully
when you are placing an order with us if you are actually Saving
Half in comparison with the top major brands.
Advertisement
Table of Contents

Related Manuals for VEVOR SC-5XD


Summary of Contents for VEVOR SC-5XD
- Page 1 Technical Support and E-Warranty Certificate www.vevor.com/support ROLLING HOT-DOG GRILL MODEL: SC-5XD / SC-7XD / SC-11XD We continue to be committed to provide you tools with competitive price. "Save Half", "Half Price" or any other similar expressions used by us only...
- Page 2 Technical Support and E-Warranty Certificate www.vevor.com/support This is the original instruction, please read all manual instructions carefully before operating. VEVOR reserves a clear interpretation of our user manual. The appearance of the product shall be subject to the - 1 -...
- Page 3 product you received. Please forgive us that we won't inform you again if there are any technology or software updates on our product. Warning-To reduce the risk of injury, user must read instructions manual carefully. Indoor use only. Pay attention to high temperatures to prevent burns. CORRECT DISPOSAL This product is subject to the provision of European Directive 2012/19/EC.
-
Page 4: Safety Warnings And Precautions
WARM PROMPT: A white protective film is attached to the surface of the fuselage to protect the fuselage from scratches.Please tear it off before use. SAFETY WARNINGS AND PRECAUTIONS Thank you for using this product. In order to make sure that you can operate the machine correctly, read this instruction carefully before operation and keep it properly for future reference. - Page 5 come into contact with any hot surfaces. 12. Do not place the unit on or near hot air, electric burners or heaters. 13. Always switch off the power to the socket before plugging in or unplugging. Hold the plug instead of pulling on the cord. 14.
-
Page 6: Product Parameters
PRODUCT PARAMETERS MODEL Region Voltage Power Plug Type Fuse North AC110 V 750W American PLUG America 60Hz SC-5XD AC220-240V Europe 1000W European PLUG 50Hz North AC110 V American PLUG 1050W America 60Hz SC-7XD AC220-240V Europe European PLUG 1400W 50Hz North... -
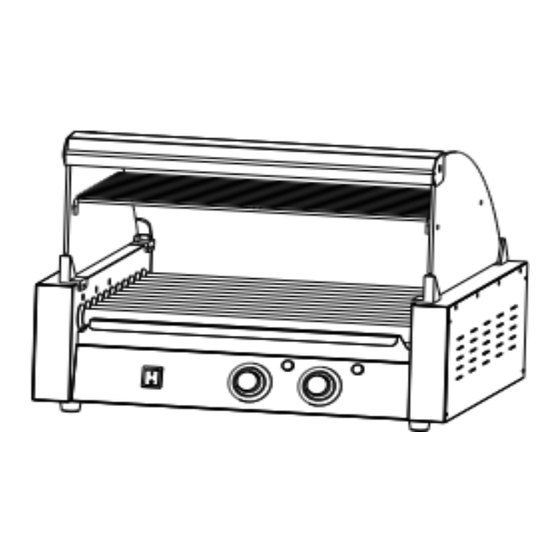
Page 7: Product Components
PRODUCT COMPONENTS Note: The location of the core components of these three machines is the same! 1. Power Switch 2.Temperature Knob (Front) 3. Heat Light (Front) 4.Temperature Knob (Back) 5. Heat Light (Back) 6. Pan 7. Fuse 8. Protective Earthing 9. -
Page 8: Exploded View
EXPLODED VIEW Note: The location of the core components of these three machines is the same! Name Name Glass front fixed beam Glass stand front (right) Glass front door Screws M4x8 Curved glass Screws M5x14 Side glass Screws M6x14 Shelves Nut M5 Behind the glass stand Mica gasket... -
Page 9: Assembly Drawing
ASSEMBLY DRAWING Note: The location of the core components of these three machines is the same! Step1 1. First use screws (J) to fix the (F-G-H-I) accessories to the rack in sequence. Note: Do not tighten the screws completely yet. Step2 2.1 Use screws (L) to fix the left and right accessories (P) to the reserved fixing holes in... - Page 10 3.1 Place the accessory (C) into the slot of the glass fixture. Step3 Step4 4 Use fasteners (K; N; M) to fix accessories (A) to the reserved openings in the glass in order and tighten them. - 9 -...
- Page 11 Step5 5 Place the accessory (E) onto the installed accessory (P) from top to bottom. Step6 6 Use screws (O) to secure accessory (B) to the installed glass front fixed beam; complete installation. - 10 -...
- Page 12 OPERATING INSTRUCTIONS Before using the appliance for the first time, peel off any promotional materials and packaging materials, and check that the product are clean and free of dust. If necessary, wipe them over with a damp cloth. Spread over with an absorbent kitchen towel and wipe off any excess oil.
-
Page 13: Cleaning And Maintenance
5.When connecting or unplugging the plug, it should be disconnected from the total external power supply. 6. Keep your hands dry when plugging the cord. TIPS 1. To save electricity and reduce the heating time, you can naturally defrost the sausages or heat it by microwave oven before. - Page 14 Imported to USA: Sanven Technology Ltd. Suite 250, 9166 Anaheim Place, Rancho Cucamonga, CA 91730 YH CONSULTING LIMITED. C/O YH Consulting Limited Office 147, Centurion House, London Road, Staines-upon-Thames, Surrey, TW18 4AX E-CrossStu GmbH Mainzer Landstr.69, 60329 Frankfurt am Main. Technical Support and E-Warranty Certificate www.vevor.com/support...
- Page 15 Techniczny Certyfikat wsparcia i e-gwarancji www.vevor.com/support ROLLING HOT-DOGA GRILL MODEL: SC-5XD / SC-7XD / SC-11XD Nadal dokładamy wszelkich starań, aby zapewnić Państwu narzędzia w konkurencyjnej cenie. „Zaoszczędź pół ceny”, „Zaoszczędź połowę ceny” lub inne podobne wyrażenia używane wyłącznie przez nas reprezentuje szacunkową...
- Page 16 Śmiało możesz się z nami skontaktować: Wsparcie techniczne i certyfikat e-gwarancji www.vevor.com/support To jest oryginalna instrukcja. Przed przystąpieniem do obsługi prosimy o dokładne zapoznanie się ze wszystkimi instrukcjami. VEVOR zastrzega sobie jasną interpretację naszej instrukcji obsługi. Wygląd produktu - 1 -...
- Page 17 zależy od produktu, który otrzymałeś. Proszę wybaczyć nam, że nie będziemy ponownie informować Państwa, jeśli pojawią się jakieś aktualizacje technologii lub oprogramowania naszego produktu. Ostrzeżenie — aby zmniejszyć ryzyko obrażeń, użytkownik musi uważnie przeczytać instrukcję obsługi. Do użytku wewnątrz. Uważaj na wysokie temperatury, aby zapobiec poparzeniom. PRAWIDŁOWA UTYLIZACJA Ten produkt podlega przepisom Dyrektywy Europejskiej 2012/19/WE.
-
Page 18: Safety Warnings And Precautions
CIEPŁA PODPOWIEDŹ: Na powierzchnię naklejona jest biała folia ochronna Kadłub, aby chronić kadłub przed zadrapaniami. Przed użyciem należy go oderwać. SAFETY WARNINGS AND PRECAUTIONS Dziękujemy za korzystanie z tego produktu . Aby mieć pewność, że będziesz mógł prawidłowo obsługiwać maszynę, przeczytaj uważnie niniejszą instrukcję przed rozpoczęciem użytkowania i zachowaj ją... - Page 19 działaniem lub jakimkolwiek uszkodzeniem mechanicznym. Wyślij go do najbliższego autoryzowanego centrum serwisowego w celu sprawdzenia i naprawy (urządzenie powinni otwierać WYŁĄCZNIE technicy). 9. Korzystanie z akcesoriów lub przystawek, które nie są dostarczone lub zalecane przez producenta, może spowodować obrażenia. 10. Jeżeli maszyna nie będzie używana przez dłuższy czas, należy ją odłączyć od prądu, wyczyścić, przykryć...
-
Page 20: Product Parameters
Bezpie MODEL Region Napięcie Typ wtyczki cznik Ameryka AC 110 V 6 0 Amerykanin 750 W północna WTYCZKA SC-5XD 10 A AC 220-240 Europejczyk Europa 1000 W V 50 Hz WTYCZKA Ameryka AC 110 V 6 0 Amerykanin 1050 W północna... -
Page 21: Product Components
3. Jeżeli maszyna nie jest zasilana, wyjmij wtyczkę z gniazdka elektrycznego i sprawdź, czy nie przepalił się bezpiecznik. 4. Zaleca się, aby produkty korzystały z oddzielnych linii i gniazd, aby uniknąć przeciążenia wyłącznika automatycznego lub bezpiecznika zwłocznego. CIEPŁA PODPOWIEDŹ: Na powierzchnię naklejona jest biała folia ochronna Kadłub, aby chronić... - Page 22 ⑦ ⑧ ⑨ - 7 -...
-
Page 23: Exploded View
EXPLODED VIEW Uwaga: lokalizacja głównych komponentów tych trzech maszyn jest taka sama! NIE. Nazwa ILOŚ NIE. Nazwa ILOŚ Ć Ć Stała belka szklana Przednia podstawka przednia szklana (prawa) Szklane drzwi Śruby M4x8 wejściowe Zakrzywione szkło Śruby M5x14 Szkło boczne Śruby M6x14 Półki Nakrętka M5 Za szklanym stojakiem... -
Page 24: Assembly Drawing
Za szklanym stojakiem Nylonowy rękaw (po prawej) Uwaga: ilość części podana w instrukcji oznacza faktyczne zużycie, a części nieużywane stanowią części zamienne. ASSEMBLY DRAWING Uwaga: lokalizacja głównych komponentów tych trzech maszyn jest taka sama! Step1 1. First use screws (J) to fix the (F-G-H-I) accessories to the rack in sequence. - Page 25 Step2 2.1 Use screws (L) to fix the left and right accessories (P) to the reserved fixing holes in the glass in sequence. 2.2 First put the left and right glass into the glass fasteners in sequence, and then tighten the four fixing screws.
- Page 26 4 Use fasteners (K; N; M) to fix accessories (A) to the reserved openings in the glass in order and tighten them. Step5 5 Place the accessory (E) onto the installed accessory (P) from top to bottom. - 11 -...
- Page 27 Step6 6 Use screws (O) to secure accessory (B) to the installed glass front fixed beam; complete installation. OPERATING INSTRUCTIONS Przed pierwszym użyciem urządzenia należy odkleić wszelkie elementy promocyjne materiałów i materiałów opakowaniowych oraz sprawdzić, czy produkt jest czysty i wolny od kurzu. W razie potrzeby przetrzyj je wilgotną szmatką. Rozłóż...
- Page 28 panelu, kontrolka ogrzewania świeci się, a rolki zaczynają się nagrzewać. Gdy temperatura osiągnie ustawioną wartość, obróć pokrętło w kierunku zgodnym z ruchem wskazówek zegara do około 302°F (150°C). W tym momencie kontrolka nagrzewania zgaśnie, co oznacza, że osiągnął on ustawioną temperaturę. 5.
-
Page 29: Cleaning And Maintenance
CLEANING AND MAINTENANCE 1. Po zakończeniu pieczenia wyjmij wtyczkę z gniazdka elektrycznego. Przed czyszczeniem pozostaw maszynę do całkowitego ostygnięcia. 2. Wałki należy czyścić co 4-5 godzin grillowania. 3. Zewnętrzną część wytrzeć miękką, suchą szmatką. Nigdy nie używaj ściernych środków czyszczących ani szorstkich podkładek. 3. Wszelkie inne czynności serwisowe powinny być... - Page 30 Producent: Shanghaimuxinmuyeyouxiangongsi Adres: Shuangchenglu 803nong11hao1602A-1609shi, baoshanqu, szanghaj 200000 CN. Import do AUS: SIHAO PTY LTD. 1 ROKEVA STREETEASTWOOD NSW 2122 Australia Import do USA: Sanven Technology Ltd. Suite 250, 9166 Anaheim Place, Rancho Cucamonga, CA 91730 YH CONSULTING LIMITED. C/O YH Consulting Limited Office 147, Centurion House, London Road, Staines-upon-Thames, Surrey, TW18 4AX E-CrossStu GmbH...
- Page 31 Techniczny Certyfikat wsparcia i e-gwarancji www.vevor.com/support...
- Page 32 Technisch Support und E-Garantie-Zertifikat www.vevor.com/support ROLLENDER HOT-DOG-GRILL MODELL: SC-5XD / SC-7XD / SC-11XD Wir sind weiterhin bestrebt, Ihnen Werkzeuge zu wettbewerbsfähigen Preisen anzubieten. "Sparen Sie die Hälfte", "Halber Preis" oder andere ähnliche Ausdrücke, die wir nur verwenden stellt eine Schätzung der Einsparungen dar, die Sie durch den Kauf bestimmter Werkzeuge erzielen können...
- Page 33 Support? Dann kontaktieren Sie uns gerne: Technischer Support und E-Garantie-Zertifikat www.vevor.com/support Dies ist die Originalanleitung. Bitte lesen Sie alle Anweisungen sorgfältig durch, bevor Sie das Gerät in Betrieb nehmen. VEVOR behält sich eine klare Auslegung unserer Bedienungsanleitung vor. Das Erscheinungsbild - 1 -...
- Page 34 des Produkts richtet sich nach dem Produkt, das Sie erhalten haben. Bitte verzeihen Sie uns, dass wir Sie nicht erneut informieren, wenn es Technologie- oder Software-Updates für unser Produkt gibt . Warnung: Um das Verletzungsrisiko zu verringern, muss der Benutzer die Bedienungsanleitung sorgfältig lesen. Nur Innen benutzen.
-
Page 35: Safety Warnings And Precautions
WARMER HINWEIS: Eine weiße Schutzfolie ist auf der Oberfläche angebracht der Rumpf, um den Rumpf vor Kratzern zu schützen. Bitte reißen Sie es vor der Verwendung ab. SAFETY WARNINGS AND PRECAUTIONS Vielen Dank, dass Sie dieses Produkt verwenden . Um sicherzustellen, dass Sie das Gerät richtig bedienen können, lesen Sie diese Anleitung vor der Inbetriebnahme sorgfältig durch und bewahren Sie sie für spätere Verwendung auf . - Page 36 7. Kühlen Sie die heißen Teile vor dem Betrieb und der Reinigung ab . 8. Betreiben Sie das Gerät nicht mit beschädigtem Kabel oder Stecker, Fehlfunktionen oder mechanischen Schäden. Senden Sie es zur Überprüfung und Reparatur an Ihr nächstgelegenes autorisiertes Servicecenter (NUR Techniker sollten das Gerät öffnen).
-
Page 37: Product Parameters
PRODUCT PARAMETERS Stromspann Leistun Sicher MODELL Region Steckertyp Nordame Wechselstrom EinAmerikaner 750 W rika 110 V , 6,0 Hz STECKER SC-5XD 10 A Wechselstro Europäisch Europa m 220–240 V, 1000 W STECKER 50 Hz Nordame Wechselstrom EinAmerikaner 1050 W rika... - Page 38 Nordame Wechselstrom EinAmerikaner 1650 W rika 110 V , 6,0 Hz STECKER SC- 11 XD Wechselstro Europäisch Europa m 220–240 V, 2200 W STECKER 50 Hz Aufmerksamkeit : 1. Die für dieses Gerät verwendete Spannung muss mit der Versorgungsspannung übereinstimmen. 2.
-
Page 39: Product Components
PRODUCT COMPONENTS Hinweis: Die Position der Kernkomponenten dieser drei Maschinen ist gleich! 1. Power Switch 2.Temperature Knob (Front) 3. Heat Light (Front) 4.Temperature Knob (Back) 5. Heat Light (Back) 6. Pan 7. Fuse 8. Protective Earthing 9. Power Socket ① ②... -
Page 40: Exploded View
EXPLODED VIEW Hinweis: Die Position der Kernkomponenten dieser drei Maschinen ist gleich! Name Name Fester Balken vorne Glasständer vorne aus Glas (rechts) Glasfronttür Schrauben M4x8 Gebogenes Glas Schrauben M5x14 Seitenscheibe Schrauben M6x14 Regale Mutter M5 Hinter dem Glasständer Glimmerdichtung (links) Ö... -
Page 41: Assembly Drawing
(rechts) Hinweis: Die in der Anleitung angegebene Teilemenge entspricht der tatsächlichen Nutzung und die nicht verwendeten Teile sind Ersatzteile. ASSEMBLY DRAWING Hinweis: Die Position der Kernkomponenten dieser drei Maschinen ist gleich! Step1 1. First use screws (J) to fix the (F-G-H-I) accessories to the rack in sequence. - Page 42 Step2 2.1 Use screws (L) to fix the left and right accessories (P) to the reserved fixing holes in the glass in sequence. 2.2 First put the left and right glass into the glass fasteners in sequence, and then tighten the four fixing screws.
- Page 43 4 Use fasteners (K; N; M) to fix accessories (A) to the reserved openings in the glass in order and tighten them. Step5 5 Place the accessory (E) onto the installed accessory (P) from top to bottom. - 11 -...
- Page 44 Step6 6 Use screws (O) to secure accessory (B) to the installed glass front fixed beam; complete installation. OPERATING INSTRUCTIONS Vor der ersten Inbetriebnahme des Gerätes alle Werbeaufkleber abziehen Materialien und Verpackungsmaterial und prüfen Sie, ob das Produkt sauber und staubfrei ist.
- Page 45 Bedienfeld, die Heizanzeige leuchtet und die Walzen beginnen zu heizen. Wenn die Temperatur den eingestellten Wert erreicht hat, drehen Sie den Knopf im Uhrzeigersinn auf etwa 150 °C (302 °F). Zu diesem Zeitpunkt erlischt die Heizanzeige, was bedeutet, dass die eingestellte Temperatur erreicht ist. 5.
-
Page 46: Cleaning And Maintenance
CLEANING AND MAINTENANCE 1. Wenn Sie mit dem Backen fertig sind, ziehen Sie den Stecker aus der Steckdose. Lassen Sie die Maschine vor der Reinigung vollständig abkühlen. 2. Die Walzen sollten nach jeweils 4-5 Grillstunden gereinigt werden. 3. Wischen Sie die Außenseite mit einem weichen, trockenen Tuch ab. Verwenden Sie niemals Scheuermittel oder raue Pads. - Page 47 Hersteller: Shanghaimuxinmuyeyouxiangongsi Adresse: Shuangchenglu 803nong11hao1602A-1609shi, baoshanqu, Shanghai 200000 CN. Nach AUS importiert: SIHAO PTY LTD. 1 ROKEVA STREETEASTWOOD NSW 2122 Australien Importiert in die USA: Sanven Technology Ltd. Suite 250, 9166 Anaheim Place, Rancho Cucamonga, CA 91730 YH CONSULTING LIMITED. C/O YH Consulting Limited Office 147, Centurion House, London Road, Staines-upon-Thames, Surrey, TW18 4AX...
- Page 48 Technisch Support und E-Garantie-Zertifikat www.vevor.com/support...
- Page 49 Technique Assistance et certificat de garantie électronique www.vevor.com/support GRILL À HOT-DOG ROULANT MODÈLE : SC-5XD/SC-7XD/SC-11XD Nous continuons à nous engager à vous fournir des outils à des prix compétitifs. "Économisez la moitié", "Moitié prix" ou toute autre expression similaire utilisée uniquement par nous représente une estimation des économies dont vous pourriez bénéficier en achetant...
- Page 50 Assistance technique et certificat de garantie électronique www.vevor.com/support Il s'agit des instructions originales, veuillez lire attentivement toutes les instructions du manuel avant de l'utiliser. VEVOR se réserve une interprétation claire de notre manuel d'utilisation. L'apparence du produit - 1 -...
- Page 51 dépend du produit que vous avez reçu. Veuillez nous pardonner que nous ne vous informerons plus s'il y a des mises à jour technologiques ou logicielles sur notre produit. Avertissement : Pour réduire le risque de blessure, l'utilisateur doit lire attentivement le manuel d'instructions. Utilisation en intérieur uniquement.
-
Page 52: Safety Warnings And Precautions
INDICATION CHALEUREUSE: Un film protecteur blanc est fixé à la surface de Le fuselage pour protéger le fuselage des rayures. Veuillez le déchirer avant utilisation. SAFETY WARNINGS AND PRECAUTIONS Merci d'avoir utilisé ce produit . Afin de vous assurer que vous pouvez utiliser la machine correctement, lisez attentivement ces instructions avant de l'utiliser et conservez-les correctement pour référence future . - Page 53 doivent ouvrir l'appareil). 9. L'utilisation d'accessoires ou d'accessoires non fournis ou recommandés par le fabricant peut provoquer des blessures. dix. Si la machine ne doit pas être utilisée pendant une longue période, débranchez-la, nettoyez-la, couvrez-la et rangez-la dans un endroit sec et sûr. 11.
-
Page 54: Product Parameters
PRODUCT PARAMETERS Type de Fusibl MODÈLE Région Tension Pouvoir connecteur Amérique CA110 V 6 0 Américain 750W du Nord PRISE SC-5XD L'Europe AC220-240V européen 1000W 50Hz PRISE Amérique CA110 V 6 0 Américain 1050W du Nord PRISE SC-7XD L'Europe AC220-240V européen... -
Page 55: Product Components
3. Si la machine n'est pas alimentée, retirez la fiche de la prise électrique et vérifiez si le fusible est grillé. 4. Il est recommandé que les produits utilisent des lignes et des prises séparées pour éviter une surcharge du disjoncteur ou du fusible temporisé. INDICATION CHALEUREUSE: Un film protecteur blanc est fixé... -
Page 56: Exploded View
⑦ ⑧ ⑨ EXPLODED VIEW Remarque : L'emplacement des composants principaux de ces trois machines est le même ! - 7 -... - Page 57 QTÉ QTÉ Poutre fixe à façade en Support en verre avant verre (droite) Porte d'entrée en verre Vis M4x8 Verre courbé Vis M5x14 Verre latéral Vis M6x14 Étagères Écrou M5 Derrière le support en Joint en mica verre (à gauche) Ô...
-
Page 58: Assembly Drawing
ASSEMBLY DRAWING Remarque : L'emplacement des composants principaux de ces trois machines est le même ! Step1 1. First use screws (J) to fix the (F-G-H-I) accessories to the rack in sequence. Remarque : Ne serrez pas encore complètement les vis. Step2 2.1 Use screws (L) to fix the left and right accessories (P) to the reserved fixing holes in... - Page 59 3.1 Place the accessory (C) into the slot of the glass fixture. Step3 Step4 4 Use fasteners (K; N; M) to fix accessories (A) to the reserved openings in the glass in order and tighten them. - 10 -...
- Page 60 Step5 5 Place the accessory (E) onto the installed accessory (P) from top to bottom. Step6 6 Use screws (O) to secure accessory (B) to the installed glass front fixed beam; complete installation. - 11 -...
- Page 61 OPERATING INSTRUCTIONS Avant d'utiliser l'appareil pour la première fois, décollez toute étiquette promotionnelle matériaux et matériaux d'emballage, et vérifiez que le produit est propre et exempt de poussière. Si nécessaire, essuyez-les avec un chiffon humide. Étalez-la avec un torchon absorbant et essuyez tout excès d’huile. Lorsque votre appareil est chauffé...
-
Page 62: Cleaning And Maintenance
appropriée entre 248°F et 320°F (120-160°C). 4. Lors du chauffage, vos mains ne sont pas autorisées à toucher le rouleau en acier pour éviter les brûlures. 5.Lorsque vous connectez ou débranchez la fiche, elle doit être déconnectée de l'alimentation externe totale. 6. - Page 63 l'enfiler. 3. Appliquez de l'huile végétale sur la surface du produit pour éviter la rouille. Fabricant : Shanghaimuxinmuyeyouxiangongsi Adresse : Shuangchenglu 803nong11hao1602A-1609shi, baoshanqu, Shanghai 200000 CN. Importé en Australie : SIHAO PTY LTD. 1 ROKEVA STREETASTWOOD NSW 2122 Australie Importé aux États-Unis : Sanven Technology Ltd. Suite 250, 9166 Anaheim Place, Rancho Cucamonga, CA 91730 YH CONSULTING LIMITED.
- Page 64 Technique Assistance et certificat de garantie électronique www.vevor.com/support...
- Page 65 Technisch Ondersteuning en e-garantiecertificaat www.vevor.com/support ROLLENDE HOTDOGGRILL MODELLEN: SC-5XD / SC-7XD / SC-11XD Wij blijven ons inzetten om u gereedschap te bieden tegen een concurrerende prijs. "Bespaar de helft", "Halve prijs" of andere soortgelijke uitdrukkingen die alleen door ons worden gebruikt...
- Page 66 Technische ondersteuning en e-garantiecertificaat www.vevor.com/support Dit is de originele instructie. Lees alle instructies in de handleiding zorgvuldig door voordat u ermee aan de slag gaat. VEVOR behoudt zich een duidelijke interpretatie van onze gebruikershandleiding voor. Het - 1 -...
- Page 67 uiterlijk van het product is afhankelijk van het product dat u heeft ontvangen. Vergeef ons alstublieft dat we u niet opnieuw zullen informeren als er technologie- of software-updates zijn voor ons product. Waarschuwing-Om het risico op letsel te verminderen, moet de gebruiker de handleiding zorgvuldig lezen.
-
Page 68: Safety Warnings And Precautions
WARME PROMPT: Op het oppervlak is een witte beschermfolie aangebracht de romp om de romp tegen krassen te beschermen. Scheur deze voor gebruik af. SAFETY WARNINGS AND PRECAUTIONS Bedankt voor het gebruik van dit product . Om er zeker van te zijn dat u de machine correct kunt bedienen, dient u deze instructie vóór gebruik zorgvuldig door te lezen en goed te bewaren voor toekomstig gebruik . - Page 69 erkende servicecentrum voor onderzoek en reparatie (ALLEEN technici mogen het apparaat openen). 9. Het gebruik van accessoires of hulpstukken die niet door de fabrikant zijn geleverd of aanbevolen, kan letsel veroorzaken. 10. Als de machine langere tijd niet wordt gebruikt, haal dan de stekker uit het stopcontact, maak hem schoon, dek hem af en bewaar hem op een droge en veilige plaats.
-
Page 70: Product Parameters
Samen MODEL Regio Spanning Stroom Stekkertype smelte Noord Wisselstroom Een mericaan 750W Amerika 110 V 6 0 Hz PLUG SC-5XD 10 A AC220-240V Europees Europa 1000W 50Hz PLUG Noord Wisselstroom Een mericaan 1050W Amerika 110 V 6 0 Hz PLUG... -
Page 71: Product Components
2. Gebruikers moeten het in de buurt van de aan / uit-schakelaar en zekering installeren. 3. Als de machine geen stroom heeft, haal dan de stekker uit het stopcontact en controleer of de zekering is doorgebrand. 4. Het wordt aanbevolen dat producten afzonderlijke leidingen en stopcontacten gebruiken om overbelasting van de stroomonderbreker of de tijdvertragingszekering te voorkomen. -
Page 72: Exploded View
⑦ ⑧ ⑨ EXPLODED VIEW Let op: De locatie van de kerncomponenten van deze drie machines is hetzelfde! - 7 -... - Page 73 Naam Naam Vaste balk Glasstandaard voorzijde van glas voorzijde (rechts) Glazen voordeur Schroeven M4x8 Gebogen glas Schroeven M5x14 Zijglas Schroeven M6x14 Planken Moer M5 Achter glazen Mica-pakking standaard (links) Glasstandaard Schroeven M4x12 voorzijde (links) Achter glazen Nylon mouw standaard (rechts) Let op: het aantal onderdelen dat in de handleiding wordt weergegeven, is daadwerkelijke gebruik...
-
Page 74: Assembly Drawing
ASSEMBLY DRAWING Let op: De locatie van de kerncomponenten van deze drie machines is hetzelfde! Step1 1. First use screws (J) to fix the (F-G-H-I) accessories to the rack in sequence. Let op: Draai de schroeven nog niet helemaal vast. Step2 2.1 Use screws (L) to fix the left and right accessories (P) to the reserved fixing holes in... - Page 75 3.1 Place the accessory (C) into the slot of the glass fixture. Step3 Step4 4 Use fasteners (K; N; M) to fix accessories (A) to the reserved openings in the glass in order and tighten them. - 10 -...
- Page 76 Step5 5 Place the accessory (E) onto the installed accessory (P) from top to bottom. Step6 6 Use screws (O) to secure accessory (B) to the installed glass front fixed beam; complete installation. - 11 -...
- Page 77 OPERATING INSTRUCTIONS Voordat u het apparaat voor de eerste keer gebruikt, dient u al het reclamemateriaal te verwijderen materialen en verpakkingsmaterialen, en controleer of het product schoon en stofvrij is. Veeg ze indien nodig af met een vochtige doek. Verspreid met een absorberende keukendoek en veeg overtollige olie weg.
-
Page 78: Cleaning And Maintenance
voor 120-160°C (248°F-320°F). 4. Bij het verwarmen mogen uw handen de stalen rol niet aanraken om verbranding te voorkomen. 5. Wanneer u de stekker aansluit of loskoppelt, moet deze worden losgekoppeld van de totale externe voeding. 6. Houd uw handen droog wanneer u het snoer aansluit. - Page 79 voorkomen. Fabrikant: Shanghaimuxinmuyeyouxiangongsi Adres: Shuangchenglu 803nong11hao1602A-1609shi, baoshanqu, shanghai 200000 CN. Geïmporteerd naar AUS: SIHAO PTY LTD. 1 ROKEVA STREETEASTWOOD NSW 2122 Australië Geïmporteerd naar de VS: Sanven Technology Ltd. Suite 250, 9166 Anaheim Place, Rancho Cucamonga, CA 91730 YH CONSULTING LIMITED. C/O YH Consulting Limited Office 147, Centurion House, London Road, Staines-upon-Thames, Surrey, TW18 4AX...
- Page 80 Technisch Ondersteuning en e-garantiecertificaat www.vevor.com/support...
- Page 81 Teknisk Support och e-garanticertifikat www.vevor.com/support RULLANDE HOT-DOG GRILL MODELL: SC-5XD / SC-7XD / SC-11XD Vi fortsätter att vara engagerade i att ge dig verktyg till konkurrenskraftiga priser. "Spara hälften", "Halva priset" eller andra liknande uttryck som endast används av oss representerar en uppskattning av besparingar du kan dra nytta av att köpa vissa verktyg...
- Page 82 Teknisk support och e-garanticertifikat www.vevor.com/support Detta är den ursprungliga instruktionen, läs alla instruktioner noggrant innan du använder den. VEVOR reserverar sig för en tydlig tolkning av vår användarmanual. Utseendet på produkten är beroende av den produkt du - 1 -...
- Page 83 fått. Ursäkta oss att vi inte kommer att informera dig igen om det finns någon teknik eller mjukvaruuppdateringar på vår produkt. Varning - För att minska risken för skada måste användaren läsa instruktionerna noggrant. Endast inomhusbruk. Var uppmärksam på höga temperaturer för att förhindra brännskador. KORREKT AVFALLSHANTERING Denna produkt omfattas av bestämmelserna i det europeiska direktivet 2012/19/EC.
-
Page 84: Safety Warnings And Precautions
VARMT PROMPT: En vit skyddsfilm är fäst på ytan av flygkroppen för att skydda flygkroppen från repor. Riv av den före användning. SAFETY WARNINGS AND PRECAUTIONS Tack för att du använder den här produkten . För att försäkra dig om att du kan använda maskinen korrekt, läs denna instruktion noggrant före användning och förvara den på... - Page 85 11. Låt inte nätsladden hänga över kanten på bordet eller bänken och låt den inte komma i kontakt med heta ytor. 12. Placera inte enheten på eller nära varmluft, elektriska brännare eller värmeelement. 13. Stäng alltid av strömmen till uttaget innan du ansluter eller koppla ur. Håll i kontakten istället för att dra i sladden.
-
Page 86: Product Parameters
PRODUCT PARAMETERS Säkrin MODELL Område Spänning Kraft Pluggtyp Nordame AC 110 V 6 En merikan 750W rika PLUGG SC-5XD AC220-240V europeiska Europa 1000W 50Hz PLUGG Nordame AC 110 V 6 En merikan 1050W rika PLUGG SC-7XD AC220-240V europeiska Europa 1400W... -
Page 87: Product Components
PRODUCT COMPONENTS Obs: Placeringen av kärnkomponenterna i dessa tre maskiner är densamma! 1. Power Switch 2.Temperature Knob (Front) 3. Heat Light (Front) 4.Temperature Knob (Back) 5. Heat Light (Back) 6. Pan 7. Fuse 8. Protective Earthing 9. Power Socket ① ②... -
Page 88: Exploded View
EXPLODED VIEW Obs: Placeringen av kärnkomponenterna i dessa tre maskiner är densamma! NEJ. namn NEJ. namn Fast balk i glas fram Glasstativ fram (höger) G lass ytterdörr Skruvar M4x8 C urvat glas Skruvar M5x14 S ide glas Skruvar M6x14 Hyllor Mutter M5 Bakom glasstativet... -
Page 89: Assembly Drawing
Obs: mängden delar som visas i manualen är den faktiska användningen och de oanvända delarna är reservdelar. ASSEMBLY DRAWING Obs: Placeringen av kärnkomponenterna i dessa tre maskiner är densamma! Step1 1. First use screws (J) to fix the (F-G-H-I) accessories to the rack in sequence. Obs: Dra inte åt skruvarna helt ännu. - Page 90 Step2 2.1 Use screws (L) to fix the left and right accessories (P) to the reserved fixing holes in the glass in sequence. 2.2 First put the left and right glass into the glass fasteners in sequence, and then tighten the four fixing screws.
- Page 91 4 Use fasteners (K; N; M) to fix accessories (A) to the reserved openings in the glass in order and tighten them. Step5 5 Place the accessory (E) onto the installed accessory (P) from top to bottom. - 10 -...
- Page 92 Step6 6 Use screws (O) to secure accessory (B) to the installed glass front fixed beam; complete installation. OPERATING INSTRUCTIONS Innan du använder apparaten för första gången, dra bort eventuella erbjudanden material och förpackningsmaterial, och kontrollera att produkten är ren och fri från damm.
-
Page 93: Cleaning And Maintenance
tidpunkt slocknar värmeindikatorn, vilket betyder att den har nått den inställda temperaturen. 5. Placera de förberedda korvarna parallellt i mitten av de två valsarna, då roterar korvarna in motsatta riktningar. Placera inte korvarna för nära varandra, lämna cirka 0,4 tum (10 mm) i slutet av varje rulle. - Page 94 2. Rullarna ska rengöras var 4-5 timmes grillning. 3. För utsidan, torka av med en mjuk, torr trasa. Använd aldrig ett slipande rengöringsmedel eller en hård pad. 3. All annan service ska utföras av en auktoriserad servicerepresentant. Varning: Använd inte vätska för att skölja produkten direkt för att undvika vattenskador på...
- Page 95 YH CONSULTING LIMITED. C/O YH Consulting Limited Office 147, Centurion House, London Road, Staines-upon-Thames, Surrey, TW18 4AX E-CrossStu GmbH Mainzer Landstr.69, 60329 Frankfurt am Main. - 14 -...
- Page 96 Teknisk Support och e-garanticertifikat www.vevor.com/support...
- Page 97 Técnico Soporte y certificado de garantía electrónica www.vevor.com/support PARRILLA RODANTE PARA PERRITOS CALIENTES MODELO: SC-5XD / SC-7XD / SC-11XD Seguimos comprometidos a proporcionarle herramientas a precios competitivos. "Ahorre a mitad de precio", "A mitad de precio" o cualquier otra expresión similar utilizada únicamente por nosotros...
- Page 98 Soporte técnico y certificado de garantía electrónica www.vevor.com/support Estas son las instrucciones originales; lea atentamente todas las instrucciones del manual antes de operar. VEVOR se reserva una interpretación clara de nuestro manual de usuario. La apariencia del - 1 -...
- Page 99 producto estará sujeta al producto que recibió. Perdone que no le informaremos nuevamente si hay actualizaciones de tecnología o software en nuestro producto. Advertencia: para reducir el riesgo de lesiones, el usuario debe leer atentamente el manual de instrucciones. Solamente para uso en interiores. Preste atención a las altas temperaturas para evitar quemaduras.
-
Page 100: Safety Warnings And Precautions
Aviso cálido: Una película protectora blanca está adherida a la superficie de El fuselaje para protegerlo de arañazos. Quítelo antes de usarlo. SAFETY WARNINGS AND PRECAUTIONS Gracias por usar este producto . Para asegurarse de que puede operar la máquina correctamente, lea atentamente estas instrucciones antes de utilizarla y consérvelas adecuadamente para consultarlas en el futuro . - Page 101 desenchúfela, límpiela, cúbrala y guárdela en un lugar seco y seguro. 11. No deje el cable de alimentación colgando sobre el borde de la mesa o mostrador ni permita que entre en contacto con superficies calientes. 12. No coloque la unidad sobre o cerca de aire caliente, quemadores eléctricos o calentadores.
-
Page 102: Product Parameters
PRODUCT PARAMETERS Tipo de Fusibl MODELO Región Voltaje Fuerza enchufe América CA110 V 6 0 Americano 750W del norte ENCHUFAR SC-5XD 10 A CA220-240 europeo Europa 1000W V 50 Hz. ENCHUFAR América CA110 V 6 0 Americano 1050W del norte ENCHUFAR... -
Page 103: Product Components
4. Se recomienda que los productos utilicen líneas y enchufes separados para evitar la sobrecarga del disyuntor o del fusible de retardo. Aviso cálido: Una película protectora blanca está adherida a la superficie de El fuselaje para protegerlo de arañazos. Quítelo antes de usarlo. PRODUCT COMPONENTS Nota: ¡... -
Page 104: Exploded View
⑦ ⑧ ⑨ EXPLODED VIEW Nota: ¡ La ubicación de los componentes principales de estas tres máquinas es la misma! - 7 -... - Page 105 Nombre Nombre TIDA TIDA Viga fija frontal Frente del soporte de cristal vidrio (derecha) Puerta de entrada de Tornillos M4x8 cristal Vidrio curvado Tornillos M5x14 Vidrio lateral Tornillos M6x14 Estantes Tuerca M5 norte Detrás del soporte de junta de mica cristal (izquierda) Frente del soporte de Tornillos M4x12...
-
Page 106: Assembly Drawing
Nota: la cantidad de piezas que se muestra en el manual es el uso real y las piezas no utilizadas son repuestos. ASSEMBLY DRAWING Nota: ¡ La ubicación de los componentes principales de estas tres máquinas es la misma! Step1 1. - Page 107 Step2 2.1 Use screws (L) to fix the left and right accessories (P) to the reserved fixing holes in the glass in sequence. 2.2 First put the left and right glass into the glass fasteners in sequence, and then tighten the four fixing screws.
- Page 108 4 Use fasteners (K; N; M) to fix accessories (A) to the reserved openings in the glass in order and tighten them. Step5 5 Place the accessory (E) onto the installed accessory (P) from top to bottom. - 11 -...
- Page 109 Step6 6 Use screws (O) to secure accessory (B) to the installed glass front fixed beam; complete installation. OPERATING INSTRUCTIONS Antes de utilizar el aparato por primera vez, retire cualquier material promocional. materiales y materiales de embalaje, y comprobar que el producto esté limpio y libre de polvo.
- Page 110 panel, la luz indicadora de calentamiento se enciende y los rodillos comienzan a calentarse. Cuando la temperatura alcance el valor establecido, gire la perilla en el sentido de las agujas del reloj hasta aproximadamente 302 °F (150 °C). En este momento, la luz indicadora de calefacción se apagará, lo que significa que ha alcanzado la temperatura establecida.
-
Page 111: Cleaning And Maintenance
CLEANING AND MAINTENANCE 1. Una vez que haya terminado de hornear, retire el enchufe del tomacorriente. Deje que la máquina se enfríe completamente antes de limpiarla. 2. Los rodillos deben limpiarse cada 4-5 horas de asado. 3. Para el exterior, limpie con un paño suave y seco. Nunca utilice un limpiador abrasivo o una almohadilla áspera. - Page 112 YH CONSULTING LIMITED. C/O YH Consulting Limited Office 147, Centurion House, London Road, Staines-upon-Thames, Surrey, TW18 4AX E-CrossStu GmbH Mainzer Landstr.69, 60329 Frankfurt am Main. - 15 -...
- Page 113 Técnico Certificado de soporte y garantía electrónica www.vevor.com/support...
- Page 114 Tecnico Supporto e certificato di garanzia elettronica www.vevor.com/support GRIGLIA PER HOT DOG ROTOLANTE MODELLO: SC-5XD / SC-7XD / SC-11XD Continuiamo a impegnarci per fornirvi strumenti a prezzi competitivi. "Risparmia la metà", "Metà prezzo" o qualsiasi altra espressione simile utilizzata solo da noi rappresenta una stima del risparmio che potresti trarre dall'acquisto di determinati strumenti con noi rispetto ai principali marchi più...
- Page 115 Supporto tecnico e certificato di garanzia elettronica www.vevor.com/support Queste sono le istruzioni originali, leggere attentamente tutte le istruzioni del manuale prima dell'uso. VEVOR si riserva una chiara interpretazione del nostro manuale d'uso. L'aspetto del prodotto sarà soggetto al prodotto - 1 -...
- Page 116 ricevuto. Ti preghiamo di perdonarci se non ti informeremo più se sono presenti aggiornamenti tecnologici o software sul nostro prodotto. Avvertenza: per ridurre il rischio di lesioni, l'utente deve leggere attentamente il manuale di istruzioni. Solo per uso interno. Fare attenzione alle alte temperature per evitare ustioni. CORRETTO SMALTIMENTO Questo prodotto è...
- Page 117 RICHIESTA CALDA: Sulla superficie è fissata una pellicola protettiva bianca la fusoliera per proteggere la fusoliera dai graffi. Si prega di strapparla prima dell'uso. SAFETY WARNINGS AND PRECAUTIONS Grazie per aver utilizzato questo prodotto . Per essere sicuri di poter utilizzare correttamente la macchina, leggere attentamente queste istruzioni prima dell'uso e conservarle adeguatamente per riferimento futuro .
- Page 118 causare lesioni. 10. Se si prevede di non utilizzare la macchina per un lungo periodo, scollegarla, pulirla, coprirla e conservarla in un luogo asciutto e sicuro. 11. Non lasciare il cavo di alimentazione sospeso oltre il bordo del tavolo o del bancone e non lasciarlo entrare in contatto con superfici calde.
- Page 119 PRODUCT PARAMETERS MODELL Fusibil Regione Voltaggio Energia Tipo di spina Nord CA110 V 6 0 Un americano 750W America TAPPO SC-5XD CA220-240 europeo Europa 1000W V 50 Hz TAPPO Nord CA110 V 6 0 Un americano 1050 W America TAPPO...
- Page 120 Attenzione : 1. La tensione utilizzata per questo dispositivo deve essere uguale alla tensione di alimentazione. 2. Gli utenti devono installarlo vicino all'interruttore di alimentazione e al fusibile. 3. Se la macchina non è alimentata, staccare la spina dalla presa elettrica e verificare se il fusibile è...
- Page 121 ① ② ⑤ ⑥ ③ ④ ⑦ ⑧ ⑨ EXPLODED VIEW Nota: la posizione dei componenti principali di queste tre macchine è la stessa! - 7 -...
- Page 122 Nome Nome NTIT NTIT À À Trave fissa frontale in Supporto vetro vetro anteriore (destra) Porta d'ingresso Viti M4x8 vetro Vetro curvo Viti M5x14 Vetro laterale Viti M6x14 Scaffali Dado M5 Dietro il supporto in Guarnizione in mica vetro (a sinistra) Supporto vetro Viti M4x12...
- Page 123 effettivo e le parti non utilizzate sono pezzi di ricambio. ASSEMBLY DRAWING Nota: la posizione dei componenti principali di queste tre macchine è la stessa! Step1 1. First use screws (J) to fix the (F-G-H-I) accessories to the rack in sequence. Nota: non serrare ancora completamente le viti.
- Page 124 Step2 2.1 Use screws (L) to fix the left and right accessories (P) to the reserved fixing holes in the glass in sequence. 2.2 First put the left and right glass into the glass fasteners in sequence, and then tighten the four fixing screws.
- Page 125 4 Use fasteners (K; N; M) to fix accessories (A) to the reserved openings in the glass in order and tighten them. Step5 5 Place the accessory (E) onto the installed accessory (P) from top to bottom. - 11 -...
- Page 126 Step6 6 Use screws (O) to secure accessory (B) to the installed glass front fixed beam; complete installation. OPERATING INSTRUCTIONS Prima di utilizzare l'apparecchio per la prima volta, rimuovere eventuali promozioni materiali e materiali di imballaggio e verificare che il prodotto sia pulito e privo di polvere.
- Page 127 pannello, la spia di riscaldamento si accende e i rulli iniziano a riscaldarsi. Quando la temperatura raggiunge il valore impostato, ruotare la manopola in senso orario fino a circa 302°F (150°C). A questo punto, la spia del riscaldamento si spegnerà, il che significa che ha raggiunto la temperatura impostata.
- Page 128 CLEANING AND MAINTENANCE 1. Una volta terminata la cottura, staccare la spina dalla presa elettrica. Lasciare raffreddare completamente la macchina prima di pulirla. 2. I rulli devono essere puliti ogni 4-5 ore di grigliatura. 3. Per l'esterno, pulire con un panno morbido e asciutto. Non utilizzare mai un detergente abrasivo o una spugnetta dura.
- Page 129 YH CONSULTING LIMITED. C/O YH Consulting Limited Office 147, Centurion House, London Road, Staines-upon-Thames, Surrey, TW18 4AX E-CrossStu GmbH Mainzer Landstr.69, 60329 Frankfurt am Main. - 15 -...
- Page 130 Tecnico Supporto e certificato di garanzia elettronica www.vevor.com/support...
Need help?
Do you have a question about the SC-5XD and is the answer not in the manual?
Questions and answers