Table of Contents
Advertisement
Quick Links
Advertisement
Table of Contents

Subscribe to Our Youtube Channel
Related Manuals for STATESMAN SKAO15017BK


Summary of Contents for STATESMAN SKAO15017BK
- Page 1 SKAO15017BK 15 LITRE 13-IN-1 DIGITAL AIR FRYER OVEN Instruction Manual Please read these instructions carefully before use and retain for future reference. Before switching on your appliance – Always check for any damage that may have been caused in transit.
-
Page 2: Table Of Contents
CONTENTS Important Safety Instructions ........ 3-6 Air Frying Tips ............7-8 Product Overview ..........9-11 Operating Instructions ........12-21 Cleaning & Maintenance ........22-23 Troubleshooting Guide ........24-25 Mains Plug Fuse Replacement .........26 Disposal Information ..........26 Statesman Warranty/Guarantee Information ..27... -
Page 3: Important Safety Instructions
SAFETY INSTRUCTIONS Please read the safety instructions and the user manual carefully before using the appliance for the first time. Note the warnings on the appliance and in the user manual. Always keep the user manual close to hand. If you sell the appliance or give it away, please ensure that you also pass on this user manual. - Page 4 • Unplug the appliance from the socket if you are no longer using the appliance or if being left unattended. If the product, power supply cord or plug shows any signs of damage or has been dropped, stop using it immediately and unplug from power socket. Contact a qualified technical engineer or service agent for advice. • Always unplug the appliance from the power socket before cleaning or servicing and before fitting or removing accessories. • Always hold the plug to remove it, and never pull the power cord. • Do not let the appliance come into contact with or immerse in water or other liquids. Keep the appliance, the mains cable and the mains plug away from wash basins, sinks and similar areas. Never expose it to water drops or water spray.
- Page 5 • To avoid risk of injury, never reach into the inside of the appliance before it has thoroughly cooled. Do not use any metal objects inside the appliance, even aluminium foil, other than the rotating basket, rotisserie spit, grill rack and drip tray. Doing so may result in overheating. • Allow the appliance and accessories to cool down completely before replacing or removing the accessories. • Do not allow food to come into contact with the inner walls of the appliance. • Do not operate the appliance with an external timer switch or externally controlled system (e.g., a remote-controlled power socket).
- Page 6 WARNING: Risk of injury to children and persons with limited physical, sensory or mental abilities (for example, partially disabled people or older people with limited physical and mental abilities) or to those without experience and knowledge (such as children). WARNING: Packaging materials can be swallowed or used improperly, posing a risk of choking and suffocation.
-
Page 7: Air Frying Tips
AIR FRYING TIPS • Please check on the cooking of your food as our air fryer oven cooking technology will cook food quicker than that of convectional ovens. • Pat the food dry before cooking to encourage browning and to avoid excess smoke. To ensure even cooking/browning, always open the air fryer oven halfway through the cook time and check, turning foods if required. Some recipes call to brush or spray oil halfway through cooking. - Page 8 Refer to the table below for the recommended settings. The times given are for guidance only. They may vary depending on the amount, the food itself or your own preferences and taste. Food Quantity Cooking Time Cooking Temperature Thin-cut frozen chips 300–500 g 15–16 min. 200°C Thick-cut frozen chips 300–500 g 15–20 min. 200°C Home-made chips 300–500 g 10–16 min.
-
Page 9: Product Overview
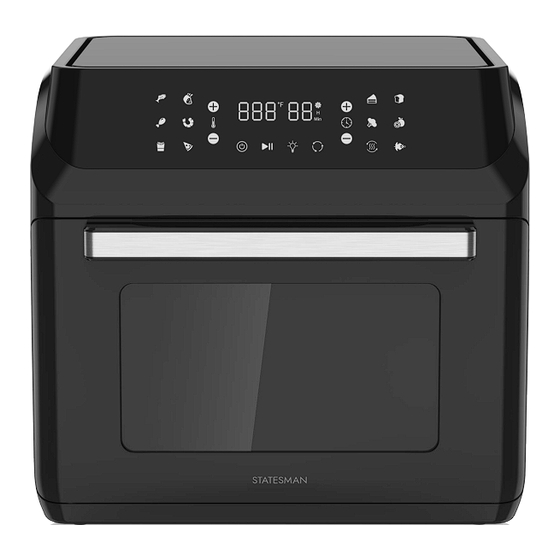
PRODUCT OVERVIEW Air Fryer Oven Air Inlet Air Outlet Touchscreen Control Metal Notch Rotisserie Bar Notch Door with Extra Large Viewing Window Door Handle Accessories Drip tray Rotating basket Removable handle 2 x grill racks 8pc skewer set Rotisserie fork and spit... - Page 10 Touch Control Panel Name Detail Function Display Displays time/temperature Increase/decrease cooking time Power on/off Rotation function (for Rotating basket/ 8pc skewer set/ Rotisserie fork and spit) Start / Pause Light on/off Increase/decrease temperature * light button and rotation button may not stay lit whilst oven is operating. Press the area where they are indicated, and they will illuminate.
- Page 11 2. Automatic Cooking Programmes Grill - Fish option see table on page 18 Roast - Chicken Leg option see table on page 18 Air Fry - Fries option see table on page 18 Grill - Steak/Chops option see table on page 18 Air Fry - Prawns/Shrimp option see table on page 18 Bake - Pizza option see table on page 18 Bake - Cakes option see table on page 18...
-
Page 12: Operating Instructions
OPERATING INSTRUCTIONS • Remove all packaging and plastic wrap from the appliance. • Check to ensure that the appliance is in perfect condition and that all accessories are included. • Place the appliance on a level, dry and heat-resistance work surface at a comfortable working height. • Before you use the accessories for the first time, and every other time you use them, clean them all with warm water and mild washing up liquid. • Dry the accessories thoroughly. • Wipe the inside and outside of the appliance with a damp cloth. - Page 13 Instruction For Use WARNING: The accessories and touchable surfaces on the appliance are extremely hot when the appliance is in use. There is a risk of burns. • Do not touch the housing during use. • Always open the appliance by the door handle when it is in use. • Use the removable handle supplied to position the rotating basket and rotisserie spit in the air fryer or to remove it. In addition, use oven gloves or a cloth to protect yourself from burns.
- Page 14 Drip tray Food residue or drops of fat are collected in the drip tray, allowing the inside of the appliance to be cleaned easily. • Before each use, push the drip tray into the lowest guide rail to collect drips of oil, grease, or residue. Grill rack Use the grill rack for dehydrating, grilling, preparing crispy foods or cooking pizza. You can use two grill racks at the same time. • Prepare the food according to the recipe and place the food in the centre of the grill rack.
- Page 15 • Once the left end is securely in place, lower the right end onto the guide rail and slide into the indent on the guide rail. • To remove the Rotisserie Basket, hook each end with the removable handle and tilt the right end slightly upwards until clear of the bracket. Move the handle gently across to the right remove the left end clear from the coupler. • Using oven gloves or a cloth, twist the lid clockwise to release and remove. Make sure the basket is tilted upwards to ensure the contents does not spill out. Take care as the basket will be hot.
- Page 16 • Using the removable handle hook each end of the Rotisserie Basket and lift into the appliance. • Insert the left side into the fixed rotating shaft. • Once the left end is securely in place, lower the right end onto the guide rail and slide into the indent on the guide rail. • Ensure that the joint or chicken can rotate freely in the oven. • To remove, use the removable handle to hook and pick up each end of the Rotisserie Fork. Tilt slightly upwards to the right and lift free from the bracket. Move the handle gently to the right until the left end is clear from the coupler.
- Page 17 1. Connect the air fryer to a properly installed, earthed, and fused socket. The local mains voltage must match the voltage stated in the technical specifications for the appliance. All indicators on the control panel will flash once and a beep will sound. Then the ON/OFF BUTTON will light up. 2. Press the On/Off button to switch on the appliance. A beep sounds and all indicators on the control panel light up.
- Page 18 Pre Set Cooking Programmes Symbol Function Temperature Cooking Time Air Fry - Fries 200°C 22min Grill - Steak/Chops 180°C 25min Grill - Fish 160°C 15min Air Fry - Prawns/Shrimp 160°C 12min Bake - Pizza 180°C 15min Roast - Chicken Leg 200°C 40min Bake - Cakes...
- Page 19 • Tap on the required symbol to select the automatic cooking programme. • The corresponding symbol will then flash. The LCD display shows the cooking temperature in ‘°C’ and the cooking time in minutes. The cooking time is counted down in minutes. • Once you have selected the cooking program, press the Start/Pause button start. The icon chosen will stay lit. • The LCD display will show ‘Pre’ and 1 beep will sound. The appliance will then begin heating up to temperature. Once reached It will beep 5 times and then switch to the cooking program selected.
- Page 20 • Once the cooking time has elapsed, 3 beeps will sound, ‘OFF’ will flash on the LCD display and the fan will continue for 20 seconds. There will be 1 final beep before the appliance automatically switches off. • Open the appliance door using the handle. • Remove the foods using oven gloves or remove the Rotating Basket/Rotisserie Spit using the removable handle. • Switch off at the mains and remove the mains plug out of the mains socket. • Allow the appliance to cool down with the appliance door open and then clean it. Interrupting the cooking process • To interrupt the cooking process before it has completed, press the Start/Pause button...
- Page 21 Please note: You can use the handle to open the appliance door during the cooking process, to check on the food. When the door is opened the cooking program will pause. When the door is closed it will resume at the same time and temperature. • To switch on the light during the cooking process, press the Switch Light On/Off button . It will switch off automatically after 2 minutes or press again to turn off. When the light is on the button will be displayed on the LCD Display. • Turn the food halfway through the cooking time to ensure the food is cooked evenly. Once the cooking time has elapsed, 3 beeps will sound, ‘OFF’ will flash on the LCD display and the fan will continue for 20 seconds. There will be 1 final beep...
-
Page 22: Cleaning & Maintenance
CLEANING & MAINTENANCE • Clean air fryer oven after every use. WARNING: There is a risk of electric shock due to live parts. • The appliance must not be immersed in water or other liquids, or held under running water, because this could cause an electric shock. • Unplug the mains plug from the socket before you start cleaning the appliance. • Ensure that no liquids or oils penetrate the appliance. - Page 23 To do this the central screw at the base of each guide rail needs to be removed. Then tilt the guide rail frame slightly outwards and lift up over the top of the hooks at the top. • When the appliance has been cleaned and dried, replace the guide rail by slightly tilting the frame and hooking the top loops back over the hooks at the top. Lower into position and secure with the base screw.
-
Page 24: Troubleshooting Guide
TROUBLESHOOTING GUIDE If you are having problems with your appliance, please use our troubleshooting guide below. If you are unable to resolve the issue using this guide, please ring our Customer Service Department on 0844 848 5861. Please have the model code and purchase information available. Problem Possible Cause Possible Solution The appliance is not The appliance is not plugged in. Plug the mains plug into an working. earthed wall socket. The cooking time and cooking Set the cooking time and cooking temperature have not been set. - Page 25 Problem Possible Cause Possible Solution Fresh chips are fried The chips have not been Place the chips in cold water for unevenly or not crispy in sufficiently soaked. around 30 minutes to remove the air fryer. the starch. Dry the chips using kitchen paper before adding to the fryer pan.
-
Page 26: Mains Plug Fuse Replacement
Fuse Cover MAINS PLUG FUSE REPLACEMENT Fuse Replacement (Class I) This appliance must be earthed. Remove the fuse cover with a small flat head screw driver. Take out the fuse and replace with a new fuse of the same Amp. Replace the fuse cover and push back into place. DISPOSAL OF OLD ELECTRICAL APPLIANCES The European Directive 2002/96/EC on Waste Electrical and Electronic Equipment (WEEE), requires that old household electrical appliances must not be disposed of in normal unsorted municipal waste. -
Page 27: Statesman Warranty/Guarantee Information
STATESMAN WARRANTY/GUARANTEE TERMS & CONDITIONS THANK YOU FOR CHOOSING STATESMAN As a valued customer we would like to offer you a FREE 2-year warranty to cover your product against any electrical or mechanical defects. This means that in the unlikely event you develop a fault or problem with your product we will happily repair or replace the item free of charge. - Page 28 38 Bluestem Road, Ransomes Europark, Ipswich, IP3 9RR EU: Castle Electrical Factors Ltd., Dundalk, A91 KA9R, IR 0844 848 5861...
Need help?
Do you have a question about the SKAO15017BK and is the answer not in the manual?
Questions and answers