Table of Contents
Advertisement
Quick Links
Advertisement
Table of Contents

Related Manuals for Yolink YS8007-UC

Summary of Contents for Yolink YS8007-UC
- Page 1 Thermometer Hygrometer YS8007-UC Installation & User Guide Revision Apr. 28, 2024...
-
Page 2: Table Of Contents
Contents . Welcome! . Before You Begin . In the Box . Required Items . Get to Know Your Sensor . Power Up . Install the App . Add Your Sensor to the App . Installation . App Functions: Device Screen . -
Page 3: Welcome
Welcome Thank you for purchasing YoLink products! We appreciate you trusting YoLink for your smart home & automation needs. Your 100% satisfaction is our goal. If you experience any problems with your installation, with our products or if you have any questions that this manual does not answer, please contact us right away. -
Page 4: Before You Begin
Visit our Thermometer Hygrometer support page on our website, for the latest installation guides, additional resources, information and videos by visiting: https://www.yosmart.com/support/YS8007-UC Or by scanning the QR code: Download the most current version of the user guide by scanning the QR code:... - Page 5 Before You Begin, Continued Your Thermometer Hygrometer connects to the internet via a YoLink hub, and it does not connect directly to your WiFi or local network. In order for remote access to the device from the app, and for full functionality, a hub is required.
-
Page 6: In The Box
In the Box Two AA Batteries (Installed) Thermometer Hygrometer Quick Start Guide Required Items You may require these items: Medium Phillips Screwdriver Hammer Nail or Self Tapping Screws Double-sided Mounting Tape or Velco... -
Page 7: Get To Know Your Sensor
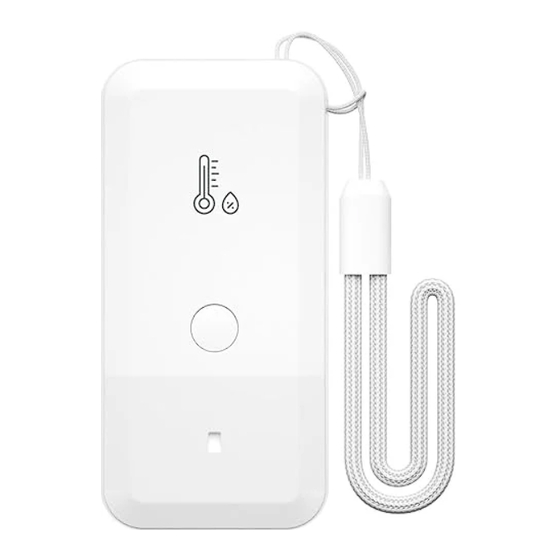
Get to Know Your Sensor SET button Hanging Rope LED Indicator Battery Compartment Cover LED Behaviors Blinking Red Once, then Blinking Red Once Green Once Device Alerts Device Start-Up Fast Blinking Green Blinking Red And Green Thermostat Pairing in Alternately Progress Restoring to Factory Defaults... -
Page 8: Power Up
Power Up Press the SET button briefly, long enough for the LED to illuminate, blinking red then green SET Button... -
Page 9: Install The App
Install the App If you are new to YoLink, please install the app on your phone or tablet, if you have not already. Otherwise, please proceed to the next section. Scan the appropriate QR code below or find the “YoLink app” on the appropriate app store. -
Page 10: Add Your Sensor To The App
Add Your Sensor to the App 1. Tap Add Device (if shown) or tap the scanner icon: Scanner icon 2. Approve access to your phone’s camera, if requested. A viewfinder will be shown on the app. 3. Hold the phone over the QR code so that the code appears in the viewfinder. - Page 11 Add Your Sensor to the App, Continued 4. You can change the device name and assign it to a room later. Tap Bind device. 5. If successful, the screen will appear as shown. Tap Done. Thermometer Hygrometer...
-
Page 12: Installation
Installation A popular use for this sensor is in fridges, freezers and other refrigerated environments. The sensor can be placed on a flat surface or it can be hung up. 3M brand “Command” hooks, as well as mounting tape and adhesive-backed Velcro have been used to secure our sensors to the interior walls or vertical surfaces within refrigerators and freezers. - Page 13 Installation, Continued Do not obstruct the openings on the sensors. Direct intense sunlight, rain and snow over an extended period can discolor or damage the device. Consider placing the sensor where it has overhead cover and/or protection from the elements. Place the sensor where it will be out of reach of children.
-
Page 14: App Functions: Device Screen
App Functions: Device Screen In the app, tap on your Thermometer Hygrometer icon. Your Thermometer Hygrometer main screen should be similar to the one shown below. Tap to exit this screen Device name Tap for contact & support resources Thermometer Hygrometer Tap for device Details screen Signal strength... -
Page 15: App Functions: Device Details Screen
Thermometer Hygrometer Details screen. Your Thermometer Hygrometer screen should be similar to the one shown below. Device Type Device Name (Tap to Edit) YS8007-UC Room (Tap to Edit) YS8007-UC Alert Tap to edit Alert Settings (see Alert Settings) - Page 16 Device Serial Number Signal Intensity (From YoLink Hub) Battery Battery level indicator. If red, batteries are low; replace batteries soon. Firmware Revision (Refer to page 33) Remove Device From Current Account Tap to delete the device from your YoLink account...
-
Page 17: App Afunctions: Alert Settings Screen
App aFunctions: Alert Settings Screen Alarm Strategy Tap to edit the sensor's Alarm Strategy Tap here to open the digital temperature alert settings Tap the slider control and adjust the high or low alert value. The "normal" range will be displayed in blue text as a low alert value, to the high alert value. -
Page 18: App Functions: Chart Screen
App Functions: Chart Screen Tap to select Daily, Weekly, Monthly data Tap to select time range Tap to export data... -
Page 19: App Functions: Alarm Strategy Screen
App Functions: Alarm Strategy Screen You can set up notifications in Alarm Strategy settings, make sure you have enabled App, Email, SMS notification from the app->Menu->Settings->Account Settings->Advanced Settings, and verified your email address and added your phone number in the app. Strategy Name Tap to edit the name Related Devices... - Page 20 Send SMS Tap to select Admin to enable limited text messages, select All (subscribe required-starter or standard plan), if desired to send to all members Trigger Action Tap to choose trigger actions (YoLink sirens, YoLink SpeakerHubs, scene)
-
Page 21: App Functions: Automation
App Functions: Automation The Thermometer Hygrometer can be set up as a condition in an automation. For example, you can automatically turn on a fan if the sensor detects a high temperature. This example is shown below. The automation also sends a custom notification (via app push notification, email SMS, or SpeakerHub broadcast) reminding you the sensor detects high or low temperature. -
Page 22: Sensor Calibration
Sensor Calibration Your Thermometer Hygrometer has a high-accuracy digital sensor that has been calibrated at the time of manufacture. Your sensor readings should always be accurate, but if you believe the sensor is not accurate and/or if you have a thermometer or trusted sensor, etc. that displays a different reading, you can adjust the humidity and temperature readings with a plus or minus offset of your choice. - Page 23 Sensor Calibration, Continued How to Calibrate Your Sensor: 1. Open the sensor's Details screen and tap Calibration. 2. The Calibration screen is displayed, as shown below. To calibrate the temperature or humidity, tap and hold the associated slider bar control, then slide the control to the right, for a positive offset, or to the left, for a negative offset.
-
Page 24: Sensor Refresh Frequency
Sensor Refresh Frequency Both temperature and humidity values refresh when one of the following conditions are met: a. The SET button has SET Button been pressed When temp is over 32°F(0°C), at least 1.8°F (1°C) change over a period longer than 1 minute;... - Page 25 Sensor Refresh Frequency, Continued c. When temp is over or equal to 14°F(-10°C), at least 3.6°F (2°C) change within 1 minute; When temp is below -14°F(-10°C), at least 9°F (5°C) change within 1 minute. d. At least 5% change over a period longer than 1 minute e.
-
Page 26: 3Rd-Party Services
3rd-Party Services The YoLink Thermometer Hygrometer works with several voice assistants, including Alexa and Google, and it works with other automation platforms such as IFTTT. To set up voice assistant integrations, in the app, go to Settings, Third-Party Services, and follow the instructions. - Page 27 3rd-Party Services, Continued Google only supports querying the temperature or humidity of the devices. For example, edit the name of the device in Alexa or Google to “Sunroom", then you can ask: “Echo, what is the sunroom temperature?" You can also try, “Alexa, what is the temperature of the Sunroom sensor?"...
-
Page 28: Battery Replacement
Battery Replacement Tools Required : Small Phillips Screwdriver Remove the battery compartment cover. Pry open the cover using a fingernail, or a slotted screwdriver. Start at the bottom of the device. Once part of the cover begins to separate, move your fingernail or screwdriver gently around the edges of the cover, until the back cover comes free. - Page 29 Battery Replacement, Continued Remove the old batteries, press SET button several times to release capacitor. Install two new alkaline AA batteries. (Do not mix old and new batteries) Reassemble the battery compartment cover and tighten it firmly.
-
Page 30: Specifications
Specifications Voltage: 3V DC (2 AA Alkaline Battery) Device Current Draw: ≤ 135mA (operating), ≤ 35uA (standby) Sensor Types: Temperature, Humidity Temperature Value 0.1 (°F/°C) Accuracy: Humidity Value 0.1% Accuracy: Alert Temperature: -4°F-129.2°F (-20°F-54°F) Alert Humidity: 0%-100% Dimensions: 3.14 x 1.49 x 0.98 inches (80 x 38 x 25 millimeters, LxWxD) - Page 31 Specifications, Continued Temperature Error -4°F-32°F, ±0.72°F (Typical): (-20°C-0°C, ±0.4°C) 32°F-129.2°F, ±0.36°F (0°C-54°C, ±0.2°C) Temperature Error -4°F-32°F, ±1.26°F (Maximum): (-20°C-0°C, ±0.7°C) 32°F-129.2°F, ±0.72°F (0°C-54°C, ±0.4°C) Humidity Error 0%-10%/ 90%-100%, (Typical, @77°F ±3% (@25°C)): 10%-90%, ±2% Humidity Error 0%-10% / 90%-100%, (Maximum, @77°F ±5% (@25°C)): 10%-90%, ±3.5%...
- Page 32 Specifications, Continued 1.49” (38.0mm) 0.98” (25.0mm) FRONT SIDE 1.49” (38.0mm) 0.98” (25.0mm)
-
Page 33: Factory Reset
Factory Reset When directed by customer support, and/or as an attempt to resolve a problem with your Thermometer Hygrometer, it may be necessary to perform a factory reset. Factory resetting your sensor returns it to the factory default programming and settings. This is a simple process: Hold the SET Button for 20 to 30 seconds, until the LED blinks red and green... -
Page 34: Firmware Updates
Firmware Updates Your YoLink products are frequently being improved, with new features and functions added over time. It is periodically necessary to make changes to your device firmware. For optimal performance of your device, and to give you access to any improvements made to your device model, these firmware updates should be... - Page 35 Firmware Updates, Continued Firmware is like settings in your sensor that define the overall operations of the sensor. These settings are added to the sensor when it is manufactured, and they are periodically updated, as needed, to add improvements, new features, new integrations, etc, to your sensor, as they become available.
-
Page 36: Troubleshooting
Troubleshooting Problem: Sensor is offline or has a low signal status. Possible Solution: a) Signal strength for the sensor is too low at that location. Move the sensor closer to the hub, relocate the hub closer to the sensor (if possible), or add another hub (to extend the signal range). -
Page 37: Warnings
Warnings For optimal performance and lifetime of your Thermometer Hygrometer, please adhere to the following warnings: Please install, operate and maintain the Thermometer Hygrometer only as outlined in this manual. Improper use may damage the unit and/or void the warranty. When replacing the batteries, only use new alkaline non-rechargeable batteries. - Page 38 Warnings, Continued Install or use this device only in clean environments. Dusty or dirty environments may prevent the proper operation of this device, and will void the warranty. If your Thermometer Hygrometer does get dirty, please clean it by wiping it down with a clean, dry cloth.
-
Page 39: Warranty
Warranty 2 Year Limited Electrical Warranty YoSmart Inc. warrants to the original user (“customer”) of this product that it will be free from defects in materials and workmanship, under normal use, for 2 years from the date of purchase. This warranty does not apply to devices that have been improperly installed, modified, put to a use other than designed, or subjected to acts of God (such as floods,... -
Page 40: Fcc Statement
FCC Statement This device complies with part 15 of the FCC Rules. Operation is subject to the following two conditions: (1) This device may not cause harmful interference, and (2) this device must accept any interference received, including interference that may cause undesired operation. - Page 41 RF exposure requirement. The device can be used in portable exposure condition without restriction. PRODUCT NAME: THERMOMETER HYGROMETER PARTY: YOSMART, INC. TELEPHONE: 831-292-4831 MODEL NUMBER: YS8007-UC ADDRESS: 25172 ARCTIC OCEAN DRIVE, SUITE 106, LAKE FOREST, CA 92630 USA EMAIL: SERVICE@YOSMART.COM...
-
Page 42: Aa Contact Us
Support Home Page Finally, if you have any feedback or suggestions for us, please email us at feedback@yosmart.com Thank you for trusting YoLink! YoLink Customer Support 25172 Arctic Ocean Drive, Suite 106, Lake Forest, CA 92630 © 2024 YOSMART INC. CALIFORNIA, USA...
Need help?
Do you have a question about the YS8007-UC and is the answer not in the manual?
Questions and answers