Advertisement
Quick Links
Advertisement

Subscribe to Our Youtube Channel
Related Manuals for Kohler AMP FOURFRONT 9250


Summary of Contents for Kohler AMP FOURFRONT 9250
- Page 1 AMP FOURFRONT Operation Manual READ ENTIRE MANUAL BEFORE OPERATING MACHINE...
- Page 2 Congratulations on your purchase of AMP’s FOURFRONT 9250 4 in 1. American Motor Products is certain you will be satisfied with your purchase of the most innovative products on the market. The combination of Generator, Welder, Plasma Cutter, and Air Compressor is the first of its kind.
-
Page 3: Table Of Contents
TABLE OF CONTENTS Page 4 SECTION 1. SAFETY Page 14 SECTION 2. SPECIFICATIONS Page 15 SECTION 3. MACHINE BREAKDOWN Page 19 SECTION 4. INSTALLATION Page 25 SECTION 5. STARTING YOUR UNIT Page 26 SECTION 6. OPERATION Page 30 SECTION 7. SHUTTING UNIT DOWN Page 30 SECTION 8. -
Page 4: Section 1. Safety
SECTION 1. SAFETY RECOGNIZE SAFETY INFORMATION This is the safety alert symbol. When you see this symbol on your machine or in this manual, be alert to the potential for personal injury. Follow recommended precautions and safe operating practices. UNDERSTAND SIGNAL WORDS A signal word--DANGER, WARNING or CAUTION--is used with the safety-alert symbol. - Page 5 CARBON MONOXIDE - POISONOUS GAS Use unit outdoors, away from open windows, vents, or doors. Unit exhaust contains carbon monoxide - a poisonous gas that can kill you. You CAN NOT smell or see this gas. Never use the unit in enclosed or partially enclosed spaces. The unit can produce high levels of carbon monoxide very quickly.
- Page 6 SAFETY WARNING WHEN REFUELING Injury or death may occur because of improper fueling. Do not smoke while filling engine fuel tank. Always refuel slowly to avoid the possibility of spilled fuel which may cause a risk of fire. Gasoline is extremely flammable, and its vapors can explode if ignited. Observe all safety regulations for the safe handling of fuel.
-
Page 7: Electrical Hazards
ELECTRICAL HAZARDS This product must be grounded. If it should malfunction or breakdown, grounding provides a path of least resistance for electric current to reduce the risk of electric shock. Do not touch live electrical parts. DANGER - IMPROPER CONNECTION OF THE EQUIPMENT GROUNDING CONDUCTOR CAN RESULT IN A RISK OF ELECTROCUTION. -
Page 8: Risk Of Fire Or Explosion
RISK OF FIRE OR EXPLOSION Serious injury or death may occur from normal sparks in the engine ignition system or engine exhaust/muffler. Always operate the unit in a well-ventilated area free of flammable vapors, combustible dust, gases, or other combustible materials. Do not weld where the atmosphere may contain flammable dust, gas, or liquid vapors (such as gasoline). - Page 9 RISK OF Bursting Serious injury or death may occur from an air tank explosion if air tanks are not properly maintained. Drain air tank daily or after each use to prevent moisture buildup in the air tank. If air tank develops a leak, replace the air tank immediately. Never repair, weld, or make modifications to the air tank or its attachments.
- Page 10 RISK OF Burns Serious injury could occur from touching exposed metal parts. These areas can remain hot for some time after the unit is shutdown. Never allow any part of your body or other materials to contact any exposed metal parts on the unit. Never allow any part of your body to contact the engine muffler, compressor head or adjacent areas RISK OF Flying Objects...
-
Page 11: Important Safety Instructions
IMPORTANT SAFETY INSTRUCTIONS WARNING: To reduce the risk of injury, read this operator’s manual completely before using. When using this product, the following basic precautions should always be followed: 1. Risk from Negligence: Risk of injury from negligent use. Never allow children or adolescents to operate this unit! Stay alert and watch what you are doing. -
Page 12: Prepare For Emergencies
Wear Protective Clothing Wear close fitting clothing and safety equipment appropriate to the job. Wear dry, hole-free insulating gloves and body protection. Wear a suitable hearing protective device such as earmuffs or earplugs to protect against objectionable or uncomfortable loud noises. Operating equipment safely requires the full attention of the operator. - Page 13 Inspect your Unit! Be sure all covers; guards and shields are tight and in place. Locate all operating controls and safety labels. Inspect power cord for damage before using. There is a hazard of electrical shock from crushing, cutting or heat damage. Service Unit Safely Before servicing the unit, disconnect all equipment and battery (if equipped) and allow unit to cool down.
-
Page 14: Section 2. Specifications
SECTION 2. SPECIFICATIONS FOURFRONT 9250 KEY SPECS Rated Watts 6,000 GENERATOR Max Watts 6,500 Voltage 120V/240V Engine Name Kohler COMMAND PRO Engine Model CH440-3174 Engine Displacement 429cc Cooling System Air Cooled ENGINE Air Valve Low Oil Sensor? Start Modes Manual, Key, Remote... -
Page 15: Section 3. Machine Breakdown
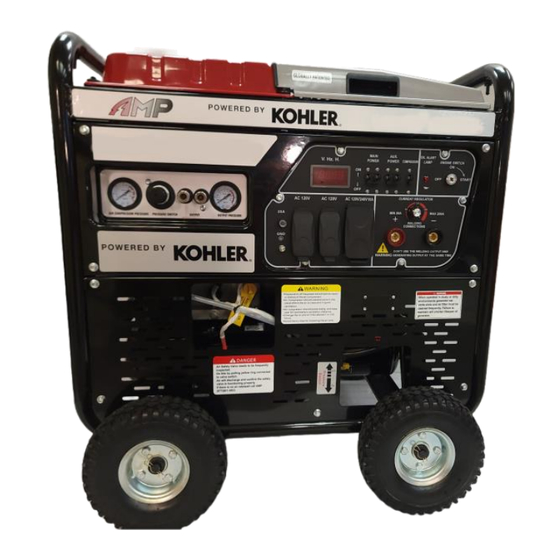
SECTION 3. MACHINE BREAKDOWN 3.1 CONTROL PANEL NOTE: DO ATTEMPT TO MODIFY THIS PANEL IN ANYWAY. THIS WILL VOID WARRANTY. 1. Digital Display (Hours/Volts/Hertz) 6. Ignition Switch 2. Main Power Breaker 7. Welding Terminals 3. Auxiliary Power Breaker 8. Welder / Plasma Cutter Switch 4. - Page 16 3.2 PLASMA CUTTER 1. Current Display (Plasma Cutter Only) 5. Plasma Cutter Grounding Clamp 2. Welder (MMA) Cutter (CUT) Switch 6. Plasma Cutter Positive Lead 3. Welder Current Range 7. Air Pressure Regulator 4. Plasma Cutter/Welder Current Regulator 8. Air Pressure Gauge...
- Page 17 3.3 Machine 1. Removable Access Panel 6. Handle 2. Fuel Tank 7. Water/Tank Drain Valves 3. Frame 8. Air Filter Housing 4. Fuel Shutoff Valve 9. Choke Lever 5. Engine Recoil Start 10. Muffler...
- Page 18 3.4 Removable Panel 1. AC Filter 2. Plasma Cutter 3. AC Capacitor 4. AC Pump Heads 5. AC Manifold Supply Line 3.5 Front Access Locations 1. Oil Fill/Check Plug 2. Battery Ground 3. Low Oil Sensor 4. Oil Drain Plug 5.
-
Page 19: Air Compressor
3.6 Air Compressor 1. Air Pressure Regulator 2. Air Pressure Gauges 3.Air Hose Quick Connects 4. Pressure Release/Water Drain Valves 5. AC Tank Assembly SECTION 4. Installation 4.1 READ THIS ENTIRE MANUAL. Before starting the unit, please read this manual carefully, this will ensure you understand the equipment and get the longevity out of your investment. - Page 20 Plug 4.6 Unit engine oil recommendation 4.6.1 KOHLER ENGINE MANUAL. Engine oil is a major factor affecting the performance and service life of the unit. For engines, please refer to your Kohler Command PRO CH440-3174 Kohler Engine Manual. 4.6.2 CHECK OIL BEFORE EACH USE. Regularly check and replace the oil to avoid failure caused by the oil level is too low, too high, too dirty, and too thick.
- Page 21 • Purchase gasoline in small quantities and store it in clean, approved containers. • To minimize gum deposits in your fuel system and to insure It is important to check whether the fuel is sufficient, fill the fuel with a filter screen, and leave an appropriate space in the fuel tank to prevent accidents due to fuel expansion.
- Page 22 4.10 Electric start, please check that the voltage across the battery is 12.5-13V before starting the engine. 4.11 Air Compressor Pre-Check. Preparation before starting the air compressor. 4.11.1 Confirm the 4 in 1 unit meets the rated output volume and rated output pressure required by your job details.
- Page 23 4.11.4.1 Check your safety valve switch is working correctly. Once the tank of machine has relative pressure, pull the pull ring of the safety valve to the right to ensure safety valve is operating correctly. If air release is abnormal, the air compressor must be stopped immediately. 4.11.4.2 After each use of air compressor checklist! Be sure to always drain all air pressure from the tanks.
- Page 24 Inverter cutting machine transfers the working voltage of 50/60Hz to high frequency (such as 30KHz) via single tube IGBT high-power device, then reduces the voltage and adjusts the current, delivers high- power cutting current via PWM technology. RULES TO FOLLOW WHEN CUTTING -Keep the plasma cutter in the off position when not in use.
-
Page 25: Section 5. Starting Your Unit
4.13.2 Using the Plasma Cutter 4.13.2.1 Adjust the air pressure regulator on panel to 43 PSI. 4.13.2.2 Turn the panel switch button to "CUT”. 4.13.2.3 When pressing the trigger on the torch will activate the magnetic valve. Plasma cutting torch nozzle will blow out plasma arc. -
Page 26: Section 6. Operation
5.3.2 Recoil Start: Place the start key on the panel in the "ON" position, then gently pull the starting handle until you feel resistance, then pull quickly. If unsuccessful, repeat until the unit starts successfully. After start-up, the starting handle should be gently lowered back into the engine to avoid damage. Do not allow the rope to rub against the unit, otherwise the starting rope will wear out prematurely. - Page 27 NOTE: Unplug all equipment from the power receptacles before starting the unit. 3. Turn all breakers off before starting the unit NOTE: READ KOHLER ENGINE MANUAL PRIOR TO STARTING 4. RECOIL (PULL START): Place the start key on the panel in the "ON" position, then gently pull the starting handle until you feel resistance, then pull quickly.
-
Page 28: Generator Start-Up
GENERATOR START-UP: 1. Make sure all breakers are in off position. 2. Plug in tool to generator outlet. 3. Turn on Main Break 4. Turn on Auxiliary Breaker PLASMA CUTTER START-UP: 1. Turn on the Welder/Cutter Breaker on control panel. 2. - Page 29 6.6 Welding Electrode Chart. Each welding rod has its own range of amperage to correctly burn the rod. Use the chart below as a guide for knowing where the amperage on welder needs to be set depending on the rod you’re working with at the time. 6.7 Digital Meter Display.
-
Page 30: Section 7. Shutdown
6.9 Use a surge protector when powering sensitive electronics! Electronic devices, including computers and many programmable appliances use components that are designed to operate within a narrow voltage range and may be affected by momentary voltage fluctuations. While there is no way to prevent voltage fluctuations, you can take steps to protect sensitive electronic equipment. -
Page 31: Section 9. Troubleshooting
8.3 If you’re operating in dusty environments, the maintenance schedule timeline should be cut in half. 8.4 Refer to the maintenance section of the Engine Owner’s Manual for the maintenance schedule, spark plug servicing, air filter replacement, etc. 8.5 Cleaning your Unit. Never directly spray the generator with water. 8.5.1. - Page 32 Inspect AVR. Guide on AMP website. Call AMP @ 877-601-2823 before inspecting rotor, stator, slip rings or generator set voltage. Check amperage control setting chart on page 19. No weld output: Inspect welding lead connections on ground and stinger clamps Generator power output at Clean your grounding clamp and workpiece you’re...
- Page 33 Inspect all electrical cords No output Circuit Breaker is open. Reset the Circuit. power on Inspect Carbon Brush Assembly. Guide on AMP Generator Website. receptacles; no weld output Inspect AVR. Guide on AMP website. Call AMP @ 877-601-2823 before inspecting rotor, stator, slip rings or generator set voltage.
- Page 34 AC pumps no Inspect AVR. Guide in Troubleshooting Section of AMP website. air; Generator produces no Call AMP @ 877-601-2823 before inspecting rotor, stator, slip rings or generator set voltage. power Output Pressure is too high. Decrease pressure at Manifold. The tank drain valve is open.
- Page 35 Poor Ground Connection. Check ground. Arc will not Worn out or damaged ground clamp. Replace Clamp. transition from Pilot to Cutting The torch being held too far from work piece. Hold closer. Supply Air Pressure Too Low. Increase Pressure. Improperly installed consumables. Install properly. Worn or Damaged Consumables.
- Page 36 Fuel Valve is off. Turn it on. If pull starting: Key needs to be in middle position. Old Fuel or Water in Fuel. Drain and replace fuel. Flooded with Fuel. Let the unit sit for 10 minutes.
-
Page 37: Section 9. Wiring Diagram
Section 9. Wiring Diagram...
Need help?
Do you have a question about the AMP FOURFRONT 9250 and is the answer not in the manual?
Questions and answers
Cómo calibrar las válvulas de motor