Advertisement
THANK YOU
Thank you for purchasing the L2 Series lectern. Please read these instructions thoroughly before
installing or assembling this product.
PRODUCT FEATURES
• The only budget-friendly lectern solution that delivers support and security for AV systems,
complete with a patented rack, power, thermal and cable management, and connectivity.
• The 12 RU removable rack boasts a tool-less experience with easy access to rear connections
or removal for simple servicing, yet locks in place for transportation.
• Flip-up side shelf for extra surface space on certain models.
Instruction Sheet
L2 SERIES
Lectern
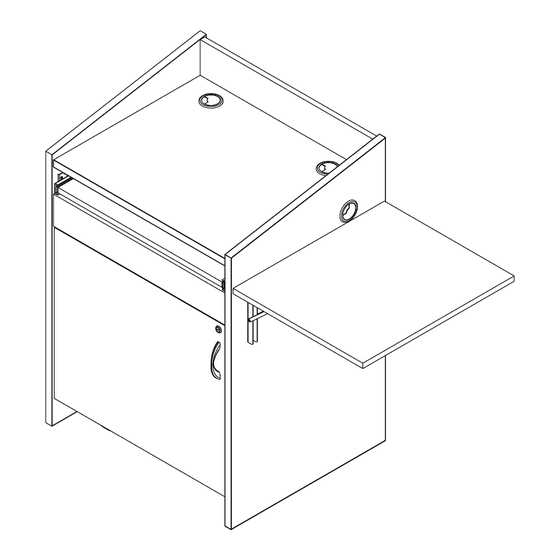
NOTE: L2 lectern
shown with a
flip-up side shelf
configuration.
I-00824
Rev B
Advertisement
Table of Contents

Related Manuals for LEGRAND Middle Atlantic L2 Series


Summary of Contents for LEGRAND Middle Atlantic L2 Series
- Page 1 Instruction Sheet L2 SERIES Lectern NOTE: L2 lectern shown with a flip-up side shelf configuration. THANK YOU Thank you for purchasing the L2 Series lectern. Please read these instructions thoroughly before installing or assembling this product. PRODUCT FEATURES • The only budget-friendly lectern solution that delivers support and security for AV systems, complete with a patented rack, power, thermal and cable management, and connectivity.
-
Page 2: Important Safety Instructions
IMPORTANT SAFETY INSTRUCTIONS • Read these instructions. • Heed all warnings. • Clean only with dry cloth. • Keep these instructions. • Follow all instructions. • Only use attachments/accessories specified by the manufacturer. DANGER HAZARDOUS VOLTAGE: The lightning flash with the arrowhead symbol, within an equilateral triangle is intended to alert the user to the presence of uninsulated dangerous voltage within the product’s enclosure that may be of sufficient magnitude to constitute a risk of electric shock to persons. -
Page 3: Instructions Importantes Sur La Sécurité
INSTRUCTIONS IMPORTANTES SUR LA SÉCURITÉ • Lire ces instructions. • Respectez tous les avertissements. • Nettoyer uniquement avec un chiffon sec. • Conservez ces instructions. • Suivez toutes les instructions. • N'utilisez que des accessoires spécifiés par le fabricant. DANGER TENSION DANGEREUSE: Le symbole de la pointe de flèche, dans un triangle équilatéral, est destiné à alerter l'utilisateur sur la présence de tension dangereuse non isolée dans l'enceinte du produit qui peut être d'une ampleur suffisante pour constituer un risque d'électrocu- tion. -
Page 4: Weight Ratings
Global Fan Controller Power Supply Wire Tie (With US, AU, BS, and SAA Attachments) NOTE: • To order more hardware, contact support at av.support@legrand.com or (866) 977-3901. • Additional hardware is included that may not be required for your installation. Page 4... -
Page 5: Required Tools
REQUIRED TOOLS • Hammer WARNING: Use tools with caution and follow all necessary safety • ¼” Drill Bit protocols. • Power Driver AVERTISSEMENT: Utiliser des outils avec prudence et suivre With 6” Long Phillips Bit tous les protocoles de sécurité nécessaires. or 6”... -
Page 6: Relocating The Rack
REMOVING THE RACK FROM THE GUIDE BRACKETS 1. Remove (2x) thumb screws. (FIGURE A) 2. Use handle on front of lower rack to pull the framework out of the lectern and off the guide brackets. 3. Reverse the procedure to re-install the rack. NOTE: Carefully review all other topics in these instructions before loading equipment in the rack, performing cable management, and reinstalling the rack inside the lectern. - Page 7 INSTALLING THE FLIP-UP SIDE SHELF (IF ORDERED) NOTE: Use the following topic if your lectern includes a flip-up side shelf configuration. 1. Locate pilot mounting holes (inside of the lectern) on the side you wish to install the shelf. (FIGURE C) NOTE: The figure shows a right panel shelf installation, but the procedure is the same for either side.
- Page 8 CONNECTING THE PRE-INSTALLED FAN 1. Install the jumper on the fan controller (F) for one • Jumper on two center pins (pre-installed of the following functions: location) turns the fan on at 87º F (31º C) Jumper and off at 85º F (29º C). (FIGURE E) •...
-
Page 9: Adjusting The Door
CONNECTING THE PRE-INSTALLED FAN (CONTINUED) 5. Fasten the connector for your specific locale to the large end of the global power supply (H) as shown. (FIGURE H) NOTE: Attachments for US, EU, BS, and SAA are provided with the global power supply. United European States... - Page 10 RELOCATING THE LACER BAR INSIDE THE BACK OF THE LECTERN If desired, you may relocate the lacer bar that is pre-installed inside the back of the lectern into any of the pre-drilled screw locations. (FIGURE K) NOTE: NOTE: • Leaving the lacer bar in the pre-installed top position is best for forming •...
-
Page 11: Cable Management
CABLE MANAGEMENT This topic shows you how to create a proper service loop when running cables to equipment installed in the rack inside your lectern. 1. Load your equipment into the rack and form a service loop by using wire ties (M) to attach the cables to the lacer bars on the back of the rack and lectern as shown. -
Page 12: Warranty
Factory Distribution United States: New Jersey, California, and Illinois | Canada: Ontario | The Netherlands: Weert At Legrand AV Inc. we are always listening. Your comments are welcome. Legrand AV is an ISO 9001 and ISO 14001 Registered Company. Page 12...
Need help?
Do you have a question about the Middle Atlantic L2 Series and is the answer not in the manual?
Questions and answers