Table of Contents
Advertisement
Quick Links
Advertisement
Table of Contents

Related Manuals for TRENDnet TE100-PCIFC


Summary of Contents for TRENDnet TE100-PCIFC
- Page 1 MicheM...
-
Page 2: Table Of Contents
Table of Contents RODUCT VERVIEW ................ACKAGE ONTENTS ................4 RODUCT EATURES Driver Support Utilities (Windows only, Vista is not supported) LEDs RIVER ARDWRE NSTALLATION ............. 6 NSTALLING RIVER ARDWARE ..........ONNECTING... -
Page 3: Product Overview
Product Overview Package Contents When you unpack the product package, you shall find the items listed below. Please inspect the contents, and report any apparent damage or missing items immediately to our authorized reseller. • TE100-PCIFC • Multi-Language Quick Installation Guide •... -
Page 4: Product Features
UDP, TCP/IP checksum offload for Ipv4 frames Two LEDs: LNK/ACT (link/activity), 100 (100Mbps speed) Driver Support The Adapter supports a wide range of drivers for commonly used network operating systems: Windows 95 (including OSR2), Windows 98, Windows 98 (including SE), Windows ME, Win2000, Windows 2003, Windows XP, Workgroups 3.11,... -
Page 5: Utilities (Windows Only, Vista Is Not Supported)
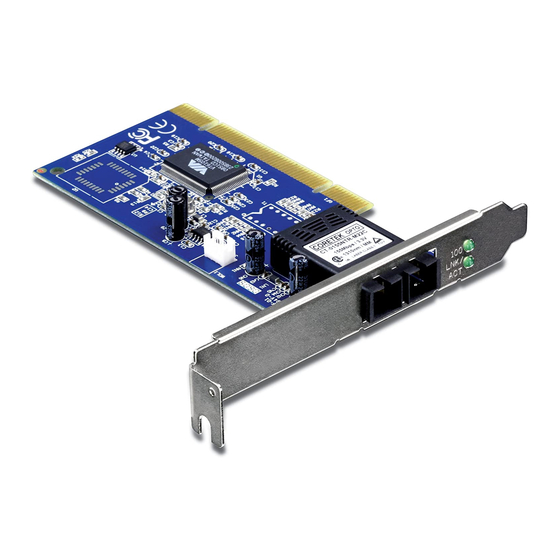
Utilities (Windows only, Vista is not supported) NIC Control Set Dos Diagnostic Utility LEDs LNK/ACT Link/Activity 100 100Mbps LEDs Status Indication A valid network connection established. Steady LNK stands for LINK. Transmitting or receiving data. LNK/ACT Flashing ACT stands for ACTIVITY. -
Page 6: Driver/Hardwre Installation
Remove any metal decorations from your hands and wrists. Step 7: Remove the cover from your PC. Step 8: Locate an empty, non-shared bus mastering PCI slot and remove the corresponding backplate. Save the screw for use in Step 10. - Page 7 <Note> Do not install the TE100-PCIFC in a shared PCI slot. Avoid any PCI slot next to an ISA slot because this is often a shared slot and does not support bus mastering. If you are going to install the Remote Wake-Up cable, choose an available PCI slot most close to the 3- pin Remote Wake-Up connector on the PC motherboard.
- Page 8 Save the screw for use in Step 6. <Note> Do not install the TE100-PCIFC in a shared PCI slot. Avoid any PCI slot next to an ISA slot because this is often a shared slot and does not support bus mastering.
- Page 9 Step 12: If the following screen pop up, insert the Windows 98SE CD-ROM into CD-ROM driver. (For Windows 98SE only) Step 13: Click OK to reboot your computer.
-
Page 10: Connecting Remote Wake-Up Cable
PC supports this remote wake-up and you wish to use this function. If your PCI bus supports version 2.2 or higher, there is no Wake-Up cable required. The feature can be enabled without using the cable. -
Page 11: Connecting To Your Network
Connect the other end of the network cable to a 100Base-FX hub or a switch. <Note> Insert the cable that is connected to the transmit (TX) connector on the Fiber Adapter into the receive (RX) connector on the network hub or switch. -
Page 12: Cabling Requirements
Cabling Requirements For connector type, cabling requirements, and maximum segment distance when connecting the TE100-PCIFC to your network, please refer to the following table. Fiber Wavelength of 1300nm Max. Distance Connections Type Fiber Optic required (* full-duplex) Multi-mode, 62.5/125 µm 2 km <Note>... -
Page 13: Nic Control Set Utility
NIC Control Set Utility The NIC Control Set is a Windows-based application. It provides Network Interface Card information, setting, statistics and diagnostic function. Also, it provides multiple VLAN function. My Computer All NIC drivers are currently installed in this computer. -
Page 14: Service
Service All network services are currently installed in this computer. Client All network clients are currently installed in this computer. -
Page 15: General
General Display the basic information of the adapter, such as MAC Address, IP Address, Link Speed, and Duplex Mode. -
Page 16: Setting
Setting Display and set the parameters of the adapter by disable & enable the function. Statistics Display all the statistics information of the NIC. -
Page 17: Diagnostics
Diagnostics Diagnose the hardware functionality: MAC Registers, PHY Registers, Loopback and Cable Link. The continuous option can be set as an infinite loop of testing. Please be award that perform this task will temporary disable the adapter. Once the adapter has finished the test, it will enable again. -
Page 18: Vlan Settings
VLAN settings Add/Remove VLAN Setting for add/remove VLAN User should specify VLAN ID and VLAN name in the dialog box. VLAN01 (VLAN ID =1) added VLAN01 (VID = 1) will be displayed in VLAN area in NIC Control Set. -
Page 19: Driver Setting Changed By Nic Control Set
Driver setting changed by NIC Control Set NIC Control Set will enable 802.1Q Tagging automatically if VLAN is created. -
Page 20: Remove Vlan/Change Vlan Property
Remove VLAN/Change VLAN property... -
Page 21: Dos Diagnostic Utility
DIAG utility provide basic functional test for the NIC. The main features are listed below: Main Menu I/O Base Address: I/O base address is assigned by PCI BIOS and cannot be modified. Interrupt Output Line: Interrupt is assigned by PCI BIOS and cannot be modified. -
Page 22: Loading Network Drivers
• Linux Kernel 2.2.x/2.4.x/2.6.x • FreeBSD 3.2, 4.0, 4.11, 4.2, 5.x • SCO UnixWare 7.x/OpenUnix 8, SCO UNIX 5.0 Find the suitable network driver for the platform that you are using. Carefully read the readme text file for that driver. -
Page 23: Specifications
Interface PCI/Multi-Mode SC-type port 148,810pps for 100Mbps Performance 200Mbps (Full-Duplex) Data Rate 62.5/125µm multi-mode SC-type fiber cable, up to 2 km, Cable wavelength 1310nm LED Indicators LNK (Link) / ACT (Activity), 100 (100Mbps) Dimensions 122mm × 117mm (4.8 × 4.6in.) 80g (0.18lb.) approx. - Page 24 There are no user serviceable parts inside the product. Do not remove or attempt to service the product by any unauthorized service center. This warranty is voided if (i) the product has been modified or repaired by any ...
- Page 25 TRENDNET SHALL NOT BE LIABLE UNDER THIS WARRANTY IF ITS TESTING AND EXAMINATION DISCLOSE THAT THE ALLEGED DEFECT IN THE PRODUCT DOES NOT EXIST OR WAS CAUSED BY CUSTOMER’S OR ANY THIRD PERSON’S MISUSE, NEGLECT, IMPROPER INSTALLATION OR TESTING, UNAUTHORIZED ATTEMPTS TO REPAIR OR MODIFY, OR ANY OTHER CAUSE BEYOND THE RANGE OF THE INTENDED USE, OR BY ACCIDENT, FIRE, LIGHTNING, OR OTHER HAZARD. LIMITATION OF LIABILITY: TO THE FULL EXTENT ALLOWED BY LAW TRENDNET ALSO EXCLUDES FOR ITSELF AND ITS SUPPLIERS ANY LIABILITY, WHETHER ...
- Page 26 Go to http://www.trendnet.com/gpl or http://www.trendnet.com Download section and look for the desired TRENDnet product to access to the GPL Code or LGPL Code. These codes are distributed WITHOUT WARRANTY and are subject to the copyrights of the developers. TRENDnet does not provide technical support for these codes. Please go to http://www.gnu.org/licenses/gpl.txt or http://www.gnu.org/licenses/lgpl.txt ...
Need help?
Do you have a question about the TE100-PCIFC and is the answer not in the manual?
Questions and answers