Table of Contents
Advertisement
Quick Links
Advertisement
Table of Contents

Related Manuals for MAKINEX PPB-8-15-AU


Summary of Contents for MAKINEX PPB-8-15-AU
- Page 1 Portable Power Box PPB-8-15-AU OPERATOR’S MANUAL Rev 0524...
-
Page 2: Table Of Contents
Table of Contents INTRODUCTION ............................. 3 DISCLAIMER ............................4 ABOUT THIS MANUAL ........................5 KEY TERMS ............................5 SAFETY INFORMATION ........................6 EMERGENCY INFORMATION ......................7 SAFETY DECALS ..........................8 OVERALL MACHINE DIMENSIONS ....................11 OPERATING YOUR PORTABLE POWER BOX ................12 CONTROL INTERFACE ....................... -
Page 3: Introduction
MAKINEX. The information contained in this manual was based on machines in production at the time of publication. MAKINEX reserves the right to change any portion of this information without notice. All rights, especially copying and distribution rights are reserved. -
Page 4: Disclaimer
DISCLAIMER MAKINEX and its affiliates take no responsibility for any damage, injury or death resulting from the incorrect or unsafe use of this product. Use of this product should be undertaken by competent persons only. It is the operator’s responsibility to ensure that the following safety procedures are followed. -
Page 5: About This Manual
ABOUT THIS MANUAL This manual uses the following symbols to help differentiate between different kinds of information. The safety symbol is used with a key word to alert you to potential hazards in operating and owning power equipment. Follow all safety messages to avoid or reduce the risk of serious injury or death. -
Page 6: Safety Information
SAFETY INFORMATION Read this manual thoroughly before operating your Portable Power Box. Failure to follow instructions WARNING could result in serious injury or death RISK OF ELECTRICAL SHOCK Electrical shock can cause burnt marks, cardiac arrest DANGER or even death. •... -
Page 7: Emergency Information
EMERGENCY INFORMATION In the event of an emergency follow the steps below: 1. To disable the product, turn off the on/off switch. See picture below. This will cut off the power to the inverter immediately. 2. Further to the above, switch off all the circuit breakers (push down) and isolator. -
Page 8: Safety Decals
SAFETY DECALS EARTH STUD Page 8 of 25... - Page 9 PPB-8-15-AU Page 9 of 25...
-
Page 10: Product Description And Specification
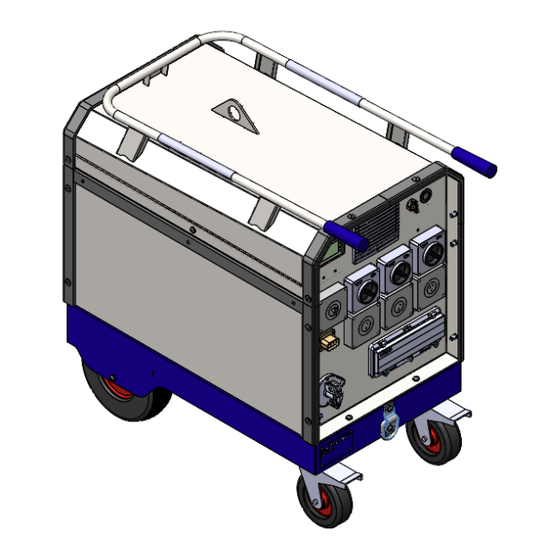
PRODUCT DESCRIPTION AND SPECIFICATION The Makinex PPB-8-10-AU / PPB-8-15-AU is the future of portable temporary power. They are relatively small, emit no fumes, produces little noise and are safe for indoors or confined space. Built with safety in mind, the unit is complete with circuit breaker protection and offers the latest technology in battery storage. -
Page 11: Overall Machine Dimensions
OVERALL MACHINE DIMENSIONS Page 11 of 25... -
Page 12: Operating Your Portable Power Box
OPERATING YOUR PORTABLE POWER BOX CONTROL INTERFACE Below is the control interface of the Makinex Portable Power Box 1 – On/off switch 7 – 3 x AC Outlets 3 Pin 230V AC 15A 2 – USB outlets (type A + type C) 8 –... -
Page 13: Startup Operation
STARTUP OPERATION 2.1 Ensure all breakers (14) are switched ON. 2.2 Turn the “On/Off” switch (1) to the ON position. 2.3 Turn the “Battery Isolator”(12) switch to the ON position. 2.4 Wait for display to turn on and let the machine warm up for 1 minute. 2.5 The PPB can now be used by plugging devices into outlets (7). -
Page 14: Battery Monitor
BATTERY MONITOR 5.1 Interface description For example, the below LCD display means: Battery capacity is 200Ah and it is 100% charged. The present battery voltage is 53.5V. The present current is -0.53A. Note: The “-” symbol means amp draw from batteries. In other words, batteries are powering loads connected to the Portable Power Box. -
Page 15: Charging The Product
CHARGING THE PRODUCT 6.1 Turn the “Battery DC Isolator” to the ON position. 6.2 Connect the charging cable to the 230V Inlet Socket on the Makinex Portable Power Box and the AC wall outlet. 6.3 Turn on Inlet Circuit Breaker. -
Page 16: Transporting The Product
TRANSPORTING THE PRODUCT 7.1 Lifting Point – Use the lifting eye on the top cover of the PPB to lift the unit. The label adjacent to the lifting eye indicates the total weight of the unit. Please ensure the lifting equipment used is rated for this weight. 7.2 Tie Down Points –... - Page 17 PPB COVER 8.1 Install the PPB Cover when required eg. In the rain. Pull the PPB Cover out of the pouch that is attached to the PPB. When installing, ensure the clear side is on the I/O Panel side to allow access to power outlets. Once cover is over the unit, pull both zippers down all the way to ensure I/O Panel is protected.
-
Page 18: Maintenance
MAINTENANCE GENERAL MAINTENANCE Always keep the unit clean. Clean the unit with cloth. Please DO NOT use pressure cleaner. Avoid exposing the product to heavy rain. The Portable Power Box’s warranty does not cover items that have been subjected to operator abuse or negligence. To receive full value from the warranty, the operator must maintain the Portable Power Box as instructed in this manual including storage. -
Page 19: Troubleshooting
On/off switch is OFF Turn On the On/off switch Battery fault is rare. Access battery and Battery fault further diagnose required (1) Inverter module malfunction Contact Makinex DC voltage is too low (battery is Inverter Fault Charge the unit (alarm warning). flat). -
Page 20: Limited Warranty
MAKINEX product in peak operating condition. MAKINEX warrants each new Portable Power Box to be free from defects in material and workmanship under normal domestic and industrial use and service for the period specified below, conditional to the limitations and exclusions printed on this page. -
Page 21: Warranty Exclusions
• Cosmetic defects such as paint, decals, etc. • Failures due to acts of God and other force majeure events beyond the manufacturer’s control. • Problems cause by parts that are not original MAKINEX parts. • Maintenance service costs • Freight costs... -
Page 22: Owner's Responsibility Under Limited Warranty
Maintenance services are not covered under warranty. Claim Procedure: Contact MAKINEX by phone or email informing us of your machines problem or defect. Once the extent of the claim has been assessed, we retain the right to compensate the consumer for such defect, or repair (parts &... -
Page 23: Contact Information
CONTACT INFORMATION For sales, service, warranty, and parts for all MAKINEX products; please refer below. SALES, SERVICE, SPARE PARTS & WARRANTY SALES TEL 1300 795 953 or +61 2 9460 8071 WEB www.makinex.com.au AUSTRALIA SERVICE, SPARE PARTS & WARRANTY EMAIL service@makinex.com.au... - Page 24 Page 24 of 25...
- Page 25 Page 25 of 25...
Need help?
Do you have a question about the PPB-8-15-AU and is the answer not in the manual?
Questions and answers