
Subscribe to Our Youtube Channel
Related Manuals for GIGACLOUD TECHNOLOGY N709P180329K


Summary of Contents for GIGACLOUD TECHNOLOGY N709P180329K
- Page 1 ASSEMBLY INSTRUCTION INSTRUCTIONS DE MONTAGE SKU NO. : N709P180329K / N709P180330K / N715P180331K LOFT BED WITH CABINET / LIT MEZZANINE AVEC ARMOIRE Page: 1 of 45 / Page : 1 sur 45...
-
Page 2: Safety Warnings
" 2. Replacement parts, including additional guardrails, maybe obtained from any of our dealers (GIGACLOUD TECHNOLOGY (USA) INC.4388 SHIRLEY AVE, EL MONTE, CA 91731) 3. Follow the information on the warnings appearing on the upper bunk bed end structure and on the carton. -
Page 3: Avertissements De Sécurité
" 2. Les pièces de rechange, y compris les garde-corps supplémentaires, peuvent être obtenues auprès de l'un de nos revendeurs (GIGACLOUD TECHNOLOGY (USA) INC.4388 SHIRLEY AVE, EL MONTE, CA 91731). 3. Suivez les informations sur les avertissements apparaissant sur la structure d'extrémité... - Page 4 ASSEMBLY INSTRUCTION INSTRUCTIONS DE MONTAGE SKU NO. : N709P180329K / N709P180330K / N715P180331K LOFT BED WITH CABINET / LIT MEZZANINE AVEC ARMOIRE Page: 4 of 45 / Page : 4 sur 45...
- Page 5 ASSEMBLY INSTRUCTION INSTRUCTIONS DE MONTAGE SKU NO. : N709P180329K / N709P180330K / N715P180331K LOFT BED WITH CABINET / LIT MEZZANINE AVEC ARMOIRE Page: 5 of 45 / Page : 5 sur 45...
- Page 6 ASSEMBLY INSTRUCTION INSTRUCTIONS DE MONTAGE SKU NO. : N709P180329K / N709P180330K / N715P180331K LOFT BED WITH CABINET / LIT MEZZANINE AVEC ARMOIRE Page: 6 of 45 / Page : 6 sur 45...
-
Page 7: Part List
PART LIST / LISTES DE PIÈCES Box 1 - N709P180329K Encadré 1 - N709P180329K 01 x 2 02 x 3 Side rail / Panel / Panneaux Barrière latérale 03 x 1 04 x 1 Side rail - headboard / Barrière latérale - tête de lit... - Page 8 PART LIST / LISTES DE PIÈCES Box 2 - N709P180330K Encadré 2 - N709P180330K 15 x 5 16 x 8 Big shelf Side Panels / Grande étagère Panneaux latéral 17 x 8 18 x 4 Side Panels / Top Cross b ars / Panneaux latéral Barres transversales supérieures 19 x 3...
- Page 9 PART LIST / LISTES DE PIÈCES Box 2 - N709P180330K Encadré 2 - N709P180330K 29 x 2 30 x 2 Small Back panels / Small Back panels / Petits panneaux arrière Petits panneaux arrière Page: 9 of 45 / Page : 9 sur 45...
- Page 10 PART LIST / LISTES DE PIÈCES Box 3 - N715P180331K Encadré 3 - N715P180331K 31 x 14 32 x 1 Slats / Lattes Handrail / Balustrade 33 x 1 34 x 1 Handrail / Balustrade Handrail / Balustrade 35 x 1 36 x 1 Handrail / Balustrade Handrail / Balustrade...
- Page 11 PART LIST / LISTES DE PIÈCES Box 3 - N715P180331K Encadré 3 - N715P180331K 45 x 1 46 x 1 Bottom Cross b ar / Middle Cross b ar / Barre transversale inférieure Barre transversale centrale 47 x 1 48 x 1 Support b ar / Vertical support bar / Barre de support verticale...
-
Page 12: Hardware List
HARDWARE LIST / LISTE DU MATÉRIEL Box 2 - N709P180330K Encadré 2 - N709P180330K M6 x 13 mm Crossing Nut 75pcs / M6 x 70 mm M6 x 100 mm pièces pièces pièces Bolt 18pcs / Boulon 18 Bolt 57pcs / Boulon 57 Écrou de croisement 75 M6 x 30 mm M6 x 35 mm... - Page 13 STEP 1: Following below illustration -Insert hardware #H to 48, connect 48 with 4, 47 -Using hardware #B, #C, #H connect 7 with 4, 47 Step 2 / Étape 2 ÉTAPE 1: Ci-dessous l'illustration -Insérer la matériel #H aux 48, connectez 48 avec 4, 47 -En utilisant le matériel #B, #C, #H connectez 7 avec 4, 47...
- Page 14 STEP 3: Following below illustration -Using hardware #B, #C, #H connect 6 with 4, 47 ÉTAPE 3: Ci-dessous l'illustration -En utilisant le matériel #B, #C, #H connectez 6 avec 4, 47 STEP 4: Following below illustration ÉTAPE 4: Ci-dessous l'illustration Page: 14 of 45 / Page : 14 sur 45...
- Page 15 STEP 5: Following below illustration -Using hardware #B, #C, #H connect 9 with 5, 43, 44, 45, 46 ÉTAPE 5: Ci-dessous l'illustration -En utilisant le matériel #B, #C, #H connectez 9 avec 5, 43, 44, 45, 46 STEP 6: Following below illustration -Using hardware #B, #C, #H connect 08 with 5, 43, 44, 45, 46 ÉTAPE 6:...
- Page 16 STEP 7: Following below illustration -Using hardware #A, #C, #H connect 1, 11 with legs (6, 7, 8, 9) ÉTAPE 7: Ci-dessous l'illustration -En utilisant le matériel #A, #C, #Hconnectez 1, 11 avec les pattes (6, 7, 8, 9) Page: 16 of 45 / Page : 16 sur 45...
- Page 17 STEP 8: Following below illustration ÉTAPE 8: Ci-dessous l'illustration STEP 9: Following below illustration -Using hardware #B, #C, #H connect 23, 24 with 18, 19, 21 ÉTAPE 9: Ci-dessous l'illustration -En utilisant le matériel #B, #C, #H connectez 23, 24 avec 18, 19, 21 Page: 17 of 45 / Page : 17 sur 45...
- Page 18 STEP 10: Following below illustration ÉTAPE 10: Ci-dessous l'illustration STEP 11: Following below illustration -Using hardware #B, #C, #H connect 25 with 18, 19, 21 ÉTAPE 11: Ci-dessous l'illustration -En utilisant le matériel #B, #C, #H connectez 26 avec 18, 19, 21 Page: 18 of 45 / Page : 18 sur 45...
- Page 19 STEP 12: Following below illustration -Using hardware #M connect hardware #N with 15 -Repeat x3 ÉTAPE 12: Ci-dessous l'illustration -En utilisant le matériel #M, connectez le matériel #N avec 15 -Répéter x3 STEP 13: Following below illustration -Using hardware #D connect 15 with 18, 19, 21 ÉTAPE 13: Ci-dessous l'illustration -En utilisant le matériel #D connectez 15 avec...
- Page 20 STEP 14: Following below illustration -Using hardware #D connect 15 with 18, 19, 21 ÉTAPE 14: Ci-dessous l'illustration -En utilisant le matériel #D connectez 15 avec 18, 19, 21 STEP 15: Following below illustration -Using hardware #M connect hardware #N with side of shelf ÉTAPE 15: Ci-dessous l'illustration...
- Page 21 STEP 16: Following below illustration -Using hardware #I connect 26, 27 with cabinet ÉTAPE 16: Ci-dessous l'illustration -En utilisant le matériel #I connectez 26, 27 avec armoire Page: 21 of 45 / Page : 21 sur 45...
- Page 22 STEP 17: Following below illustration ÉTAPE 17: Ci-dessous l'illustration STEP 18: Following below illustration -Using hardware #B, #C, #H connect 25 with 18, 19, 21 ÉTAPE 18: Ci-dessous l'illustration -En utilisant le matériel #B, #C, #H connectez 25 avec 18, 19, 21 Page: 22 of 45 / Page : 22 sur 45...
- Page 23 STEP 19: Following below illustration ÉTAPE 19: Ci-dessous l'illustration STEP 20: Following below illustration -Using hardware #B, #C, #H connect 25 with 18, 20, 21, 22 ÉTAPE 20: Ci-dessous l'illustration -En utilisant le matériel #B, #C, #H connectez 25 avec 18, 20, 21, 22 Page: 23 of 45 / Page : 23 sur 45...
- Page 24 STEP 21: Following below illustration -Using hardware #M connect hardware #N with 28 -Repeat x3 ÉTAPE 21: Ci-dessous l'illustration -En utilisant le matériel #M, connectez le matériel #N avec 28 -Répéter x3 STEP 22: Following below illustration -Using hardware #D connect 28 with 18, 20, 21, 22 ÉTAPE 22: Ci-dessous l'illustration -En utilisant le matériel #D connectez 28 avec...
- Page 25 STEP 23: Following below illustration -Using hardware #D connect 28 with 18, 19, 21 ÉTAPE 23: Ci-dessous l'illustration -En utilisant le matériel #D connectez 28 avec 18, 19, 21 STEP 24 Following below illustration -Using hardware #M connect hardware #N with side of shelf ÉTAPE 24: Ci-dessous l'illustration...
- Page 26 STEP 25: Following below illustration -Using hardware #I connect 29, 30 with cabinet ÉTAPE 25: Ci-dessous l'illustration -En utilisant le matériel #I connectez 29, 30 avec armoire Page: 26 of 45 / Page : 26 sur 45...
- Page 27 STEP 26: Following below illustration ÉTAPE 26: Ci-dessous l'illustration STEP 27: Following below illustration -Using hardware #G, #H connect 40 with 41, 42 ÉTAPE 27: Ci-dessous l'illustration -En utilisant le matériel #G, #H connectez 40 avec 41, 42 Page: 27 of 45 / Page : 27 sur 45...
- Page 28 STEP 28: Following below illustration -Using hardware #G, #H connect 34 with 33 ÉTAPE 28: Ci-dessous l'illustration -En utilisant le matériel #G, #H connectez 34 avec 33 Page: 28 of 45 / Page : 28 sur 45...
- Page 29 STEP 29: Following below illustration -Using hardware #G, #H connect 35 with 34 ÉTAPE 29: Ci-dessous l'illustration -En utilisant le matériel #G, #H connectez 35 avec 34 STEP 30: Following below illustration -Using hardware #G, #H connect 36 with 35 ÉTAPE 30: Ci-dessous l'illustration -En utilisant le matériel #G, #H connectez 36 avec 35...
- Page 30 STEP 31: Following below illustration -Using hardware #G, #F, #H connect 37 with 33, 34, 35, 36 ÉTAPE 31: Ci-dessous l'illustration -En utilisant le matériel #G, #F, #H connectez 37 avec 33, 34, 35, 36 Page: 30 of 45 / Page : 30 sur 45...
- Page 31 STEP 32: Following below illustration -Using hardware #F, #G, #H connect 10 with 36, ÉTAPE 32: Ci-dessous l'illustration -En utilisant le matériel #F, #G, #H connectez 10 avec 36, 37 Page: 31 of 45 / Page : 31 sur 45...
- Page 32 STEP 33: Following below illustration -Using hardware #D connect 38 with 49 ÉTAPE 33: Ci-dessous l'illustration -En utilisant le matériel #D connectez 38 avec 49 STEP 34: Following below illustration -Using hardware #D connect 38 with 50 ÉTAPE 34: Ci-dessous l'illustration -En utilisant le matériel #D connectez 38 avec 50 Page: 32 of 45 / Page : 32 sur 45...
- Page 33 STEP 35: Following below illustration -Using hardware #D connect 38 with 51 ÉTAPE 35: Ci-dessous l'illustration -En utilisant le matériel #D connectez 38 avec 51 STEP 36: Following below illustration -Using hardware #D connect 39 with 52 ÉTAPE 36: Ci-dessous l'illustration -En utilisant le matériel #D connectez 39 avec 52 Page: 33 of 45 / Page : 33 sur 45...
- Page 34 STEP 37: Following below illustration ÉTAPE 37: Ci-dessous l'illustration Page: 34 of 45 / Page : 34 sur 45...
- Page 35 STEP 38: Following below illustration ÉTAPE 38: Ci-dessous l'illustration Page: 35 of 45 / Page : 35 sur 45...
- Page 36 STEP 39: Following below illustration ÉTAPE 39: Ci-dessous l'illustration Page: 36 of 45 / Page : 36 sur 45...
- Page 37 STEP 40: Following below illustration ÉTAPE 40: Ci-dessous l'illustration Page: 37 of 45 / Page : 37 sur 45...
- Page 38 STEP 41: Following below illustration ÉTAPE 41: Ci-dessous l'illustration Page: 38 of 45 / Page : 38 sur 45...
- Page 39 STEP 42: Following below illustration ÉTAPE 42: Ci-dessous l'illustration Page: 39 of 45 / Page : 39 sur 45...
- Page 40 STEP 43: Following below illustration ÉTAPE 43: Ci-dessous l'illustration Page: 40 of 45 / Page : 40 sur 45...
- Page 41 STEP 44: Following below illustration ÉTAPE 44: Ci-dessous l'illustration Page: 41 of 45 / Page : 41 sur 45...
- Page 42 STEP 45: Following below illustration ÉTAPE 45: Ci-dessous l'illustration Page: 42 of 45 / Page : 42 sur 45...
- Page 43 STEP 46: Following below illustration - Move the curtain between the two bookshelves, using wood screws to tighten the curtain rod (53) to the side rails (01) ÉTAPE 46: Ci-dessous l'illustration - Déplacer le rideau entre les deux étagères, à l'aide de vis à...
- Page 44 STEP 47: Following below illustration -Using hardware #L connect 31 with 1 ÉTAPE 47: Ci-dessous l'illustration -En utilisant le matériel #L connectez 31 avec 1 Page: 44 of 45 / Page : 44 sur 45...
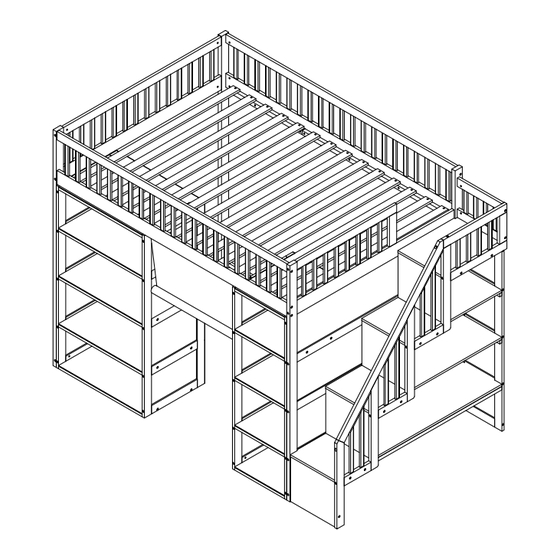
- Page 45 STEP 48: Complete ÉTAPE 48: Complète Page: 45 of 45 / Page : 45 sur 45...
Need help?
Do you have a question about the N709P180329K and is the answer not in the manual?
Questions and answers