Advertisement
Available languages
Available languages
Quick Links
MODELO
MODEL
LEA TODAS LAS INSTRUCCIONES ANTES DE USAR ESTE APARATO
TSSTTVFDMAFNS_22SEM1 (LA).indd 1
TSSTTVFDMAFNS_22SEM1 (LA).indd 1
TSSTTVFDMAFNS
Manual de Instrucciones
HORNO CON FREIDORA DE AIRE
Instruction Manual
AIR FRY OVEN
READ ALL INSTRUCTIONS BEFORE USING THIS APPLIANCE
2022/5/13 上午11:38
2022/5/13 上午11:38
Advertisement

Subscribe to Our Youtube Channel
Related Manuals for Oster TSSTTVFDMAFNS


Summary of Contents for Oster TSSTTVFDMAFNS
- Page 1 MODELO TSSTTVFDMAFNS MODEL Manual de Instrucciones HORNO CON FREIDORA DE AIRE LEA TODAS LAS INSTRUCCIONES ANTES DE USAR ESTE APARATO Instruction Manual AIR FRY OVEN READ ALL INSTRUCTIONS BEFORE USING THIS APPLIANCE TSSTTVFDMAFNS_22SEM1 (LA).indd 1 TSSTTVFDMAFNS_22SEM1 (LA).indd 1 2022/5/13 上午11:38...
-
Page 2: Precauciones Importantes
PRECAUCIONES IMPORTANTES Cuando se utiliza cualquier artefacto eléctrico, siempre se deben seguir precauciones básicas de seguridad para reducir el riesgo de incendio, descarga eléctrica y/o lesiones a personas, incluyendo lo siguiente: 1. Lea todas las instrucciones antes de usar este producto. Este aparato genera calor durante su uso. - Page 3 12. No utilice el aparato para otro uso que no sea el previsto. El mal uso puede causar lesiones. Diseñado solo para uso doméstico en encimeras. Mantenga 152mm (6”) despejadas de la pared y por todos los lados. Utilice siempre el aparato en una superficie seca, estable y nivelada.
- Page 4 24. Consulte la sección Limpieza para obtener instrucciones sobre cómo limpiar superficies en contacto con alimentos. 25. Modelos con sonda de temperatura: La sonda estará caliente durante el uso, maneje con cuidado. Siempre proteja sus manos con guantes de horno antideslizantes o similares. Desconecte la sonda antes de retirar los alimentos del aparato.
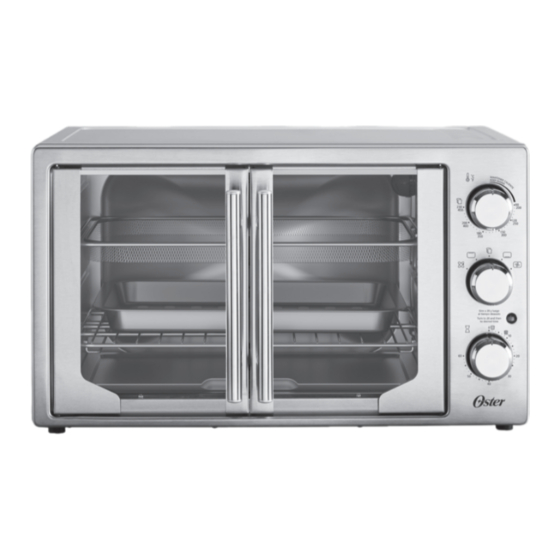
- Page 5 INFORMACIÓN SOBRE SU HORNO PARA MOSTRADOR Bienvenido ¡Felicitaciones por su compra del Horno con Freidora de Aire OSTER ! Si usted ® necesita servicio para su horno de mostrador OSTER , no lo devuelva al lugar de ® compra. 1. Puertas de vidrio templado - Para ver los alimentos desde el frente.
- Page 6 Figura 1 Figura 2 Figura 3 Preparación para Usar Su Horno para Mostrador por Primera Vez Si está usando su horno para mostrador por primera vez asegúrese de: • Retirar todos los adhesivos de la superficie del horno. • Abrir la puerta del horno y retirar todos los documentos impresos y los papeles de la parte interior del horno para mostrador.
- Page 7 Uso de la Función de Tostar (Ver la Fig. 4) Elija la posición deseada para la rejilla. (Consulte la sección “Posicionamiento de la rejilla”) NOTA: la graduación variará dependiendo del tipo de pan. Los panes más blancos y los gofres (waffle) requieren graduaciones de tostado más claro.
- Page 8 ADVERTENCIA: Los alimentos cocinados, la cesta de freír con aire, la bandeja de hornear y la puerta pueden estar muy calientes, manipule con cuidado. No deje el horno de mostrador sin supervisión. Preguntas Frecuentes y Respuestas sobre como Freír con Aire Caliente ¿Debo revolver mis alimentos con aceite? RESPUESTA: No todos los alimentos se beneficiarán por cocinarlos en aceite antes de freírlos con aire.
- Page 9 Carne/Ave/Pescado Alas de pollo 700 g 230 grados 20 min - 25 min Bistec 450 g 230 grados 10 min -12 min Chuletas de puerco 700 g 220 grados 20 min Hamburguesa 450 g 220 grados 20 min - 25 min Pechuga de pollo 450 g 200 grados...
- Page 10 Para Usar la Función de Hornear (Ver la Fig. 6) Paso 1. Coloque una bandeja para horneado con alimento en la rejilla de alambre. Paso 2. Cierre completamente las puertas de vidrio. Paso 3. Gire la perilla de funciones al función de hornear “ “. Paso 4.
- Page 11 Uso de la Función de Asar (Ver la Fig. 8) La función ajustable de asar permite al horno asar a cualquier temperatura. Fabuloso para derretir queso a 150º F o cocinar pescado a 400º F. Ajuste según sea necesario. Paso 1. Coloque la comida en la rejilla para asar o en una bandeja de hornear si es necesario.
- Page 12 Uso de la perillLLa de control de tiempo (ver Fig. 10) Después de girar la perilla de temperatura a la temperatura deseada, gire la perilla de control de tiempo al el tiempo de cocción deseado. Si el tiempo de cocción deseado es menos de 20 min, gire la perilla de control de tiempo a 20 min y luego al tiempo deseado.
- Page 13 Posicionamiento De La Bandeja • El horno posée dos posiciones para colocar la bandeja de hornear, el cual le permite adaptarse a una amplia variedad de alimentos. La bandeja puede colocarse sobre la rejilla o introducirse a travez de las guías por debajo de la misma. (Ver la figura abajo) •...
- Page 14 Combine el azúcar, la margarina y la canela en un tazón pequeño con un tenedor hasta que queden bien mezclados. Unte cada tajada de pan con porciones iguales de la mezcla. En un Horno Tostador Oster, ponga a tostar hasta que el azúcar se derrita y el pan quede dorado de acuerdo a su gusto.
- Page 15 ¼ de pulgada (0.6cm) 1 limón, cortado por la mitad 1 ½ taza de caldo de gallina Precaliente el horno tostador para mostrador Oster a 450°F. Esparza los vegetales al ® fondo de un molde para hornear de 11 pulgadas (28 cm) por 1 ½ a 2 pulgadas (3.5 a 5 cm) de alto y ponga encima la pechuga de pavo.
- Page 16 CONSEJOS ÚTILES / DIAGNÓSTICO DE PROBLEMAS PROBLEMA POSIBLES CAUSAS SOLUCIÓN Alimentos crudos/pasados de • Temperatura o • Tal vez tenga que ajustar el cocción. programación del tiempo y la temperatura a gusto. tiempo incorrectas. • Debido a que su horno para mostrador es más pequeño que su horno común, se calentará...
-
Page 17: Important Safeguards
IMPORTANT SAFEGUARDS When using electrical appliances, basic safety precautions should always be followed to reduce the risk of fire, electric shock, and/or injury to persons including the following: 1. Read all instructions before using this product. This appliance generates heat during use. Do not touch hot surfaces. - Page 18 12. Do not use appliance for other than intended use. Misuse can cause injuries. Intended for household countertop use only. Keep 6 inches (152 mm) clear from the wall and on all sides. Always use appliance on a dry, stable, level surface. 13.
- Page 19 NOTICES 1. Some countertop and table surfaces are not designed to withstand the prolonged heat generated by certain appliances. Do not set the heated unit on a finished wood table. We recommend placing a hot pad or trivet under your toaster oven to prevent possible damage to the surface.
- Page 20 LEARNING ABOUT YOUR COUNTERTOP OVEN Welcome Congratulations on your purchase of an OSTER Oven with Air Fryer! If you require ® service on your OSTER Countertop Oven, do not return to place of purchase. ® 1. Tempered Glass Doors – For front viewing of food.
- Page 21 Figure 1 Figure 2 Figure 3 Preparing To Use Your Countertop Oven for the First Time If you are using your Countertop oven for the first time, please be sure to: • Remove any stickers from the surface of the oven. •...
- Page 22 To Use the Toast Function (See Fig. 4) Select desired rack position. (See “Positioning Rack” Section) NOTE: Different types of bread require different settings. Lighter breads and waffles require lighter setting. Darker breads, muffins and English muffins require a darker setting. Step 1.
- Page 23 FAQ About Air Frying Should I toss my food in oil? ANSWER: Not all foods will benefit from being tossed in oil prior to being air fried. Frozen foods and foods with a high fat content such as chicken wings or bacon do not require oil.
- Page 24 Food Weight Function Temperature Time (min) Oil? (°C) Meat/Poultry/Fish Breaded Chicken 1 lb 200 degrees 20 min - 25 min Breast Breaded Fish 1 lb 200 degrees 12 min - 15 min Bacon 0.5 lb 220 degrees 12 min - 15 min Salmon 1-1.5 lb 230 degrees...
- Page 25 To Use the Bake Function (See Fig. 6) Step 1. Place baking pan with food inside on wire rack. Step 2. Close glass doors completely. Step 3. Turn the Function dial to Bake “ ”. Step 4. Turn the Temperature dial to desired setting. Step 5.
- Page 26 To Use the Broil Function (See Fig. 8) Adjustable Broil allows the oven to broil at any temperature. Great for melting cheese at 150º F or cooking fish at 400º F. Adjust as needed. Step 1. Place food on broil rack or on baking pan if needed. See “Positioning Rack”...
- Page 27 To Use The Timer (See Fig. 10) After rotating the Temperature Dial to your desired temperature, rotate the Timer Dial to the desired cook time. If the desired cooking time is shorter than 20 minutes, turn the dial to 20 minutes and then to the desired time.
- Page 28 Positioning Pan • To accommodate a wide variety of foods the oven has two pan positions. The pan can be placed on top of the rack or inserted into the guide rails below the rack. (See Figure Below) • Before removing the pan allow the unit to cool. •...
- Page 29 Combine the sugar, margarine and cinnamon in a small bowl with a fork until well blended. Spread each bread slice with equal portions of the mixture. In an Oster ® Countertop Oven, toast until the sugar is melted and the bread is browned to your preference.
- Page 30 1 or 2 sprigs each of fresh rosemary and 1 ½ cups chicken broth fresh thyme Preheat Oster Countertop Oven to 230°C. Sprinkle vegetables in bottom of an 11 inch ® baking pan with 1 ½ - 2 inches sides and top with turkey breast. Tuck garlic and herbs under breast.
- Page 31 HELPFUL TIPS / TROUBLESHOOTING PROBLEM POTENTIAL CAUSE SOLUTION Overcooked / Undercooked • Incorrect temperature • You may have to adjust the Foods. or time setting. time and temperature to desired taste. • Because your Countertop Oven is smaller than your regular oven, it will heat up faster and generally cook in shorter periods of time.
- Page 32 XXX where X is any number between 0 and 9 or any letter between A and Z. HORNO CON FREIDORA DE AIRE MODELOS: TSSTTVFDMAFNS-013, TSSTTVFDMAFNS-1MX IMPORTADOR: NEWELL BRANDS DE MÉXICO S.A. DE C.V. AV. JUÁREZ Nº 40-201, COLONIA EXHACIENDA DE SANTA MÓNICA, TLALNEPANTLA DE BAZ, C.P.
Need help?
Do you have a question about the TSSTTVFDMAFNS and is the answer not in the manual?
Questions and answers