Chapters
Table of Contents

Related Manuals for German pool REF-1111


Summary of Contents for German pool REF-1111
- Page 1 Single-Door Refrigerator REF-1111 360° Multi-Oscillation Fan RHS-126 Online Warranty Registration Please read these instructions and warranty information carefully before use and keep them handy for future reference. U S E R M A N U A L...
- Page 2 請即進行保用登記! 有關保用條款細則,請看說明書最後一頁。 Please register your warranty information now ! For Warranty Terms & Conditions, please refer to the last page of this user manual.
-
Page 3: Table Of Contents
Table of Contents Warnings & Safety Precautions Product Structure Installation Instructions Operation Instructions Cleaning & Maintenance Troubleshooting Technical Specification Warranty Terms & Conditions... -
Page 4: Warnings & Safety Precautions
Unplug this product from the power source before cleaning and maintenance. • Contact German Pool authorized service technician for repair or maintenance of this product. WARNING! Risk Of Fire / Flammable Materials This product uses natural refrigerant gas as part of its cooling system. This gas is known as R600a (Isobutene) and is environmentally friendly but can be combustible. - Page 5 Warnings & Safety Precautions 15. DO NOT cover the body or the top of this product. 16. Fix down the accessories in this product during transportation to prevent damage to them. 17. This product is not intended for use by persons (including children) with reduced physical, sensory or mental capabilities, or lack of experience and knowledge, unless they have been given supervision or instruction concerning use of this product by a person responsible for their safety.
- Page 6 Warnings & Safety Precautions Installing and Switching On This Product Operating voltage for this product is 220-240V at 50Hz. Before plugging in the power supply, ensure that the voltage on the rating label corresponds to the working voltage of your electrical system in your home. Insert the plug into an efficient Ground (Earth) connection.
-
Page 7: Product Structure
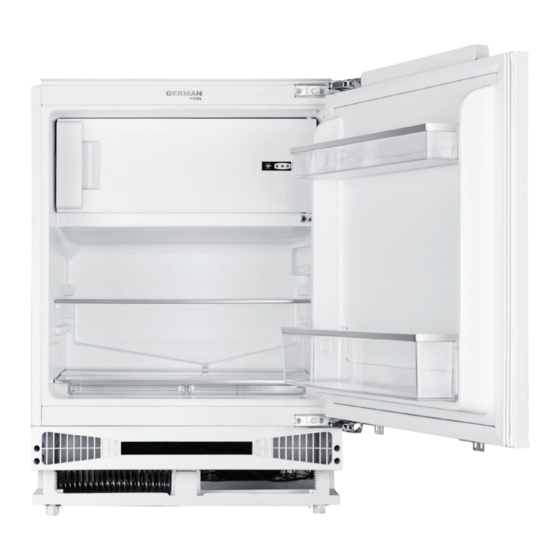
Product Structure Main Body Door Balcony Freezer Compartment Lamp/ Fridge Temperature Compartment Control Panel Adjustable Shelf Drainage Hole Door Balcony Crispers Adjustable Foot Adjustable Foot Accessories Egg Tray Ice Tray Installation Accessories Ice Scraper Drainage Hole Plug Connecting Pin WARNING! Before installation, check that all parts detailed in the product structure diagram are present. -
Page 8: Installation Instructions
Installation Instructions Installation Requirement Unit: mm... - Page 9 Installation Instructions Reversing the Door Opening Direction (Optional) Note: • To reverse the door, you will need to tilt this product backwards to access the lower hinge which is held by screws. DO NOT tilt this product more than 45 degrees and DO NOT lay this product flat on its side.
- Page 10 Installation Instructions Remove the 4 screw hole covers on the opposite side of the product cabinet (at the top and the bottom). Open the top and bottom hinges and remove the top and bottom screws that fix the hinge to the product cabinet.
- Page 11 Installation Instructions Flip over the bottom hinge by 180°, and fix it in place on the diagonally opposite corner of the product cabinet. Cover the old bottom hinge holes with 2 screw hole covers. Screw the door back onto the hinges. Make sure the product door is aligned horizontally and vertically, so that the seals are closed on all sides before final tightening of the screws.
- Page 12 Installation Instructions Installing The Product Into The Cabinet Push the refrigerator into the wooden cabinet, the refrigerator should be positioned closer to the left side of the cabinet. Tools & Parts Cross Head Screws 3.9x12, T20 Connection Flange Screw Hinge Cover Adjust the position of the refrigerator, secure product top and bottom with screws and fix the hinge to the cabinet.
- Page 13 Installation Instructions Remove the connecting metal plate, and install the connecting metal plate on the cabinet door. Please follow the steps below to connect the cabinet door and the refrigerator door. Use #13 spanner to adjust the nut until the cabinet door is level with the neighboring cabinets. P.13...
-
Page 14: Operation Instructions
Operation Instructions Note: Let this product stand for a minimum of 3 hours before plugging in to the power source. Temperature Selection • This product is equipped with a temperature control panel. Press Adjust button to change the temperature setting inside the fridge: 1 is warmest setting, 5 is coldest setting. •... -
Page 15: Cleaning & Maintenance
Operation Instructions Energy Saving Advice • DO NOT install this product close to heat sources such as cooker, dishwasher or radiator. • Locate this product in a cool well-ventilated room and make sure that the air vents are clear. • Avoid opening the product door for a long time, as warm air will enter the fridge and may cause build-up as well as affecting the energy consumption. - Page 16 Cleaning & Maintenance When This Product Is Not In Use If this product will not be used in a prolonged period of time, disconnect from the power source, empty out all the food, and clean the inside. Leave the door open to prevent build-up of odours. Defrosting Note: •...
-
Page 17: Troubleshooting
Troubleshooting Should a problem occur with this product, check if you can solve it following the table below. If problem persists, please contact German Pool Customer Service & Repair Centre. DO NOT disassemble or repair this product yourself. Problem Solution... - Page 18 Troubleshooting Smell/odour Check all food and drinks in the fridge are in date and correctly packaged. If they are not, remove them immediately or repackage; check for spillages on each shelf, rack and drawer, remove the drawers to check that no spillages have settled underneath them if necessary.
-
Page 19: Technical Specification
Technical Specification Model REF-1111 Voltage / Frequency 220-240 V, 50 Hz Rated Power (Max) 100 W Product Dimensions (W) 596 (D) 550 (H) 818-870 mm Total Capacity 112 L Rated Total Net Capacity 111 L Net Weight 28 kg •... - Page 20 目錄 警告及注意事項 產品結構 安裝說明 使用說明 清潔與保養 故障檢修 技術規格 保用條款 P.20...
-
Page 21: 警告及注意事項
警告及注意事項 警告! 使用本產品前,請仔細閱讀所有說明。 • 本產品只限家居室內日常使用,如產品作任何商業、工業、出租或其他用途,保用證即告失 效。 • 請勿讓兒童或身體有殘障、精神不健全及對本產品缺乏經驗或知識的人士單獨使用本產品;如 需使用,必須要在負責任的成年人監管下方可使用。 • 應照顧好兒童,確保他們不會玩耍本產品。 • 無成年人監管下,勿讓兒童清潔及維護本產品。 • 使用前,請先檢查所有電壓是否與本產品標籤上的電壓相符。 • 如果電源線損壞,為免發生意外,電源線必須由廠方、廠方指定的維修中心或同等合格的技術 人員進行更換。 • 清潔或檢查本產品前,必須先關機及拔掉插頭。 • 請聯繫德國寶授權的技術人員進行維修或保養本產品。 警告!小心火災危險/易燃物品 1. 本產品使用天然製冷劑氣體作為其冷卻系統的一部分。這種氣體被稱為R600a(異丁烯),對 環境無害,但可能是可燃的。因此,在處理或運輸本產品時必須小心,以確保製冷迴路組件不 會損壞。 2. 嚴禁堵塞本產品的通風口。 3. 嚴禁將本產品放置或靠在電源線上。 4. 嚴禁使用機械設備或其他人工方式加速除霜過程,例如加熱器或吹風機。 5. 嚴禁在本產品的冷藏室內使用電器。 6. 如果本產品用作更換帶鎖的舊雪櫃,作為安全措施,在存放或處置之前必須將鎖拆下,防止兒 童將自己鎖在雪櫃內。 7. 舊雪櫃和冰箱含有絕緣氣體和製冷劑,必須妥善處理。如果您有任何疑問,請聯繫您所在地的 相關部門或經銷商。必須確保在相關廢物處理服務機構接收該產品之前,不會損壞報廢單元。... - Page 22 警告及注意事項 17. 本產品不適合身體、感官或精神能力較差或缺乏經驗和知識的人員(包括兒童)使用,除非有 負責其安全的人員對他們進行有關使用本產品的監督或指導。 18. 必須監督兒童,確保他們不玩耍本產品。 19. 如果電源線損壞,必須由製造商、其服務代理或類似合格人員更換,以避免危險。 20. 本設備旨在用於家庭和類似應用,例如:商店、辦公室和其他工作環境中的員工廚房區域;農 舍;酒店、汽車旅館和其他住宅類型環境中的客戶;民宿。 21. 警告!保持本產品外殼或內置結構中的通風口暢通無阻。 22. 警告!除製造商推薦以外,嚴禁使用機械設備或其他方式來加速除霜過程。 23. 警告!嚴禁損壞製冷劑迴路。 24. 警告!嚴禁在本產品的冷藏室內使用電器,除非是製造商推薦的類型。 25. 警告!嚴禁在產品後部放置多個便攜式插座或便攜式電源。 26. 嚴禁在本產品中存放爆炸性物質,例如帶有易燃推進劑的氣霧罐。 27. LED燈的更換或維修均必須由製造商、其服務代理或類似的合格人員進行。 28. 警告!由於本產品使用了易燃氣體和製冷劑,必須根據當地監管機構的規定廢棄冰箱。 29. 警告!放置本產品時,必須確保電源線沒有被卡住或損壞。 電氣安全 30. 本產品必須插入接地插座! 31. 打開電源之前,必須確保電源電壓與銘牌上所示的電壓相同。本產品工作電壓為 220-240V;50Hz。連接到任何其他電源可能會損壞本產品。 32. 本產品可能配有不可重新接線的插頭。如果需要更換插頭中的保險絲,則必須重新安裝保險絲 蓋。如果保險絲蓋丟失或損壞,在找到合適的更換零件之前嚴禁使用插頭。 33. 如果因插頭不適用於您的插座,或因任何方式損壞而必須更換插頭,則應將其剪下,並按照接 線說明安裝合適的插頭。必須由合資格的電工來執行,拆下的插頭必須安全處理,避免因插入...
- Page 23 警告及注意事項 7. 本產品放置在臥式冷凍櫃或冰櫃旁邊時,它們之間必須保持至少10厘米的距離,以防止外表面 受潮。 8. 本產品必須在平坦的表面上使用。 9. 如要調平本產品,請使用本產品底部的可調節支腳。 10. 嚴禁將本產品放置在鋪有地毯的表面上,避免阻礙通風。 11. 保持本產品外殼或內置結構中的通風口暢通無阻。 12. 本產品只能放置在平坦、堅固的表面上。 13. 建議由合資格的廚房安裝工或木工安裝本產品。 14. 必須選擇乾燥、通風良好的空間。 15. 必須將本產品放置在易於插拔插頭的位置。 接通電源前 1. 使用本產品前,在溫水中加入一茶匙碳酸氫鈉,用布擦拭所有部件,再用乾淨的濕布重複此過 程並晾乾。清潔時必須確保本產品未連接電源。 2. 除去所有運輸膠帶和發泡膠保護件。用蘸有溫肥皂水的布清潔內部,再用清水擦拭並擦乾。 3. 首次打開本產品時可能會產生氣味,當產品開始冷卻時氣味會消失。 4. 當本產品就位後,調整支腳以確保穩定。這對於確保安靜運行和正確開門至關重要。 5. 連接到電源插座後,至少3小時內避免打開本產品的電源。本產品內的冷卻劑在運輸和就位後 需要時間沉澱,否則會影響本產品的冷卻性能。 6. 當本產品穩定後,找到溫度控制面板並將其設置為「5」,然後打開電源,壓縮機將開始工 作,關上產品門。 7. 我們建議至少4小時內避免打開產品門,以使本產品達到標準工作溫度。 8. 當製冷劑被泵送到冷卻系統並通過本產品後部的盤管或管道時,您可能會聽到微弱的聲響。壓 縮機運作時,您可能會聽到輕微的呼呼聲或脈動噪音。恆溫器控制壓縮機的運行,當壓縮機循...
-
Page 24: 產品結構
產品結構 主機 櫃門放置架 急凍室 照明燈及 冷藏室 溫度控制面板 可拆卸放置架 排水孔 櫃門放置架 蔬果儲藏盒 支腳 支腳 配件 雞蛋托盤 冰塊托盤 安裝配件 刮冰器 排水孔塞 連接銷 注意: 安裝前,必須檢查所有部件是否齊全。 P.24... -
Page 25: 安裝說明
安裝說明 安裝尺寸圖 單位:mm P.25... - Page 26 安裝說明 重置開門方向(可選) 注意: • 要重置開門方向,您需要向後傾斜本產品才能接觸到裝有螺釘的下部鉸鏈。 嚴禁將本產品傾 斜超過45度,嚴禁將本產品側放平放。 • 為了您自身的安全,應至少由2人抬起或傾斜本產品。 • 所需工具:十字螺絲刀、一字螺絲刀和六角扳手或套筒螺絲刀。 1. 拆下本產品門正面頂部和底部的4個螺絲孔蓋。 2. 門關閉後,把將門固定到鉸鏈頂部和底部的螺絲卸下。 3. 用手托著門底部並拆下,必須小心地提起門,確保不會損壞鉸鍊或門。 P.26...
- Page 27 安裝說明 4. 拆下機身另一側頂部和底部的4個螺絲孔蓋。 5. 打開頂部和底部鉸鏈,將固定到機身上的鉸鏈的頂部和底部螺絲卸下。 6. 將頂部鉸鏈翻轉180°,並將其固定在機身的對角處。 翻轉180° P.27...
- Page 28 安裝說明 7. 將底部鉸鏈翻轉180°,並將其固定在機身的對角處,然後裝回螺絲孔蓋。 翻轉180° 8. 將鉸鏈與門用螺絲固定,重新安裝門。必須確保門水平和垂直對齊,以便在最終擰緊之前,四 邊的密封條已緊貼門。 9. 將門頂部和底部的4個螺絲孔蓋裝回到現在固定鉸鏈的另一側。 P.28...
- Page 29 安裝說明 將產品安裝到傢俱內 1. 將產品放入定製的木質傢俱中,產品應該靠近傢俱的左側。 工具及零部件 十字螺絲 3.9x12, T20 連接板 突緣螺絲 鉸鏈蓋 2. 調整產品的位置,用螺絲固定產品上下和門鉸鏈螺絲。 將鉸鏈固定在傢俱上 頂部 注意:如有需要,可以在鉸 鏈上安裝墊片 底部 3. 測量A的尺寸 測量前,需要拆下盒蓋。 P.29...
- Page 30 安裝說明 4. 拆下連接金屬板,將連接金屬板安裝在木門上。 5. 請按照以下步驟連接木門和雪櫃門。 用#13號扳手調節螺母,使木門與左右側櫃水平。 P.30...
-
Page 31: 使用說明
使用說明 注意: 連接電源之前讓本產品靜置至少3小時。 溫度選擇 • 本產品配備溫度控制面板。按調節按鈕可改變冷藏室內的溫度等級:設置1是最暖,設置5是最 冷。 • 根據本產品所在房間的環境溫度,您可能需要調節溫度控制面板:在環境溫度較高的房間中, 溫度控制面板可能需要調整至較冷的設置;在環境溫度較低的房間中,溫度控制面板可能需要 調整至較暖的設置。 • 設置最冷(設置5)應用作快速冷卻/冷凍設置,並且只能在大量食物放入冰箱前2小時進行設 置。 • 食物放入冰箱後,應將溫度控制恢復至設置4,否則冷藏室內的溫度可能會降至0℃以下,因為 壓縮機將持續運行。 • 設置溫度控制後,關上門並插上電源插頭。建議至少4小時內不要打開門,以使設備達到標準 工作溫度。 注意: • 冷藏室的標準工作溫度應在0℃至4℃之間,急凍室的標準工作溫度應在-18℃至-25℃之間。 • 新鮮儲存食物的溫度和開門頻率會影響冷藏室內的溫度。如有需要請自行更改溫度設置。 節能建議 • 避免將本產品安裝在靠近熱源的位置,例如炊具、洗碗機或散熱器。 • 將本產品放置在陰涼、通風良好的房間內,並確保通風口暢通。 • 盡量避免長時間打開雪櫃門,因為熱空氣會進入雪櫃內,導致櫃內結冰,影響能耗。 • 確保沒有任何障礙物阻止門正常關閉。 • 確保門封條乾淨且沒有撕裂或裂口。 • 將最易腐爛的食物(即保質期較短的食物如熟肉)存放在最冷的地方。 • 蔬果儲藏盒是本產品中最溫暖的部分,適用於蔬菜、沙律和水果等。 • 嚴禁令本產品超載:避免阻礙冷空氣循環或堵塞,形成熱氣團。... -
Page 32: 清潔與保養
清潔及保養 警告! 清潔和維護前,必須拔除電源插頭。 內部清潔 • 嚴禁將水倒在本產品上。 • 必須定期使用碳酸氫鈉和溫水(5毫升至0.5升水)的溶液清潔內腔。 • 用肥皂水清潔配件,嚴禁將它們放入洗碗機中。 • 嚴禁使用研磨產品、清潔劑或肥皂。 • 清洗後,用濕布抹拭再小心擦乾。 • 完成清潔後,用乾燥的手重新連接插頭。 外部清潔 • 用沾上溫肥皂水的濕布清洗外殼,嚴禁使用研磨產品。 • 產品底面有鋒利邊緣,清潔必須小心。 • 每年用刷子或吸塵器對本產品後部和壓縮機進行一至兩次除塵,因為灰塵的積累會影響本產品 的性能並導致能耗增加。 不使用本產品時 長時間不使用本產品時,必須斷開電源,清空所有食物並清潔內部。將門打開以防止氣味積聚。 除霜 注意: • 執行以下過程時必須小心。 • 建議每年除霜兩次或當霜層厚度約為7mm(1/4英寸)時進行除霜。 1. 在解凍過程前2小時,將溫度控制調校到設置5,確保食物處於最低溫度,然後再取出冷凍食 品。所有食物均應用多層報紙包裹並存放在陰涼處(例如其他雪櫃或冰箱)。 2. 在可拆卸放置架及櫃門放置架下方和旁邊放置幾層報紙或毛巾。 3. 關閉電源插座並拔出電源插頭。 4. 取出所有部件,並讓門或蓋子打開。可以將裝有溫水(不是熱水)的容器小心地放入本產品 內,以加快除霜過程。... -
Page 33: 故障檢修
故障檢修 每當本產品出現問題時,請檢查是否可以按照下表解決問題。如果問題仍然存在,請聯繫德國寶客 戶服務及維修中心,嚴禁私自拆卸維修。 故障現象 解決方法 本產品不運作 檢查本產品是否已接通電源 檢查是否停電 檢查插頭是否故障 檢查保險絲是否熔斷 檢查本產品的電壓是否正確 插座是否有故障?將插頭連接到確定工作正常的插座上 內部溫度不夠冷 檢查是否放入太多食物 檢查溫度控制面板是否設置為合適的溫度 檢查本產品是否放置在陽光直射處或太靠近熱源 檢查環境溫度是否在本產品的操作限制範圍內 門是否經常打開?打開門後空氣中的濕度進入本產品,在潮濕環境下開門越 頻繁,濕氣積聚的機會越大 內部溫度太冷 通過溫度控制面板調節提高溫度。最高設置(設置5)只能用作快速冷卻,並 且只能在大量食物放入冰箱前 2小時設置。否則冷藏室內的溫度可能會降至 0℃以下,因為壓縮機將持續運行 產品內部潮濕 由冷凝引起,請及時擦乾 產品外部潮濕 由冷凝引起,請及時擦乾 出現異味 檢查食物和飲料是否過期且包裝正常,否則必須立即將其移除或重新包裝; 檢查是否有溢出物,必要時拆下蔬果儲藏盒,檢查下方是否有溢出物。未經 清潔和留下的溢出物可能會產生異味 檢查排水管是否堵塞或本產品背面的滴水盤是否已滿。可以通過倒入熱水來 清理管道,但必須確保已從插座上拔下插頭,並放置一個水壺或水桶來接住 流水 門無法正常關閉 確保沒有任何障礙物阻止門關閉 檢查櫃門放置架是否正確就位 檢查門密封條是否變形或撕裂 檢查本產品是否水平擺放 異常聲音 檢查本產品是否位於平坦、水平的表面上並且安裝穩定... -
Page 34: 技術規格
技術規格 型號 REF-1111 220-240 V, 50 Hz 電壓 / 頻率 100 W 額定功率(最大) 機身尺寸 (W) 596 (D) 550 (H) 818-870 mm 112 L 總容量 111 L 額定淨容量 28 kg 淨重 • 產品規格及設計如有變更,恕不另行通知。 • 中英文版本如有出入,一概以中文版為準。 • 本產品使用說明書以www.germanpool.com網上版為最新版本。 P.34... -
Page 35: Warranty Terms & Conditions
- the serial number is modified, damaged or removed from the product. - 機身編號被擅自塗改、破壞或刪除。 4. German Pool will, at its discretion, repair or replace any defective part. 4. 總代理有權選擇維修或更換配件或其損壞部份。 5. This warranty will be void if there is any transfer of 5. - Page 36 Fax:+853 2875 2661 HONG KONG TOP BRAND TEN YEAR ACHIEVEMENT AWARD © All rights reserved. Copying, reproducing or using the contents of this manual is not allowed without prior authorization from German Pool, violators will be prosecuted. www.germanpool.com REF-1111-M-24(1) P.36...
Need help?
Do you have a question about the REF-1111 and is the answer not in the manual?
Questions and answers