
Related Manuals for Stulz CFO 1602


Summary of Contents for Stulz CFO 1602
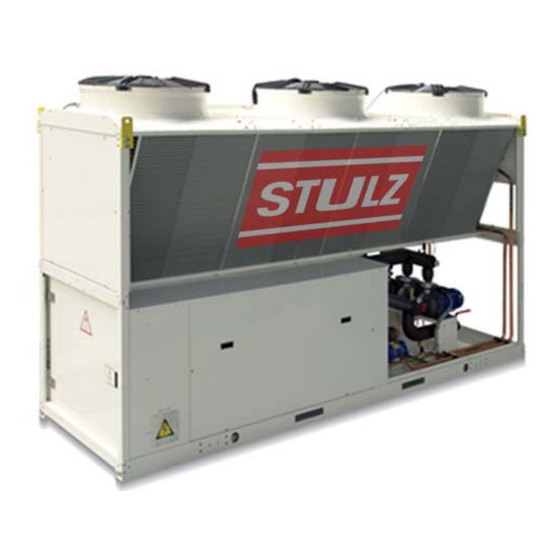
- Page 1 1602-1702-1902-2002-2102- 2302-2602-2802-3002-3202- 3402-3702-4202-4902 AIR COOLED WATER CHILLER FROM 150 TO 500 kW Installation and Use Manual...
-
Page 3: Table Of Contents
CONTENTS GENERAL INFORMATION − GENERAL WARNINGS − INTENDED USE − STANDARD UNIT SPECIFICATIONS REGULATIONS AND CERTIFICATIONS − UNI EN ISO 9001 CERTIFICATION − CE MARK RESIDUAL RISKS − REFRIGERANT SAFETY CHARTS TECHNICAL DATA − GENERAL TECHNICAL SPECIFICATIONS RECEPTION − INSPECTION UPON RECEPTION −... -
Page 4: General Information
GENERAL INFORMATION GENERAL WARNINGS MANUAL PURPOSE This manual has been designed to enable the unit to be installed, started up and maintained correctly. MANUAL INSTRUCTIONS It is essential to observe these instructions. The manufacturer declines all liability for any damage that may be caused whether directly or indirectly to persons or things if these instructions are not heeded. -
Page 5: Standard Unit Specifications
STANDARD UNIT SPECIFICATIONS COMPRESSOR scroll compressor complete with: overload thermal protection, high refrigerant discharge temperature, rubber antivibration mounts, oil charge. An oil heater is automatically switched on at the compressor shut-down to prevent oil dilution by the refrigerant. STRUCTURE hot-galvanized and painted plate structure with pre-painted aluminium external panelling to ensure maximum weatherability. - Page 6 - copper / aluminium condenser coils with acrylic lining - steel mesh strainer to be mounted at the exchanger inlet. Should the filter not be installed in the water system, Stulz declines all responsibility and the warranty on the equipment automatically expires.
-
Page 7: Regulations And Certifications
CE MARK Stulz products bear the CE mark, in compliance with the requirements of the following EC directives, including the latest amendments, and with the corresponding national approximated legislation:... -
Page 8: Residual Risks
RESIDUAL RISKS GENERAL This section lists some of the more common situations which, being beyond the control of the manufacturer, could be a source of risk to persons or property. DEFINITION OF DANGER AREA The figure below highlights the area in which only authorised personnel may operate. - External danger zone, identified by a precise area around the unit and its vertical projection on the ground in the case of hanging unit. -
Page 9: Refrigerant Safety Charts
- Failure to secure the cover enclosing electrical components can lead to the infiltration of dust and water, ultimately causing electric shocks, damage to the unit, or fire. Always fasten the cover securely to the unit. - If live metal parts of the unit are not connected properly to the earth system, they can cause electric shock or even death by electrocution. - Page 10 08 Check of the Personal protection. Assure an adequate ventilation, especially in closed rooms. exposition / Control parameters. Difluorometan (R32): Recommended limits of exposition: AEL (8h and 12h TWA) = 1000 personal ml/m3 protection Pentafluoroetan (R125): Recommended limits of exposition: AEL (8h and 12h TWA) = 1000 ml/m3 Protection of respiratory tract.
-
Page 11: Technical Data
TECHNICAL DATA GENERAL TECHNICAL SPECIFICATIONS Acoustic configuration: Standard (C) / Compressors insulation (B) SIZES 1602 1702 1902 2002 2102 2302 2602 2802 3002 3202 3402 3702 4202 4902 COOLING Cooling capacity 162,8 174,4 188,9 199,9 216,2 236,6 261,0 278,6 300,1 322,7 345,1 373,9... - Page 12 Acoustic configuration: extremely low noise (A+) SIZES 1602 1702 1902 2002 2102 2302 2602 2802 3002 3202 3402 3702 4202 4902 COOLING Cooling capacity 155,7 169,6 182,7 193,8 207,5 226,6 249,4 263,8 288,4 308,9 328,6 356,6 404,2 459,1 Compressor power input 57,5 62,8 68,2...
- Page 13 OVERLOAD AND CONTROL DEVICE CALIBRATION Value High pressure safety switch 4050 3300 Low pressure safety switch Low pressure safety switch (Brine) Antifreeze protection °C High pressure safety valve 4500 Low pressure safety valve 2800 Max no. of compressor starts per hour High compressor discharge temperature safety thermostat °C FOULING CORRECTION FACTOR...
- Page 14 Acoustic configuration: Standard (C) Sound Power Level (dB) Sound Sound pressure power level level Octave band (Hz) 63 125 250 500 1000 2000 4000 8000 dB(A) dB(A) SIZES 1602 1702 1902 2002 2102 2302 2602 2802 3002 3202 3402 3702 4202 4902 Acoustic configuration: compressors soundproofing (B)
-
Page 15: Reception
RECEPTION INSPECTION UPON RECEPTION Check on arrival that the unit has not suffered damage during transit and that it is complete in every part as specified in the order. In the event of visible damage/deficiencies being discovered, make a note immediately on the delivery document with the comment: "CONDITIONAL ACCEPTANCE —... -
Page 16: Removing The Packing
3 lifting points Insert safety pins (1) and split pins (2) use 3-arm uprights (3 slopes/chains/slings per each side of the unit) 4 lifting points How to balance the charge use 4-arm uprights Move the upper hook or the lower hooks, according to the spring (4 slopes/chains/slings per each side of the unit) equalizer rocker arm type c >... -
Page 17: Positioning
(in this case, flexible joints are necessary on all the hydraulic/ aeraulic connections – the joints are not supplied by Stulz). 6. Anchor the unit to the ground; foresee windbreak barriers in case of places where there are strong prevalent winds. -
Page 18: Dimensions
DIMENSIONS Sizes 1602-1702-1902-2002 1120 2850 (11) (12) 1600 (14) 1640 (1) INTERNAL EXCHANGER (EVAPORATOR) (9) INTERNAL EXCHANGER WATER OUTLET (2) EXTERNAL EXCHANGER (CONDENSER) (10) LIFTING LUGS (3) HOLE TO HANG UNIT (11) MINIMUM DIMENSION FOR A SAFE PASSAGE. (4) LIFTING BRACKETS (REMOVABLE, IF REQUIRED, AFTER (12) MINIMUM DIMENSION FOR A SAFE PASSAGE WHEN THE POSITIONING THE UNIT) DOOR OF THE ELECTRICAL SWITCHBOARD IS OPEN. - Page 19 Sizes 2102-2302-2602 1120 1023 1507 3800 (11) (12) 2240 (14) 1640 (1) INTERNAL EXCHANGER (EVAPORATOR) (9) INTERNAL EXCHANGER WATER OUTLET (2) EXTERNAL EXCHANGER (CONDENSER) (10) LIFTING LUGS (3) HOLE TO HANG UNIT (11) MINIMUM DIMENSION FOR A SAFE PASSAGE. (4) LIFTING BRACKETS (REMOVABLE, IF REQUIRED, AFTER (12) MINIMUM DIMENSION FOR A SAFE PASSAGE WHEN THE POSITIONING THE UNIT) DOOR OF THE ELECTRICAL SWITCHBOARD IS OPEN.
- Page 20 Sizes 2802-3002-3202 1332 2148 1120 4750 (11) (12) 2870 (14) 1640 (1) INTERNAL EXCHANGER (EVAPORATOR) (9) INTERNAL EXCHANGER WATER OUTLET (2) EXTERNAL EXCHANGER (CONDENSER) (10) LIFTING LUGS (3) HOLE TO HANG UNIT (11) MINIMUM DIMENSION FOR A SAFE PASSAGE. (4) LIFTING BRACKETS (REMOVABLE, IF REQUIRED, AFTER (12) MINIMUM DIMENSION FOR A SAFE PASSAGE WHEN THE POSITIONING THE UNIT) DOOR OF THE ELECTRICAL SWITCHBOARD IS OPEN.
- Page 21 Sizes 3402-3702 2233 2850 (11) 1600 (12) (14) 1850 (1) INTERNAL EXCHANGER (EVAPORATOR) (9) INTERNAL EXCHANGER WATER OUTLET (2) EXTERNAL EXCHANGER (CONDENSER) (10) LIFTING LUGS (3) HOLE TO HANG UNIT (11) MINIMUM DIMENSION FOR A SAFE PASSAGE. (4) LIFTING BRACKETS (REMOVABLE, IF REQUIRED, AFTER (12) MINIMUM DIMENSION FOR A SAFE PASSAGE WHEN THE POSITIONING THE UNIT) DOOR OF THE ELECTRICAL SWITCHBOARD IS OPEN.
- Page 22 Sizes 4202-4902 2233 1533 3800 (11) (12) 2240 (14) 1850 (1) INTERNAL EXCHANGER (EVAPORATOR) (9) INTERNAL EXCHANGER WATER OUTLET (2) EXTERNAL EXCHANGER (CONDENSER) (10) LIFTING LUGS (3) HOLE TO HANG UNIT (11) MINIMUM DIMENSION FOR A SAFE PASSAGE. (4) LIFTING BRACKETS (REMOVABLE, IF REQUIRED, AFTER (12) MINIMUM DIMENSION FOR A SAFE PASSAGE WHEN THE POSITIONING THE UNIT) DOOR OF THE ELECTRICAL SWITCHBOARD IS OPEN.
-
Page 23: Water Connections
- WATER CONNECTIONS - GENERAL WARNINGS Piping must be designed with the least possible number of bends and head variations. If the pressure chute of the installation is above the useful prevalence of the pump, the water delivery capacity is reduced as well as, as a consequence, the thermal exchange and the yield. - Page 24 The recovery can be: • TOTAL, with 100% recovery of the condensation heat the thermoregulation is performed by STULZ control system • PARTIAL with 20% recovery The customer is responsible for the management of the circulation pump, valves, thermostats, etc.
-
Page 25: Electrical Connections
- ELECTRICAL CONNECTIONS GENERAL WARNINGS The characteristics of the electrical lines and relevant components must be determined by specialized personnel able to design electrical installations; moreover, the lines must be in conformity with professional procedures and the regulations in force. All electrical operations should be performed by trained personnel having the necessary requisites under law and being informed about the risks relevant to these activities. - Page 26 CONNECTION TO THE MAINS 1. Make sure that the sectioning device at the beginning of the unit’s power line is opened, locked and equipped with a signal. 2. Open the general line disconnecting switch (if present) 3. Verify that the net is in conformity with the data shown in the registration plate placed on the electrical board. 4.
- Page 27 EXTERNAL AIR TEMPERATURE PROBE - Optional It allows the automatic correction of the set-point according to the external air temperature. For example, the summertime with low external temperatures, it is possible to have the internal comfort even with set- points higher than the standard. The parameter configuration must be carried out.
- Page 28 WATER RESET - Optional It allows the automatic correction of the set-point, according to an external signal of 4-20 mA or 0-10 vcc. The working process is similar to the above mentioned process. The parameter configuration must be carried out. MENU Parameter name meaning...
- Page 29 DRIVER MODULE code C5110803 The electronic thermostatic valve management firmware is located here. It is mounted on the expansion module. STRIP EVAPORATOR MODULE JUMP2 code C5110674 JUMP3 JUMP1 JUMP4 DIP1 It manages components, safety devices, inputs and outputs relative to the water circuit (pumps, differential manostat, temperature probes) DIP2 STRIP...
- Page 30 dip switch for the serial address of the module LED 1 : signalization of gateway LED 2 : signalization of gateway in working programming C5110676 C5110770 jumper for activating the firmware rewriting of the RS 485 serial port RS 485 gateway dip switch for the configuration Connection to the CAN network of the...
- Page 31 KIT LONWORKS Upon request, the unit is equipped with the kit already mounted on the electric board; it can eventually be mounted later. Refer to the electric diagram and to the LONWORKS MANUAL. For information about cables for the Lonworks network, visit the web site www.echelon.com. technology is a complete platform to implement the network system control.
-
Page 32: Start-Up
START-UP ALL THE EQUIPMENT MUST BE COMMISSIONED BY AUTHORISED SERVICE CENTRES. THIS SERVICE IS LIMITED TO START-UP OF THE UNIT ONLY AND NOT THE CONNECTIONS OR INSTALLATION OF THE SYSTEM. ONLY QUALIFIED TECHNICIANS MUST PERFORM THE FOLLOWING OPERATIONS. PRELIMINARY CHECKS Before checking, please verify the following: •... - Page 33 VERIFY TENSIONS – ABSORPTIONS Check that the temperatures of the fluids are included in the WORKING LIMITS. If the controls of the previous paragraphs are positive, it is possible to restart the unit. For information on the control panel, refer to the paragraph SETTING. While the unit is working (ATTENTION ELECTRIC RISK: WORK SAFETLY) check: •...
-
Page 34: Control
CONTROL CONTROL INTERFACE COOL cooling unit status HEAT heating ON – ECO – OFF Enabled timing bands INLET temperature OUTLET temperature alarm ; OK inserted steps on total ALARM menu access Current set point SET POINT, TIMING BANDS, CLOCK access HEAT / COOL change off = unit OFF Stata MENU access... - Page 35 SET-POINT CORRECTIONS The correction aim at optimising the energetic efficiency of the unit. To do this, the corrections dynamically modify the set-point according to some variables. For example, in the summertime with very low external temperatures, therefore with a reduced load, it is possible to obtain the internal comfort even with set-points higher that the standard with a consequent higher energetic efficiency.
- Page 36 ACCESSIBLE PARAMETERS PARAMETER MENU STRUCTURE PARAMETERS LIST Thermoreg. Antifreeze LIST Maintenance LIST Set - point LIST SCHEDULING Enscheduling LIST Configure LIST CLOCK SETUP Clock LIST Data LIST menu: PARAMETERS – THERMOREG. – SET POINT DEFAULT values 90 / CEN SecondSetC Secondary cooling Set Point 118 / CEN SetCool...
- Page 37 SETUP – PARAMETERS : To enter in the SETUP menu button F3 SETUP HOME THERMOREG. Set the setpoint and the operating modes To select the submenu buttons ▲▼ F2 – F3 ES C HOME (ATC ONLY) To access button F1 ENTER HOME To access the desired buttons...
- Page 38 SETUP – CLOCK SETUP To enter in the SETUP menu button F3 SETUP HOME CLOCK Set the clock To select the CLOCK SETUP buttons ▲▼ F2 – F3 submenu HOME DATA Set the dater To access to CLOCK button F1 ENTER HOME To set HOURS MINUTES buttons F2 F3 F4...
- Page 39 submenu: To enter in the STATA menu button F4 STATE GENERALS HOME UNIT 1 To select the module buttons ▲▼ F2 – F3 mod_comp1 HOME mod_comp2 mod_comp3 To access button F1 ENTER mod_evap HOME UNIT 2 To scroll the stata buttons ▲▼...
- Page 40 Index UNIT_1 – MOD COMP_1 Stata Valve 2 c3 status 1=ON / 0=OFF Valve 3 c3 status 1=ON / 0=OFF Liquid solenoid 1=ON / 0=OFF Coil temperature °C ( tenths ) Recovery temperature °C ( tenths ) Condensation pressure Evaporation pressure Fan Status Defrost Status 1=ON / 0=OFF...
- Page 41 An alarm list is associated with the inputs of each electronic module of the unit. According to the unit configuration, and then with electronic modules and options, some lists and/or ALARMS can not be used. ALARM STRUCTURE CENTRAL Unit_1 Mod_comp1 Mod_comp2 Mod_comp3 Mod_Evap...
- Page 42 COMPRESSOR MODULE Name E101 Cond./ Evap. temp. probe fault E102 Condensing pressure probe fault E103 Evaporation pressure probe fault E104 Recovery temp. probe fault E105 High pressure alarm E106 Low pressure alarm E107 Fan/Pump thermal cut-out alarm E111 Cond. / Evap. H2O flow alarm E112 High pressure pre-alarm 1 E113 High pressure pre-alarm 2...
-
Page 43: Routine Maintenance
ROUTINE MAINTENANCE PREVENTIVE MAINTENANCE All equipment is subjected to wear out. The maintenance makes: keeps the unit efficiency the components last longer, keeps their efficiency and limits breakdowns. Therefore, it is fundamental to perform periodical checks: a few controls can be performed by the user (AUTONOMOUS MAINTENANCE) and they are mainly cleaning activities;... - Page 44 97/23 CE PED DIRECTIVE 97/23 CE PED DIRECTIVE gives instructions for installers, users and maintenance technicians as well. Refer to local actuation norms. In Italy, refer to the Ministerial Decree of 1 December 2004 no. 329 (and following modifications) which defines the performances to be executed;...
- Page 45 R134a R407C R410A R134a R407C R410A Ts [°C] Ts [°C] Td [°C] Tb [°C] Ts [°C] Ts [°C] Ts [°C] Td [°C] Tb [°C] Ts [°C] -41.09 -26.36 -36.90 -43.90 -51.66 11.0 30.26 46.32 30.73 25.30 13.40 -37.14 -22.31 -33.11 -40.05 -48.02 11.2...
- Page 46 R134a R407C R410A R134a R407C R410A Ts [°C] Ts [°C] Td [°C] Tb [°C] Ts [°C] Ts [°C] Ts [°C] Td [°C] Tb [°C] Ts [°C] 22.0 57.53 73.74 56.00 51.63 37.88 33.0 76.22 92.30 72.94 69.73 54.54 22.2 57.92 74.14 56.36 52.01...
-
Page 47: Troubleshooting
TROUBLESHOOTING THE OPERATIONS MUST BE CARRIED OUT BY TECHNICAL QUALIFIED PERSONNEL HAVING THE REQUISITES UNDER LAW REQUISITES AND IN CONFORMITY WITH THE SAFETY REGULATIONS IN FORCE. THE INTERVENTIONS WITHIN THE WARRANTY PERIOD WILL BE CARRIED OUT BY AUTHORIZED SERVICE CENTERS. BEFORE RESETTING AN ALARM, IDENTIFY AND ELIMINATE ITS CAUSE. - Page 48 COMPRESSOR PROTECTION 1. Identify the part on the wiring diagram 2. Are the electric contacts/terminals loose? Are the leads broken or damaged? 3. Check electric coil continuity using a tester. 4. Is vacuum power voltage below the limits? 5. Check the power contactors and relative contacts. 6.
-
Page 49: Decommissioning Of The Unit
DECOMMISSIONING OF THE UNIT DISCONNECTING THE UNIT The units must be disconnected by authorized personnel, who before proceeding must first read the Residual Risks section in this manual. Before disconnecting the unit, the following must be recovered, if present: • the refrigerant (if the circuits cannot be isolated): the refrigerant must be removed using suction devices operating in a closed circuit, so as to ensure that none of the compound is released into the atmosphere.
Need help?
Do you have a question about the CFO 1602 and is the answer not in the manual?
Questions and answers