
Related Manuals for Motorola MOT00


Summary of Contents for Motorola MOT00
- Page 1 Phone Book Quick Access Options Menu Menu Menu Messages Menu English...
- Page 2 Add Entry to Phone - prompts you to enter a phone number and name. Ending a Call Press O or C, or replace the handset in the hang up Add Entry to SIM - prompts you to enter a phone number and name.
- Page 3 Personality™ also allows you to personalise the way you use your phone - for example, different ringer tones, a phone book and network selection preferences - all presented with clarity and simplicity. In this manual, each of the Personality™...
- Page 4 You will find the following symbols used throughout this manual: A Note contains additional information which is relevant to This means that you should press the M key followed by the O the feature/item. key and then the C key, in sequence, not simultaneously.
-
Page 5: Table Of Contents
Details the accessories available for use with your phone......................61 What To Do If... Helps you to solve any problems that may occur.........................63 Index A comprehensive index .................................67 The Manufacturer reserves the right to make changes in technical and product specifications without prior notice. English Contents... - Page 6 English Contents...
-
Page 7: Safety
Efficient Phone Operation The cellular telephone is one of the most exciting and innovative electronic products ever developed. With it you can stay in contact with your office, your Do not operate your transportable cellular telephone when holding the home, emergency services, and others. -
Page 8: Electronic Devices
Most electronic equipment, for example in hospitals and motor vehicles is shielded from RF energy. However, RF energy may effect some malfunctioning Do not allow children to play with your phone. It is not a toy. Children could or improperly shielded electronic equipment. -
Page 9: Battery Safety
Safety Standards Battery Safety This Cellular Telephone complies with all • To prevent injury or burns, do not allow metal objects to contact or short circuit the battery terminals. applicable RF safety standards. • Make sure that the battery terminals do not touch greasy objects. -
Page 10: European Union Directives Conformance Statement
European Union Directives Conformance Statement This product is in conformance with the requirements of the applicable EU Council Directives. Declarations of Conformance with the requirements are located at: Motorola Ltd. European Cellular Subscriber Division Midpoint, Alençon Link Basingstoke, Hampshire RG21 7PL... -
Page 11: About Your Phone And Sim Card
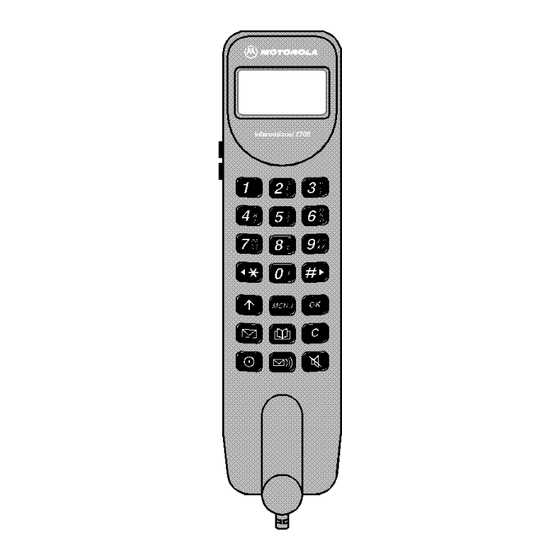
Special Keys Volume Buttons Turns the phone on and off. The buttons on the left hand side of your phone adjust the earpiece, external speaker and keypad tone volume levels. Accept call, setting, option. Volume is increased with the upper button and decreased with Access the Quick Access the lower button. - Page 12 The liquid crystal display screen used in your phone will behave differently at extremely low temperatures. You may notice that the display responds slowly to key presses; this is to be expected and does not affect the phone operation in any way.
-
Page 13: Your Sim Card
Cellular Service Provider when you bought your Switch off your phone by pressing the S key and insert the SIM phone. You will not be able to make or receive calls if you do not card into the transceiver or remote card reader. - Page 14 English About Your Phone and SIM Card...
-
Page 15: Making And Receiving Phone Calls
! If the PIN number is entered incorrectly three times in a row, your phone will automatically lock-up and the Blocked If you switch the phone on and there is no SIM card inserted, you message will be displayed. See ‘Unblocking Your Phone’ for will be asked to insert one. -
Page 16: Making A Phone Call
O. If you make a mistake, press and release the C key to It will not be possible to make a phone call unless you are in an area where there is a GSM service. When a service has been remove the last digit. - Page 17 Details on how to call a number embedded in a message are given in the Messages Menu section. 1. The Phone Book entries that you are able to access will depend on the One-Touch Dial Setting option in the Phone Book menu.
- Page 18 555-6911, with a mailbox number 1066 and password 2001. Then you may dial the following number: 5556911Ü1066Ü2001O. The first part of the number would be used to call the voicemail system. When the call is answered the first pause will produce a delay of...
-
Page 19: Receiving A Phone Call
Unanswered Call attempt was received. Ending a Phone Call To end a phone call, press O or C, or replace the handset in the hang up cup. English Making and Receiving Phone Calls... - Page 20 English Making and Receiving Phone Calls...
-
Page 21: Menu Navigation
Leaving the Menus other options using the scroll keys. To leave any of the menus, you can either press and hold the C To leave an option or sub-menu, press the C key. This will take key or repeatedly press the C key. Both of these actions will you back to the parent menu item. - Page 22 Menu Navigation - A Working Example The following steps will take you through how to switch the Extended Menus option on: When the phone is in the standby mode, press the M key. This will access the Options menu and Menu Options will be displayed.
- Page 23 If you want to move a feature from the Short Menu to the Extended Menu (or from the Extended Menu to the Short Menu), go to the feature and then hold down the O key until a prompt appears offering the following choices: •...
- Page 24 English Menu Navigation...
-
Page 25: Menu Summary
Menu Summary Phone Book and Quick Access Menus English Menu Summary... - Page 26 Messages and Options Menus English Menu Summary...
-
Page 27: Using The Features
Cellular Service Provider. enter the new number. You can also store up to 20 entries in a Fixed Dialling list if you Postscripting a number does not overwrite the entry in the have this feature. Fixed Dialling allows you to limit use of your Phone Book. - Page 28 The 0, 1,..,8 and 9 keys are used to enter alphabetic characters, for example when storing names in the Phone Book Space . ? ! , Ÿ & : " ( ) ' ` @ % ¡ ¢ 1 or when creating messages.
- Page 29 The Personal Numbers sub-menu is used for creating and Press QG. managing your list of personal numbers. This option is used to select a telephone number from a list of numerically sorted Phone Book locations. Find Entry By Name Once selected, this option will display the message Enter Press I1.
- Page 30 This option is used to add (store) entries to the Phone Book. You Once a Phone Book entry has been selected, it can be called, can choose to add the new entry to either the phone or SIM card modified or deleted.
-
Page 31: Last Ten Calls
SIM card memory areas. numbers. Check Phone Capacity, Check SIM Capacity Once an option has been selected, use the < and > keys to scroll through the list of phone numbers. Press the O key to call Once selected, a timed message XX Unused Locations the displayed number. -
Page 32: My Phone Number(S)
You may not be able to change these predefined entries. Up to 20 entries can be stored in the Fixed Dial list. The list is stored on your SIM card. ! This option may be affected by the Call Barring setting. -
Page 33: One-Touch Dial Setting
Setup Fixed Dialling One-Touch Dial Setting This option allows you to switch Fixed Dialling on or off and to This option allows you to specify which Phone Book list can be enter or change entries in the Fixed Dial list. -
Page 34: Messages Menu
One or more When the message has scrolled across the display, the beginning messages must be removed before the message can be of the message will be shown until you either remove it or a new stored. message arrives. - Page 35 Press the O key, when viewing any message, to enter the ‘Go to message to be edited. Next Message‘, ‘Delete Message‘, ‘Return Call' and ‘Edit OCall Voicemail Message’...
-
Page 36: Message Editor
Off. Service Centre number has been set. See ‘Message Settings’. If you change the setting to On, you will be asked to enter the Press the O key, when viewing any message, to enter the ‘Go to channel you wish to receive information from. -
Page 37: Message Settings
Messages Menu Message Settings Voicemail Number This option is used to enter a phone number which will be used by the ‘Call Voicemail’ option. If there is already a Voicemail Number, this will be shown in the display. This can be used, modified or deleted as desired. -
Page 38: Call Related Features Menu
Restrict ID On Next Call Your phone number will not be sent with the next attempted call, after this your phone number will be sent with calls until you re-select this option. Number of Approximate... - Page 39 Call Related Features Menu After selecting any of the call divert options there will be a short If you change the setting to On, you will be asked to enter a delay while the phone asks the network for the current setting.
- Page 40 ‘Detailed Diverting - If Busy’ option. While a Talk and Fax call is active, incoming call services like If Call Waiting is On, you will be notified of a waiting call by an Call Waiting and Call Holding are suspended.
- Page 41 The following points summarise the more common situations: A request to hold the active call, or swap the active call with a To end the active call, press O. If you have a call on hold it is • held call, has been made.
- Page 42 When Roaming If you change the barring setting, you may be asked to enter your barring password. There will be a short delay while the phone When selected, this option will bar incoming calls when you are notifies the network of the new setting.
-
Page 43: Call Restrictions
The option has two settings, or Off. Phone Number Length This option can be used to limit the number of digits allowed in a phone number. By setting this limit, you may be able to restrict access to international or long distance calls. -
Page 44: Phone Setup Menu
Adjust Ring Volume This option sets the tone your phone will make when an incoming call is received. This option is used to set the incoming call ring tone volume. Standard Tone The option has three settings, High, or Low. - Page 45 PIN code before you can proceed. Change Unlock Code You will be asked to enter a new, four to eight digit code to This option is used to change the unlock code. replace the old PIN code. The new PIN code must be entered again as confirmation.
- Page 46 This option is used to change the security code, which is set at manufacture to 000000. You will be asked to enter a new, four to eight digit code to replace the old PIN2 security code. The new PIN2 security code Once selected, you will be asked to enter the current security must be entered again as confirmation.
- Page 47 This option can be used to view the current setting of menu Once selected, you will be able to enter a new greeting of up to options. 24 characters. See ‘How to Enter Alphabetic Characters’ in the When selected, your phone will display a list of menu items Phone Book Menu section for more information.
- Page 48 Phone Setup Menu Master Clear ! This option should be used with extreme caution, for example it will clear all the Phone Book entries from your phone memory. This option is used to restore certain phone options to their original settings.
-
Page 49: Network Selection Menu
Register Now Once selected, your phone will try to register with the selected In order for the phone to make and receive phone calls, it must network. If the registration fails, your phone will try to register in register with one of the available networks. -
Page 50: Find New Network
Once entered, you will be asked where the network is to be located in the preferred list. If the phone is turned off and then on again, it will revert to Automatic Search mode and register with a network in the Show List Of Networks order of the sorted list. -
Page 51: Call Meters Menu
Your phone can handle values up to 21 digits long, although This feature allows you to display the duration of your calls and during calls it can only display the last 12 digits. If the value to reset your time meters to zero. - Page 52 This feature allows you to specify whether the time or charge This feature allows you to customise your Advice of Charge meters are displayed during a call. If you do not have the Advice settings. You will be prompted to enter your PIN2 security code of Charge service, then only the time meter is available.
-
Page 53: Lifetime Timer
Units If you switch the charge limit On, you will be prompted to enter a Sets the charge type to phone units. new limit. Enter the amount as either units or currency Currency depending on the setting of the option. -
Page 54: Accessory Setup Menu
Safety Timer Depending on your vehicle installation, either Mute Car Radio This option can be used to keep the phone on for a set period or Auxillary Alert will not appear in the Accessory Setup menu. after the vehicle ignition has been turned off. This prevents the... -
Page 55: Quick Access Menu
Add Entry to SIM access menus, the following most commonly used features are You will be prompted to enter a phone number and then a name. also available by pressing the quick access key followed by the If you already had a number displayed, it will automatically be relevant number: re-displayed when you select this feature. - Page 56 You will be prompted to select the required ring volume: High, Medium or Low. As you scroll through the options a sample of the standard ring tone at this volume will be heard. See ‘Adjust Ring Volume’ for more information. English...
-
Page 57: Using The Transportable
Removing the Handset Always start by making sure that the phone is switched off. Lift the handset from its mount. Press the lock on the coil cord plug while pulling out the cord. You are now ready to remove the transceiver. - Page 58 Insertion into the Carrying Cassette Lower the transceiver into the base of the carrying cassette. The Attach the shoulder strap by sliding the clips into the slots in the antenna connector will fit into the cutaway portion. Slide the carrying cassette. The clips will lock into place. To remove the transceiver forward until a click is heard indicating that the unit is shoulder strap, press the tabs and lift the clips.
- Page 59 Standby Time Time To ensure maximum battery performance, it is recommended that a new battery (or battery that has not been used for several Lead Acid 90 min. 12 hours months) be charged for at least 14 hours before use.
-
Page 60: Battery Charging
The Spare Battery Charger will take approximately 4 hours to power supply into the wall outlet. charge a completely discharged battery. You may either remove the battery or leave it in. If you leave it in, Cigarette Lighter Adaptor a completely discharged battery will be fully charged in approximately four hours. -
Page 61: Use Inside A Vehicle
Use Inside a Vehicle Cassette With a Car Kit Installation If you have a car kit, remove the handset and transceiver from Keypad and Display Lighting the carrying cassette and reinstall in the vehicle. The transceiver is To conserve battery power, the keypad and display lighting will released from the carrying cassette using the release latch. - Page 62 English Using the Transportable...
-
Page 63: Accessories
The Battery is for use with the carrying cassette in transportable become damaged or stolen. mode . It provides up to 12 hours standby time and up to 90 Replacement Hang Up Cup With Card Reader minutes talk time. The battery will take approximately 9 hours to fully recharge. - Page 64 English Accessories...
-
Page 65: What To Do If
Restricted displayed? Check the Call Barring and Fixed Dialling. Has the call charge limit been reached? Use your PIN2 code to reset the limit or contact your Service Provider. See ‘Set Total Charge Limit’. Has a new SIM card been inserted? Check that no new restrictions have been imposed. - Page 66 Some Service Providers automatically bar the ability to make international calls. Contact your Service Provider. Have you included the relevant codes? Press and hold the 0 key to display the international dialling prefix (+) and then enter the appropriate country code followed by the phone number. The table over page lists some of the more commonly used country codes.
- Page 67 International Country Codes The following table summarises some of the more commonly used international dial codes. Remember to press and hold 0 before you enter the code so that the international dialling prefix is displayed. Country Country Code Country Country Code...
- Page 68 English What to do if...
- Page 69 Add entry Call diverting ......... 36 Resetting .........50 To phone memory ....28 Call holding .........38 Check capacity (of the Phone Book) ..29 To SIM card memory ....28 Call metering ........49 Adjust ring volume .......42 Call meters menu .........49 Automatic answer ......
- Page 70 Editing messages ......... 33 Language selection .......44 My phone number(s) ......30 Emergency calls ........16 Last ten calls .........29 Ending a phone call ......17 Lifetime timer ........51 Entering characters ......26 Lock now ..........43 Names Erase name and number ...... 28 Entering ..........26...
- Page 71 Special keys ...........9 Keypad dialling ........41 Preventing access to ......29 Status review ........45 Phone number length ......41 Storing numbers - see Add Entry ..28 Symbols ..........10 Restrict my phone number ....36 Phone book menu ........25 Return call ..........34 Phone calls Ring on or off ........42...
- Page 72 Entering .......... 13 Setting and changing ...... 42 Voicemail Calling ..........33 Number .......... 35 Volume Adjusting the earpiece and keypad volume ........... 9 Adjusting the ringer volume .... 42 Buttons ..........9 What to do if........63 English Index...
- Page 73 English Index...
- Page 74 English Index...
Need help?
Do you have a question about the MOT00 and is the answer not in the manual?
Questions and answers