Table of Contents
Advertisement
Quick Links
Advertisement
Table of Contents

Related Manuals for PNI DT900


Summary of Contents for PNI DT900
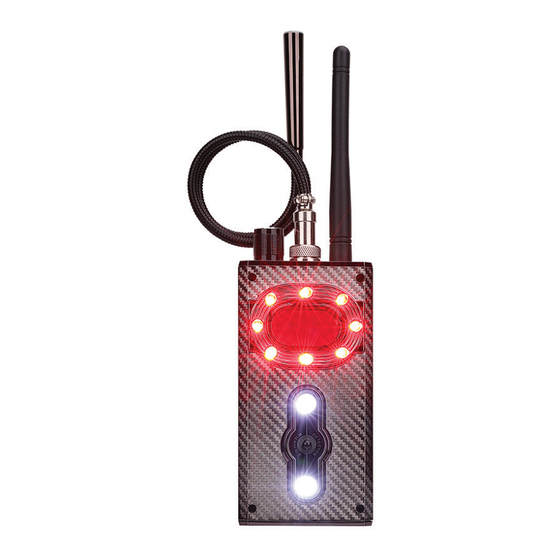
- Page 1 PNI DT900 Hidden camera and Microphone detector...
- Page 2 Contents English ..... Български ..... Deutsch ..... Español ..... Français ..... Magyar ..... Italiano ..... Nederlands ..... Polski ..... Romana .....
-
Page 3: Product Overview
Product overview Turn on/off the device. Sensitivity adjustment. Magnetic field detection probe Antenna Magnetic field detection mode... - Page 4 Sound vibration mode Smart AI mode Automatic detection at night Surveillance camera scanning mode LED lighting mode 10. 8 Laser LEDs 11. 2 white LEDs 12. IR sensor Wireless RF signal detection This is the default signal detection mode. The signal strength metric indicator is divided into 10 levels.
-
Page 5: Magnetic Field Detection
• red - is for the identified signal source To adjust the sensitivity, turn the knob on the top of the device to the right to increase the sensitivity and to the left to decrease the sensitivity. The sensitivity level determines the detection distance. Note: in the urban environment, where there are many signal sources, we recommend setting a sensitivity level between 1 and 3. - Page 6 an alarm. This mode is useful for detecting eavesdropping devices, locating and blocking magnetic field equipment. Detection of hidden surveillance cameras Press button 8 and the 8 laser LEDs will start flashing. Press button 8 again to adjust the flashing speed of the LEDs.
- Page 7 AI mode, automatic signal search Press the button 6 and the “sun” icon in the middle of the screen with the metric indicators will light up. In this mode, the device will automatically search for a signal once per minute. After it has identified a signal, it will emit an alarm and light up a signal indicator.
-
Page 8: Technical Specifications
Technical specifications RF frequency 1 MHz - 8000 MHz Dynamic detection ≥73DB Detection sensitivity ≤0.03mv 2.4G: 10 mp (standard 10mv) Detection range 1.2G: 15 mp (standard 10mv) 2G, 3G, 4G bands: 15mp Magnetic field Up to 10 cm detection distance Power supply Li-Ion battery 500mA Maximum operating... -
Page 9: Questions And Answers
Weight 350 gr Questions and answers 1. Why does the detector emit a “didi” sound and the LED indicator flashes? Cause: In the urban environment there are too many and too strong sources of signals everywhere. Solution: First turn off your own sources of signals, such as your mobile phone, Wi-Fi router, then reduce the sensitivity of the detector. -
Page 10: Преглед На Продукта
Преглед на продукта В к л ю ч е т е /и з к л ю ч е т е у с т р о й с т в о т о. Регулиране на чувствителността. Сонда за откриване на магнитно поле Антена... - Page 11 Режим на звукова вибрация Интелигентен AI режим Автоматично откриване през нощта Режим на сканиране на камера за наблюдение LED режим на осветление 10. 8 лазерни светодиода 11. 2 бели светодиода 12. IR сензор Откриване на безжичен RF сигнал Това е режимът за откриване на сигнала по подразбиране.
- Page 12 жълто - е сигнал за опасност червено - е за идентифицирания източник на сигнал За да регулирате чувствителността, завъртете копчето в горната част на устройството надясно, за да увеличите чувствителността, и наляво, за да намалите чувс твителнос т та. Нивото на чувствителност...
- Page 13 Откриване на магнитно поле За да влезете в режим на детекция на магнитно поле, натиснете бутон 4. Червеният светодиод в долния ляв ъгъл ще светне. Използвайте сондата в горната част на детектора, за да се доближите до магнитния източник. Детекторът ще издаде аларма.
- Page 14 гледате през прозореца със специален филтър. Ако видите подозрителна червена отразяваща точка, можете постепенно да определите позицията на скритата камера за наблюдение, като регулирате скоростта на мигане на лазерните светодиоди от бързо към бавно. Този режим е полезен за идентифициране на точката...
-
Page 15: Технически Спецификации
Този режим е полезен за откриване на GPS оборудване за наблюдение на позицията. IR LED детекция Натиснете бутона 7, за да активирате инфрачервения светодиод на режима за откриване на камерата за наблюдение. IR сензорът (12) ще открие през нощта или при условия на слаба светлина камерите с... - Page 16 2.4G: 10 mp (стандартно 10mv) Обхват на откриване 1.2G: 15 mp (стандартно 10mv) 2G, 3G, 4G ленти: 15mp Разстояние за откриване на До 10см магнитно поле Захранване Li-Ion батерия 500mA Максимално време на До 10 часа работа Материал ABS + Метал Размери...
- Page 17 индикаторът мига? Причина: В градската среда навсякъде има твърде много и твърде силни източници на сигнали. Решение: Първо изк лючете собствените си източници на сигнали, като мобилния си телефон, Wi-Fi рутер, след което намалете чувствителността на детектора. 2. Защо не откриват камерите за наблюдение? Причина: Камерата...
- Page 18 Produktübersicht G e r ä t e i n - / a u s s c h a l t e n . Empfindlichkeitseinstellung. Sonde zur Magnetfelderkennung Antenne Magnetfelderkennungsmodus...
- Page 19 Schallvibrationsmodus Smart-AI-Modus Automatische Erkennung bei Nacht Überwachungskamera-Scanmodus LED-Beleuchtungsmodus 10. 8 Laser-LEDs 11. 2 weiße LEDs 12. IR-Sensor Drahtlose HF-Signalerkennung Dies ist der Standardmodus zur Signalerkennung. Die Anzeige der Signalstärke ist in 10 Stufen unterteilt. Es gibt 4 Zonen mit Signalanzeigen: weiß, grün, gelb und rot, die Folgendes bedeuten: weiß...
- Page 20 rot – ist für die identifizierte Signalquelle Um die Empfindlichkeit einzustellen, drehen Sie den Knopf oben am Gerät nach rechts, um die Empfindlichkeit zu erhöhen, und nach links, um die Empfindlichkeit zu verringern. Die Empfindlichkeitsstufe bestimmt die Erkennungsentfernung. Hinweis: In der städtischen Umgebung, wo es viele S i g n a l q u e l l e n g i b t , e m p f e h l e n w i r, e i n e Empfindlichkeitsstufe zwischen 1 und 3 einzustellen.
- Page 21 linken Ecke leuchtet auf. Verwenden Sie die Sonde oben am Detektor, um näher an die magnetische Quelle heranzukommen. Der Detektor gibt einen Alarm aus. Dieser Modus ist nützlich, um Abhörgeräte zu erkennen und Magnetfeldgeräte zu lokalisieren und zu blockieren. Erkennung versteckter Überwachungskameras Drücken Sie die Taste 8 und die 8 Laser-LEDs beginnen zu blinken.
- Page 22 Laser-LEDs von schnell auf langsam einstellen. Dieser Modus ist nützlich, um den Reflexionspunkt des Überwachungskameraobjektivs zu identifizieren. AI-Modus, automatische Signalsuche Drücken Sie die Taste 6 und das „Sonnen“-Symbol in der Mitte des Bildschirms mit den metrischen Anzeigen leuchtet auf. In diesem Modus sucht das Gerät automatisch einmal pro Minute nach einem Signal.
-
Page 23: Technische Spezifikationen
Überwachungskamera-Erkennungsmodus zu aktivieren. Der IR-Sensor (12) erkennt nachts oder bei schlechten Licht verhältnissen die Kameras mit ak tivem Nachtmodus und gibt einen Alarm aus. Technische Spezifikationen HF-Frequenz 1 MHz - 8000 MHz Dynamische Erkennung ≥73DB Erkennungsempfindlichkeit ≤0,03mv 2,4G: 10 mp (Standard 10mv) 1,2G: 15 mp Erkennungsreichweite... -
Page 24: Fragen Und Antworten
Material Bis 10 Stunden Abmessungen ABS + Metall Gewicht 250 x 95 x 47 mm Weight 350 g Fragen und Antworten 1. Warum gibt der Detektor einen „Didi“-Ton von sich und die LED-Anzeige blinkt? Ursache: Im städtischen Umfeld gibt es überall zu viele und zu starke Signalquellen. - Page 25 möglicherweise nicht oder es handelt sich um eine kabelgebundene Kamera, nicht um WLAN. Lösung: Wenn es sich um eine kabelgebundene Kamera handelt, verwenden Sie die IR-LED-Erkennungsfunktion.
-
Page 26: Descripción Del Producto
Descripción del producto Enciende/apaga el dispositivo. Ajuste de sensibilidad. Sonda de detección de campo magnético Antena Modo de detección de campo magnético... - Page 27 Modo de vibración de sonido Modo IA inteligente Detección automática por la noche Modo de escaneo de cámara de vigilancia Modo de iluminación LED 10. 8 LED láser 11. 2 LED blancos 12. Sensor de infrarrojos Detección de señal RF inalámbrica Este es el modo de detección de señal predeterminado.
- Page 28 amarillo - es una señal de peligro rojo: es para la fuente de señal identificada Para ajustar la sensibilidad, gire la perilla en la parte superior del dispositivo hacia la derecha para aumentar la sensibilidad y hacia la izquierda para disminuirla. El nivel de sensibilidad determina la distancia de detección.
- Page 29 izquierda se iluminará. Utilice la sonda en la parte superior del detector para acercarse a la fuente magnética. El detector hará sonar una alarma. Este modo es útil para detectar dispositivos de escucha, localizar y bloquear equipos de campo magnético. Detección de cámaras de vigilancia ocultas Presione el botón 8 y los 8 LED del láser comenzarán...
- Page 30 de la lente de la cámara de vigilancia. Modo AI, búsqueda automática de señal. Presione el botón 6 y se iluminará el ícono del “sol” en el medio de la pantalla con los indicadores métricos. En este modo, el dispositivo buscará automáticamente una señal una vez por minuto.
-
Page 31: Especificaciones Técnicas
luz las cámaras con modo nocturno activo y emitirá una alarma. Especificaciones técnicas Frecuencia de 1MHz - 8000MHz radiofrecuencia Detección dinámica ≥73DB Sensibilidad de ≤0,03 mv detección 2,4G: 10 MP (estándar 10 mv) 1,2G: 15 MP (estándar Rango de detección 10 mv) Bandas 2G, 3G, 4G: 15mp... -
Page 32: Preguntas Y Respuestas
Batería de iones de litio Fuente de alimentación de 500 mA Tiempo máximo de Hasta las 10 horas funcionamiento Material ABS + Metal Dimensiones 250x95x47mm Peso 350 gramos Preguntas y respuestas 1. ¿Por qué el detector emite un sonido “didi” y el indicador LED parpadea? Causa: En el entorno urbano hay demasiadas y demasiado potentes fuentes de señales por todas... - Page 33 2. ¿Por qué no detectan las cámaras de vigilancia? Causa: Es posible que la cámara de vigilancia no funcione o que sea una cámara con cable, no Wi-Fi. Solución: Si se trata de una cámara con cable, utilice la función de detección de LED IR.
-
Page 34: Présentation Du Produit
Présentation du produit Allumez/éteignez l’appareil. Réglage de la sensibilité. Sonde de détection de champ magnétique Antenne Mode de détection du champ magnétique... - Page 35 Mode vibration sonore Mode IA intelligent Détection automatique la nuit Mode de numérisation de la caméra de surveillance Mode d’éclairage LED 10. 8 LED laser 11. 2 LED blanches 12. Capteur infrarouge Détection de signal RF sans fil Il s’agit du mode de détection de signal par défaut. L’indicateur métrique de la force du signal est divisé...
- Page 36 jaune - est un signal de danger rouge - correspond à la source de signal identifiée Pour régler la sensibilité, tournez le bouton situé en haut de l’appareil vers la droite pour augmenter la sensibilité et vers la gauche pour diminuer la sensibilité. Le niveau de sensibilité...
- Page 37 dans le coin inférieur gauche s’allumera. Utilisez la sonde située sur le dessus du détecteur pour vous rapprocher de la source magnétique. Le détecteur déclenchera une alarme. Ce mode est utile pour détecter les dispositifs d’écoute clandestine, localiser et bloquer les équipements à champ magnétique.
- Page 38 de clignotement des LED laser de rapide à lente. Ce mode est utile pour identifier le point de réflexion de l’objectif de la caméra de surveillance. Mode AI, recherche automatique du signal Appuyez sur le bouton 6 et l’icône « soleil » au milieu de l’écran avec les indicateurs métriques s’allumera.
-
Page 39: Spécifications Techniques
du mode détection de la caméra de surveillance. Le capteur IR (12) détectera la nuit ou dans des conditions de faible luminosité les caméras avec mode nuit actif et émettra une alarme. Spécifications techniques Fréquence RF 1 MHz - 8 000 MHz Détection dynamique ≥73DB Sensibilité... -
Page 40: Questions Et Réponses
Source de courant Batterie Li-Ion 500mA Durée de fonctionnement Jusqu'à 10 heures maximale Matériel ABS + Métal Dimensions 250x95x47mm Poids 350 gr Questions et réponses 1. Pourquoi le détecteur émet-il un son « didi » et le voyant LED clignote ? Cause : En milieu urbain, il y a partout des sources de signaux trop nombreuses et trop puissantes. - Page 41 surveillance ? Cause : La caméra de sur veillance peut ne pas fonctionner ou il s’agit d’une caméra filaire et non Wi-Fi. Solution : S’il s’agit d’une caméra filaire, utilisez la fonction de détection LED IR.
- Page 42 Termék áttekintés Kapcsolja be/ki a készüléket. Érzékenység beállítása. Mágneses tér érzékelő szonda Antenna Mágneses mező érzékelési mód...
- Page 43 Hang vibrációs mód Intelligens AI mód Automatikus érzékelés éjszaka Térfigyelő kamera pásztázási mód LED világítási mód 10. 8 lézer LED 11. 2 fehér LED 12. IR érzékelő Vezeték nélküli RF jel érzékelés Ez az alapértelmezett jelérzékelési mód. A jelerősség- mutató 10 szintre oszlik. A jelzőfények 4 zónája van: fehér, zöld, sárga és piros, amelyek a következők: fehér –...
- Page 44 piros - az azonosított jelforrást jelöli Az érzékenység beállításához forgassa el a készülék tetején található gombot jobbra az érzékenység n ö v e l é s é h e z , b a l r a p e d i g a z é r z é k e n y s é g csökkentéséhez.
- Page 45 szondát, hogy közelebb kerüljön a mágneses forráshoz. Az érzékelő riasztást ad. Ez a mód hasznos a lehallgató eszközök észlelésére, a mágneses térberendezések helyének meghatározására és blokkolására. Rejtett térfigyelő kamerák észlelése Nyomja meg a 8 gombot, és a 8 lézer LED villogni kezd. Nyomja meg ismét a 8 gombot a LED-ek villogási sebességének beállításához.
- Page 46 AI mód, automatikus jelkeresés Nyomja meg a 6 gombot, és a képernyő közepén lévő „sun” ikon kigyullad a metrikus jelzőkkel. Ebben az üzemmódban a készülék percenként eg yszer automatikusan jelet fog keresni. Miután azonosított egy jelet, riasztást ad, és világít egy jelzőfényt. Ha mind a 10 jelzőfény világít, folyamatos hangjelzés hallható.
-
Page 47: Műszaki Adatok
Műszaki adatok RF frekvencia 1 MHz - 8000 MHz Dinamikus észlelés ≥73DB Érzékelési érzékenység ≤0,03 mv 2,4G: 10 mp (normál 10 Érzékelési tartomány 1,2 G: 15 mp (normál 10 2G, 3G, 4G sávok: 15mp Mágneses tér 10 cm-ig érzékelési távolsága Li-Ion akkumulátor Tápegység 500mA... - Page 48 Méretek 250 x 95 x 47 mm Súly 350 gr Kérdések és válaszok 1. Miért ad ki „didi” hangot az érzékelő, és miért villog a LED jelzőfény? Ok: A városi környezetben mindenhol túl sok és túl erős jelforrás van. Megoldás: Először kapcsolja ki a saját jelforrásait, például mobiltelefonját, Wi-Fi útválasztóját, majd csökkentse az érzékelő...
-
Page 49: Panoramica Del Prodotto
Panoramica del prodotto Accendi/spegni il dispositivo. Regolazione della sensibilità. Sonda per il rilevamento del campo magnetico Antenna Modalità di rilevamento del campo magnetico... - Page 50 Modalità vibrazione sonora Modalità IA intelligente Rilevamento automatico di notte Modalità di scansione della telecamera di sorveglianza Modalità di illuminazione a LED 10. 8 LED laser 11. 2 LED bianchi 12. Sensore IR Rilevamento del segnale RF wireless Questa è la modalità di rilevamento del segnale predefinita.
- Page 51 giallo - è un segnale di pericolo rosso - è per la sorgente del segnale identificata Per regolare la sensibilità, ruotare la manopola sulla parte superiore del dispositivo verso destra per aumentare la sensibilità e verso sinistra per diminuire la sensibilità. Il livello di sensibilità determina la distanza di rilevamento.
- Page 52 sulla parte superiore del rilevatore per avvicinarsi alla sorgente magnetica. Il rilevatore emetterà un allarme. Questa modalità è utile per rilevare dispositivi di ascolto, localizzare e bloccare apparecchiature a campo magnetico. Rilevazione di telecamere di sorveglianza nascoste Premere il pulsante 8 e gli 8 LED laser inizieranno a lampeggiare.
- Page 53 riflessione dell’obiet tivo della telecamera di sorveglianza. Modalità AI, ricerca automatica del segnale Premi il pulsante 6 e si illuminerà l’icona del “sole” al centro dello schermo con gli indicatori metrici. In q u e s t a m o d a l i t à , i l d i s p o s i t i v o c e r c h e r à automaticamente un segnale una volta al minuto.
-
Page 54: Specifiche Tecniche
della modalità di rilevamento della telecamera di sorveglianza. Il sensore IR (12) rileverà di notte o in condizioni di scarsa illuminazione le telecamere con modalità notturna attiva ed emetterà un allarme. Specifiche tecniche Frequenza RF 1 MHz - 8000 MHz Rilevazione dinamica ≥73DB Sensibilità... -
Page 55: Domande E Risposte
Distanza di rilevamento del campo Fino a 10 cm magnetico Batteria agli ioni di litio Alimentazione elettrica da 500 mA Tempo massimo di Fino alle 10 ore funzionamento Materiale ABS + Metallo Dimensioni 250 x 95 x 47 mm Peso 350 gr Domande e risposte 1. - Page 56 come il telefono cellulare, il router Wi-Fi, quindi ridurre la sensibilità del rilevatore. 2. Perché non rilevano le telecamere di sorveglianza? Causa: la telecamera di sorveglianza potrebbe non funzionare oppure è una telecamera cablata, non Wi-Fi. Soluzione: se si tratta di una telecamera cablata, utilizzare la funzione di rilevamento LED IR.
- Page 57 Productoverzicht Schakel het apparaat in/uit. Gevoeligheid aanpassing. Detectiesonde voor magnetisch veld Antenne Magnetische velddetectiemodus...
- Page 58 Geluidstrillingsmodus Slimme AI-modus Automatische detectie ‘s nachts Scanmodus van bewakingscamera LED-verlichtingsmodus 10. 8 laser-LED’s 11. 2 witte LED’s 12. IR-sensor Draadloze RF-signaaldetectie Dit is de standaard signaaldetectiemodus. De metrische signaalsterkte-indicator is verdeeld in 10 niveaus. Er zijn 4 zones met signaalindicatoren: wit, groen, geel en rood, die als volgt weergeven: wit - is een veiligheidssignaal groen - is een verdacht signaal...
- Page 59 rood - is voor de geïdentificeerde signaalbron Om de gevoeligheid aan te passen, draait u de knop aan de bovenkant van het apparaat naar rechts om de gevoeligheid te verhogen en naar links om de gevoeligheid te verlagen. Het gevoeligheidsniveau bepaalt de detectieafstand.
- Page 60 om dichter bij de magnetische bron te komen. De detector zal een alarm laten horen. Deze modus is handig voor het detecteren van afluisterapparatuur en het lokaliseren en blokkeren van apparatuur voor magnetische velden. D etec tie verborgen bewakingscamera’s Druk op knop 8 en de 8 laser-LED’s beginnen te knipperen.
- Page 61 reflectiepunt van de lens van de bewakingscamera. AI-modus, automatisch zoeken naar signalen Druk op knop 6 en het “zon”-pictogram in het midden van het scherm met de metrische indicatoren zal oplichten. In deze modus zoekt het apparaat automatisch één keer per minuut naar een signaal. Nadat hij een signaal heeft geïdentificeerd, geeft hij een alarm af en doet hij een signaalindicator branden.
-
Page 62: Technische Specificaties
De IR-sensor (12) detecteert ‘s nachts of bij weinig licht de camera’s met actieve nachtmodus en geeft een alarm af. Technische specificaties RF-frequentie 1 MHz - 8000 MHz Dynamische detectie ≥73DB Detectiegevoeligheid ≤0,03mv 2.4G: 10 mp (standaard 10 mv) 1.2G: 15 mp (standaard Detectiebereik 10 mv) 2G-, 3G-, 4G-banden:... -
Page 63: Vragen En Antwoorden
Maximale bedrijfstijd Tot 10 uur Materiaal ABS + Metaal Dimensies 250 x 95 x 47 mm Gewicht 350 gr Vragen en antwoorden 1. Waarom laat de detector een “didi”-geluid horen en knippert de LED-indicator? Oorzaak: In de stedelijke omgeving zijn er overal te veel en te sterke signaalbronnen. - Page 64 Oplossing: Als het een bekabelde camera is, gebruik dan de IR LED-detectiefunctie.
- Page 65 Przegląd produktów Włącz/wyłącz urządzenie. Regulacja czułości. Sonda do wykrywania pola magnetycznego Antena Tryb wykrywania pola magnetycznego...
- Page 66 Tryb wibracji dźwięku Inteligentny tryb AI Automatyczne wykrywanie w nocy Tryb skanowania kamery monitorującej Tryb oświetlenia LED 10. 8 diod laserowych 11. 2 białe diody LED 12. Czujnik podczerwieni Bezprzewodowe wykrywanie sygnału RF Jest to domyślny tryb wykrywania sygnału. Wskaźnik metryki siły sygnału jest podzielony na 10 poziomów.
- Page 67 żółty - jest sygnałem niebezpieczeństwa czerwony - dotyczy zidentyfikowanego źródła sygnału Aby wyregulować czułość, obróć pokrętło znajdujące się na górze urządzenia w prawo, aby zwiększyć czułość i w lewo, aby zmniejszyć czułość. Poziom czułości określa odległość wykrywania. Uwaga: w środowisku miejskim, gdzie występuje wiele źródeł...
- Page 68 detektora, aby zbliżyć się do źródła pola magnetycznego. Detektor uruchomi alarm. Tryb ten jest przydatny do wykrywania urządzeń podsłuchowych, lokalizowania i blokowania urządzeń wytwarzających pole magnetyczne. Wykrywanie ukrytych kamer monitorujących Naciśnij przycisk 8, a 8 diod laserowych zacznie migać. Naciśnij ponownie przycisk 8, aby wyregulować prędkość...
- Page 69 obiektywu kamery monitorującej. Tryb AI, automatyczne wyszukiwanie sygnału Naciśnij przycisk 6, a ikona „słońce” na środku ekranu ze wskaźnikami metrycznymi zaświeci się. W tym trybie urządzenie automatycznie będzie wyszukiwało sygnał raz na minutę. Po zidentyfikowaniu sygnału wyemituje alarm i zapali się wskaźnik sygnału. Gdy zaświeci się...
-
Page 70: Specyfikacja Techniczna
oświetleniu kamery z aktywnym trybem nocnym i uruchomi alarm. Specyfikacja techniczna Częstotliwość radiowa 1 MHz - 8000 MHz Detekcja dynamiczna ≥73 dB Czułość wykrywania ≤0,03 mv 2,4G: 10 MP (standardowo 10 mv) 1,2G: 15 MP Zasięg wykrywania (standardowo 10 mv) Pasma 2G, 3G, 4G: 15mp Odległość... -
Page 71: Pytania I Odpowiedzi
Maksymalny czas pracy Do 10 godzin Materiał ABS + metal Wymiary 250 x 95 x 47 mm Waga 350 gr Pytania i odpowiedzi 1. Dlaczego czujka emituje dźwięk „didi” i miga dioda LED? Przyczyna: W środowisku miejskim wszędzie jest zbyt wiele i zbyt silnych źródeł... - Page 72 Prezentare produs Pornire/Oprire dispozitiv. Reglare sensibilitate. Sonda de detectare a campurilor magnetice Antena Mod detectare campuri magnetice...
- Page 73 Mod vibratie sonora Mod inteligent AI Detectie automata pe timp de noapte Mod scanare camere de supraveghere Mod iluminare LED 8 LED-uri Laser 11. 2 LED-uri albe 12. Senzor IR Detectie semnal RF wireless Acesta este modul implicit de detectie semnal. Indicatorul metric de putere a semnalului este impartit in 10 niveluri.
- Page 74 • rosu - este pentru sursa semnal identificata Pentru a regla sensibilitatea, rotiti butonul din partea superioara a dispozitivului spre dreapta pentru a creste sensibilitatea si spre stanga pentru a reduce sensibilitatea. Nivelul de sensibilitate determina distanta de detectie. Nota: in mediul urban, unde sunt multe surse de semnal haotice, recomandam setarea unui nivel de sensibilitate cuprins intre 1 si 3.
- Page 75 detectorului pentru a va apropia de sursa magnetica. Detectorul va emite o alarma. Acest mod este util pentru detectarea dispozitivelor de interceptare, localizarea si blocarea echipamentelor cu camp magnetic. Detectie camere de supraveghere ascunse Apasati butonul 8 si cele 8 LED-uri laser vor incepe sa clipeasca.
- Page 76 Mod AI, cautare automata semnal Apasati butonul 6 si pictograma “soare“ din mijlocul ecranului cu indictorii metrici se va aprinde. In acest mod, dispozitivul va cauta automat semnal o data pe minut. Dupa ce a identificat un semnal, va emite o alarma si va aprinde un indicator de semnal.
-
Page 77: Specificatii Tehnice
Specificatii tehnice Frecventa RF 1 MHz - 8000 MHz Detectie dinamica ≥73DB Sensibilitate detectie ≤0.03mv 2.4G: 10 mp (standard 10mv) 1.2G: 15 mp (standard Interval detectie 10mv) Benzile 2G, 3G, 4G: 15mp Distanta detectie Pana in 10 cm camp magnetic Acumulator Li-Ion Alimentare 500mA... - Page 78 Material ABS + Metal Dimensiuni 250 x 95 x 47 mm Greutate 350 gr Intrebari si raspunsuri 1. De ce detectorul emite un sunet “didi“ iar indicatorul LED clipeste? Cauza: In mediul urban sunt prea multe si prea puternice surse de semnale peste tot. Solutie: Inchideti mai intai propriile surse de semnale, cum ar fi telefonul mobil, router-ul Wi-Fi, apoi reduceti sensibilitatea detectorului.
- Page 79 EU Simplified Declaration of Conformity ONLINESHOP SRL declares that Hidden camera detector PNI DT900 complies with the Directive EMC 2014/30/EU. The full text of the EU declaration of conformity is available at the following Internet address: ht tps://w w w.mypni.eu/produc t s/10262/download/ certifications Опростена...
- Page 80 PNI DT900 cumple con la Directiva EMC 2014/30/EU. El texto completo de la declaración de conformidad de la UE está disponible en la siguiente dirección de Internet: ht tps://w w w.mypni.eu/produc t s/10262/download/ certifications Déclaration de conformité simplifiée de l’UE ONLINESHOP SRL déclare que Détecteur de caméra cachée...
- Page 81 Vereenvoudigde EU-conformiteitsverklaring ONLINESHOP SRL verklaart dat Verborgen cameradetector PNI DT900 voldoet aan de richtlijn EMC 2014/30/EU. De volledige tekst van de EU-conformiteitsverklaring is beschikbaar op het volgende internetadres: ht tps://w w w.mypni.eu/produc t s/10262/download/ certifications Uproszczona deklaracja zgodności UE...
- Page 82 English - CERTIFICATE OF QUALITY AND COMMERCIAL WARRANTY The products identified in this certificate based on the trade name and the sole series number S/N benefit by a commercial warranty as follows: The warranty period for natural persons is 24 months as of the delivery date for the manufacturing and material defects.
- Page 83 Romana - CERTIFICAT DE CALITATE SI GARANTIE COMERCIALA Produsele identificate in acest certificat pe baza denumirii comerciale si a numarului unic de serie S/N, beneficiaza de o garantie comerciala dupa cum urmeaza: Perioada de garantie pentru persoane fizice este de 24 luni de la data livrarii pentru defectele de fabricatie si de material.
- Page 84 EN - Please download the full version of the warranty certificate: BG - Моля, изтеглете пълната версия на гаранционния сертификат: DE - Bitte laden Sie die Vollversion des Garantiezertifikats herunter: ES - Descargue la versión completa del certificado de garantía: FR - Veuillez télécharger la version complète du certificat de garantie : HU - Kérjük, töltse le a jótállási jegy teljes verzióját: IT - Si prega di scaricare la versione completa del certificato di garanzia:...
Need help?
Do you have a question about the DT900 and is the answer not in the manual?
Questions and answers