Advertisement
Quick Links
MV23 Installation Guide
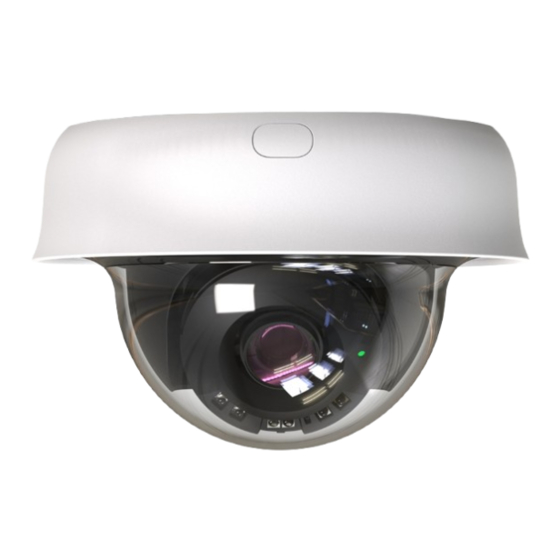
MV23 Series Overview
The Cisco Meraki MV23 series are network cameras that are exceptionally simple to deploy and configure due to their integration into the Meraki Dashboard and
cloud-augmented edge storage. The MV family eliminates complex and costly servers and video recorders required by traditional solutions, removing the
limitations typically placed on video surveillance deployments.
Package Contents:
1
Advertisement

Subscribe to Our Youtube Channel
Related Manuals for Cisco Meraki MV23 Series


Summary of Contents for Cisco Meraki MV23 Series
- Page 1 MV23 Series Overview The Cisco Meraki MV23 series are network cameras that are exceptionally simple to deploy and configure due to their integration into the Meraki Dashboard and cloud-augmented edge storage. The MV family eliminates complex and costly servers and video recorders required by traditional solutions, removing the limitations typically placed on video surveillance deployments.
- Page 2 Unit MV23-HW 1 x base mount plate small Mounting Equipment 1 x conduit adapter MV23 series does not ship with mounting screws and anchors as an included accessory in the packaging content. Screw Recommendation: • Type: Self-Tapping Screw • Size: M4 •...
-
Page 3: Pre-Install Preparation
Pre-Install Preparation You should complete the following steps before going on-site to perform an installation: Configure Your Network in the Dashboard The following is a brief overview of the steps required to add an MV23 series camera to your network. For detailed instructions about creating, configuring and managing Meraki Camera networks, refer to the online documentation (https://documentation.meraki.com/MV). - Page 4 Microphone Cut-off Switch: The MV23 Series has a new microphone cut-off switch at the camera's base. This switch can be used to disable audio and override the Dashboard Audio Settings for an added layer of security. If the regulations require disabling audio or Dashboard control for Audio enablement needs to be disabled, the microphone cut-off switch can be leveraged and set to Disabled.
- Page 5 Note: If the microphone switch is disabled and the camera is mounted, toggling the switch back ON would require accessing the camera's base. 1. Use the template to determine mounting hole locations for wall mounting before screwing in the base mount plate. Peel backing from the mounting template to stick on the wall.
-
Page 6: Factory Reset Button
Factory Reset Button: The factory reset button for MV23 series is located on the front of the camera, under the dome. - Page 7 MV23 Mount using small base plate: • Mount the small base plate onto the wall surface using the paper template provided. • Use 3x Wall anchor and screws to fix the base plate to the wall. • The MV23 Series cameras have a button to engage the locking mechanism. Press the button while aligning the camera to the small base plate. •...
- Page 10 MV23 LED Status Indicator Your MV23 series is equipped with an LED light on the front of the unit to convey system functionality and performance information. The following colours and patterns indicate the various status conditions of an MV: • Rainbow (solid, rotating through colours) - MV is booting up.
Need help?
Do you have a question about the Meraki MV23 Series and is the answer not in the manual?
Questions and answers