Advertisement
Advertisement
Table of Contents

Related Manuals for EVSE A0 Series


Summary of Contents for EVSE A0 Series
- Page 1 A0 Smart AC Charging Point User Manual...
-
Page 2: Safety Notes
Please read carefully to understand the correct use of the device before installation, maintenance and operation! Please follow the safety notes; otherwise, it may lead to a danger of death, injury and damage to the device, supplier cannot accept any liability for claims resulting from this . Thank you very much to use our AC Charging Point •... -
Page 3: Product Overview
1 Product Overview 1.1 Product Introduction The EVSE (A0 Smart AC charging point) is an AC charging point that you can use to supply electric- ity to an EV. The EVSE offers tailor-made, intelligent and network charging solutions for your company or home. - Page 4 Product pictures are shown in Figure 1-2 and Figure 1-3 below: Case B connection Figure 1-2 Socket Version Case C connection Figure 1-3 Cable Version...
- Page 5 Specifications Table 1- 1 A0 series Specification EAW-A007xxx 1P + N + PE AC Power supply EAW-A011xxx,EAW-A022xxx 3P + N + PE EAW-A007xxx 7.4kW Rated Power EAW-A011xxx 11kW EAW-A022xxx 22kW EAW-A007xxx AC 230V, 50/60Hz Rated Voltage EAW-A011xxx,EAW-A022xxx AC 400V, 50/60Hz...
-
Page 6: Installation
2 Installation 2.1 Included Mounting Parts And Required Tools Components Make sure that all parts are delivered according to the order. Check the packaging for the following parts. AS 48A Smart AC Charging Point User Manual EVSElink charger RFID cards Drilling template User Manual Wall anchors (8 x 40 mm) - Page 7 2.2 installation steps 2.2.1 Cut the drilling template from the carton, place the drilling template on the wall , drill holes where the three fixing points, insert the Wall plugs into the fixing holes. Figure 2-3 Locate the installation location for Wall-mounted...
- Page 8 Figure 2-4 Locate the installation location for pole-mounted 2.2.2 Use a screwdriver to carefully push the two barbs at the bottom of the equipment and remove the upper cover.
- Page 9 2.2.3 Loosen the six screws and carefully remove the second cover from the base box. 2.2.4 Fix the device on the wall by inserting the screws and waterproof gaskets...
- Page 10 2.2.5 Wiring diagram, Electrical Wiring 2.2.6 Screw the second cover back. 2.2.7 Put the cover back on...
- Page 11 Configuration Install EVSElink Charge App 1. Download the EVSElink Charge app to your mobile device from the Google Play or Apple App Store. Figure 3-1 EVSElink app 2. Open the app, sign in or create an account with your and email. Add the Charger 1.
- Page 12 4.You will go to the home interface to set the parameters of the EV charger. Click “set” on the top right 5.Set the parameters of the EV charger via Bluetooth.
- Page 13 6.Here is a introduction of the settings. Set Power line Phase Rotation Set local Solar...
- Page 14 CT Clamp (optional) The CT clamp can measure current up to 120A. Installation instructions Please refer to the schematic diagram below for the interface position of CT clamps in the charger. For a single-phase charge point, the CT clamp is connected to CTA, the black wire is connected to 1, and the white wire is connected to 2.
- Page 15 CT-HUB Product Diagram Installation instruction 1.Installation wiring diagram...
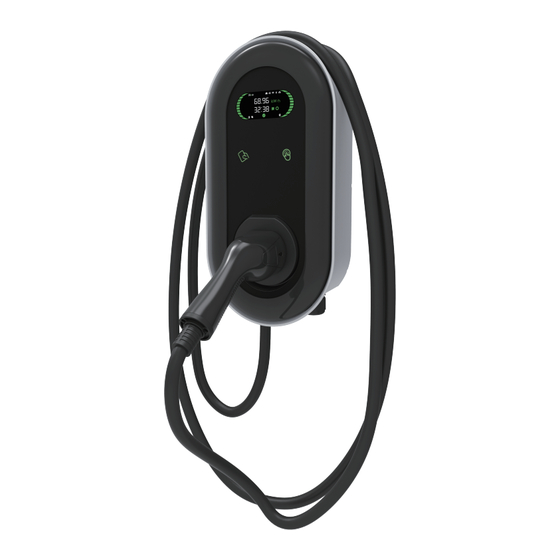
- Page 16 User Interface Instruction LCD Display Cover Applicable to the LCD display cover version (EAW-AS11W102-20 and EAW-AS09P102-20), skip if you are using a LED display cover version. 1. LCD 2. RFID reader 3. Touch Button 2 3 4 5 6 1314 16 1718 1.
- Page 17 Display Dispiay Status Description * Not connected to EV Available * Display rated current (A) * Charger is ready * Connected to EV Charging * Display rated current (A) ready * Display time (minutes) * Charging in progress * Display charging power (kW) and charging energy (kWh) in turn Charging...
- Page 18 LED Display Cover Applicable to the LED display cover version (EAW-AS11W102-10 and EAW-AS09P102-10) 1. LED 2. RFID reader 3. Touch Button 4. Socket LED description Description Solid yellow APP Mode: Not connected to EV and not connected to the app APP Mode: Not connected to EV but connected to the app Solid blue RFID or Plug &...
- Page 19 Red flashing 9 times Error: error code 9 Red flashing 10 times Error: error code 10 Red flashing 11 times Error: error code 11 Red flashing 12 times Error: error code 12 Red flashing 13 times Error: error code 13 Charging DANGER During the charge session, do not disconnect the connector.
-
Page 20: Troubleshooting And Maintenance
Troubleshooting and Maintenance Troubleshooting Error Code Error Description Troubleshooting Suggestions • Disconnect the leakage/over-current protection, switch off the distribution box immediately • Check whether the charger’s output cable is damaged or has Leakage low-impedance ground or short circuit • After troubleshooting the above problems, power on the charger again. -
Page 21: Warranty
Maintenance To ensure long-term stable operation of the equipment, the equipment does require some basic, common sense maintenance. The exterior maintenance can be performed by the user. All other service must be conducted by qualified personnel. It is recommended to perform a maintenance every month depending on the environment.
Need help?
Do you have a question about the A0 Series and is the answer not in the manual?
Questions and answers