
Subscribe to Our Youtube Channel
Related Manuals for Bumbleride FLITE


Summary of Contents for Bumbleride FLITE
- Page 1 BUMBLERIDE FLITE ASSEMBLY OPERATION MAINTENANCE Questions about your Bumbleride? We’d love to hear from you. Within the US: Phone: 1-800-530-3930 E-mail: info@bumbleride.com...
-
Page 2: Maintenance
The canopy fabric can be spot cleaned. DO NOT machine-dry any fabric part. Please note the weight capacity for this product is 50 lbs. (22 kg). As a part of continuous product development, Bumbleride reserves the right to make design changes without any notice or obligation. -
Page 3: Safety Standard
All costs associated with shipping and handling are the responsibility of the customer. Upon receipt of the product, Bumbleride or its authorized repair center, will arrange for inspection of the item. If the problem is due to defective parts or defective workmanship on behalf of Bumbleride, Bumbleride will repair or replace the product at Bumbleride’s option. -
Page 4: Manual Contents
Folding Flite Folding Flite Attaching the accessory rain shield BOX CONTENTS Frame Front Wheels (2) Canopy Rear Wheels (2) Shoulder Strap Cup Holder Infant Seat Adapter Bar *Headrest and shoulder pads Rain Shield Safety Strap 3 | Bumbleride 1-800-530-3930 info@bumbleride.com www.bumbleride.com... -
Page 5: Opening Frame
Opening frame: Please ensure that your child is a safe distance away before unfolding the Flite frame. Begin by standing the frame up with the handles on the upper side (1). Release the folding locks by pulling up on the handle triggers (2). - Page 6 Gently shake the frame forward to open and pull the handles down to lock into place (3). 5 | Bumbleride 1-800-530-3930 info@bumbleride.com www.bumbleride.com...
- Page 7 Using your foot, engage the rear frame support bars (4). 1 | Bumbleride 1-800-530-3930 info@bumbleride.com www.bumbleride.com...
-
Page 8: Attaching Wheels
Locate the two rear wheels. These wheels have brake kick pads attached (1). Slide them onto the rear legs of the Flite frame so that the brake kick pads are facing outwards (2). You will hear a click notifying you that they are engaged. - Page 9 Locate the two front wheels. These wheels have light grey tabs installed, used for locking the front wheels in line (3). Slide them onto the front legs of the Flite frame (4). You will hear a click when they have engaged.
-
Page 10: Operating Brakes
Operating brakes: To engage the Flite in a parked position, press down on the rear brake kick pads until the brakes engage (1). Warning: Never leave child unattended in stroller. Locking front wheels: To engage the front wheels in the in-line position, simply lift up on the grey tab until it locks into place (1). -
Page 11: Attaching The Canopy
Attaching the canopy: Locate the canopy holsters on the frame of your Flite (1). Slide the canopy clips into the holsters to lock into place. Attach the side snaps of the canopy to the seat body of the stroller (2). - Page 12 Operating the canopy: Pull the canopy forward to provide sun coverage (3). The rear portion of the canopy can be removed using the attached zipper (4). 11 | Bumbleride 1-800-530-3930 info@bumbleride.com www.bumbleride.com...
-
Page 13: Adjusting Backrest
To raise, pull the d-ring downward and squeeze the adjuster up to the desired position. Adjusting footrest: Flite utilizes a 3-position adjustable footrest. To adjust the footrest, locate the adjuster buttons on each side of the footrest underneath the lower seat fabric and adjust to your desired position (1). - Page 14 Attaching optional cup holder: Locate a dime-sized steel knob on either side of the stroller handle. Press the plastic cup holder onto the knob and pull downward so that the cup holder locks into place (1). 13 | Bumbleride 1-800-530-3930 info@bumbleride.com www.bumbleride.com...
- Page 15 (2). The shorter ends of the shoulder strap attach to the rear legs of the frame (3). Wrap each end around its respective leg and secure by using the attached metal hardware (4). 1 | Bumbleride 1-800-530-3930 info@bumbleride.com www.bumbleride.com | 14...
-
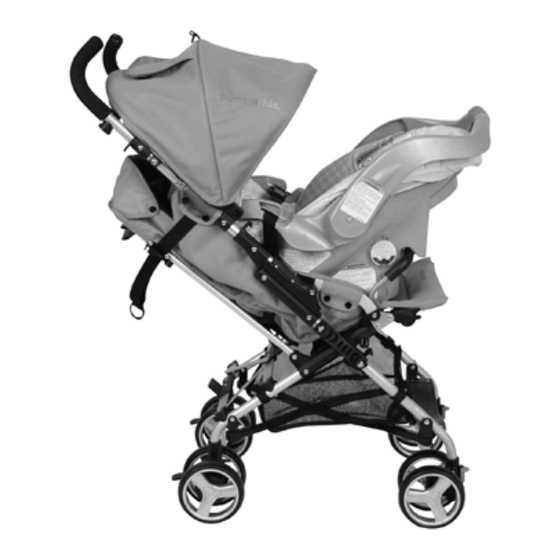
Page 16: Installing An Optional Car Seat
WARNING: Some car seats will not be compatible with this stroller. To verify whether your car seat is compatible, install the car seat WITHOUT our child in the car seat. Visit www.bumbleride.com to nd a listing of current compatible car seats. - Page 17 Tighten the safety belt. Lift up on the car seat to ensure that it is secure. Lift the backrest to its most upright position. Lift the footrest to its most upright position. 1 | Bumbleride 1-800-530-3930 info@bumbleride.com www.bumbleride.com | 16...
-
Page 18: Removing Fabric
(2). Detach the harness so that the shoulder straps can slide through the backrest slits. Gently pull the seat fabric o . The seat fabric can be machined washed using cold water on the delicate cycle. The canopy can be spot-cleaned, do not machine wash. 17 | Bumbleride 1-800-530-3930 info@bumbleride.com www.bumbleride.com... - Page 19 Warning: Ensure that your child is a safe distance away before folding the stroller. Ensure that any bar accessories that may be installed on the Flite (Snack Pack, infant seat adapter bar) are removed before folding. Begin by collapsing the canopy. Using your index ngers, pull up on the release triggers found on the handle (1).
- Page 20 Press the handles forward and down toward the ground (3). As the Flite collapses you will notice that the center support bar on the handles fold as well. When the stroller is folded, the folding locks will engage, keeping the stroller locked (4). Do not tighten the backrest adjuster after folding. Tightening the adjuster can make it di cult to open the stroller.
-
Page 21: Attaching The Accessory Rain Shield
Attaching the accessory rain shield: Begin by unfolding the packaged rain shield and placing it over the Flite. Pull the upper aps through the handle openings (1). Notice the Velcro attachments on both sides of the aps. Secure the Velcro attachments found on the upper ap to the corresponding attachments on the sidewalls of the rain shield.
Need help?
Do you have a question about the FLITE and is the answer not in the manual?
Questions and answers