Lumens CaptureVision LC300 User Manual
Hide thumbs
Also See for CaptureVision LC300:
- User manual (34 pages) ,
- Quick installation manual (2 pages)
Table of Contents
Advertisement
Quick Links
Advertisement
Table of Contents

Subscribe to Our Youtube Channel
Related Manuals for Lumens CaptureVision LC300

Summary of Contents for Lumens CaptureVision LC300
- Page 1 LC300 and LC300S CaptureVision Station User Manual - English Version LCB021 [Important] To download the latest version of the Quick Start Guide, multilingual user manual, software and drivers, please visit Lumens https://www.MyLumens.com/support...
-
Page 2: Table Of Contents
Table of Contents Copyright Information ..................3 Chapter 1 Safety Instructions ..............4 Chapter 2 Package Contents ............... 5 Chapter 3 Product Appearance and Connection ........6 3.1 Product Appearance ................6 3.2 Product Connection ................7 3.3 RS-232 I/O Pin Description .............. 7 Chapter 4 Function Description .............. -
Page 3: Copyright Information
Lumens is a trademark registered by Lumens Digital Optics Inc. Copying, reproducing or transmitting this file is not allowed unless a license is provided by Lumens Digital Optics Inc. except where copying this file is for the purpose of backup after purchasing this product. -
Page 4: Chapter 1 Safety Instructions
Chapter 1 Safety Instructions Always follow these safety instructions when setting up and using the product: 1 Operation 1.1 Use the product in the recommended operating environment, away from water or sources of heat 1.2 Do not place the product on a tilted or unstable surface. 1.3 Please ensure the power plug is dust-free prior to usage. -
Page 5: Chapter 2 Package Contents
Chapter 2 Package Contents Power Adapter 3-PIN to 2-PIN LC300/LC300S Power Cord (DC 19V) Connector Appearance may vary (Japan only) depending on country/region USB 3.0 Cable (2M) RS-232 Mounting Metal Plate M3 Metal Plate Screw (Type B to Type A) Connector (x2) (x2) (4x4) -
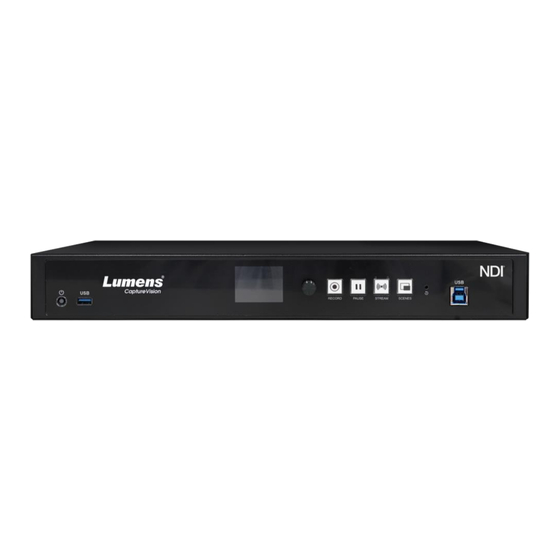
Page 6: Chapter 3 Product Appearance And Connection
Reset the device (long press for 3 seconds) Connect the computer to convert PGM audio and video into USB signal for use with video conferencing software USB3.0 Port Video/Audio source name: Lumens LC300(S) Processor XLR Out Balanced line output Line In(1) -
Page 7: Product Connection
Connect to WAN HDMI 1 Multiview User interface output; displays the settings menu and video management Main screen output, displays the recording or streaming screen and HDMI 2 Program applied layout USB 2.0 Port To connect keyboard/mouse/USB flash drive/USB camera/LC-RC01 remote control panel USB 3.0 Port Line In(2) -
Page 8: Chapter 4 Function Description
Chapter 4 Function Description 4.1 Real-Time Operation Menu Connect a monitor to the HDMI Multiview port to view the real-time operation menu Connect a keyboard/mouse to the USB port to navigate the menu Icon Name Function Descriptions Configuration Change system network settings, recording/streaming encoder settings Director Input signal source selection, audio source management, management... -
Page 9: Parameter Setting
4.3 Parameter Setting This Section covers the web-based interface. Only the HDMI Multiview provides settings of [System Settings] > [Internet]. 4.3.1 System Settings 4.3.1.1 System Settings Set up the device’s basic information, such as date and time Item Function Descriptions The device’s name and description Device Identification... - Page 10 Live Streaming Preview the program (PGM) output in real-time Supports different time zone settings. Synchronize time with an NTP service (default) and perform a manual set up. Time Zone: Select the correct time zone according to current location Date & Time ...
- Page 11 4.3.1.2 Network The factory setting is DHCP. If you want to use a static IP address, please configure the connection here. Function Descriptions DHCP: Dynamic IP address is set as default Static IP: Configure a static IP address and manually enter network information Select and fill in required network settings and click [Apply] to save The system will restart after changing network settings.
- Page 12 4.3.1.3 Services Item Function Descriptions View firmware information and apply updates Click [Update] and select the new firmware file Firmware Advance: Engineers update sub-firmware usage Save system log files to a user’s computer Enter a file name Service Data Click [Export] to export system log files The length of file name must be between 0 ~ 16 characters.
- Page 13 4.3.1.4 Configuration You can export the configuration files of the device to a computer, and import the configuration files to another device to apply the same configuration. Item Function Descriptions Export Export the current device configuration as a configuration file Import Import the exported configuration file from another device 4.3.1.5 Display...
- Page 14 4.3.2 Account Select one of three user type accounts: modify the username and password for [System Management], [Online Director], [Content Management] roles. Item Username/Password Function Descriptions High level authority. System management Administrator admin / admin permissions. Online director / director Manage playback and control basic video settings Director Video...
- Page 15 4.3.3 Source 4.3.3.1 Physical Video Source Manager Function Descriptions Click [Edit] to edit the HDMI signal source name and resolution When using a 3G-SDI input, use Video Input 4 When using a 12G-SDI input (LC300S), use Video Input 1. 4.3.3.2 USB Video Source Function Descriptions Click [+Add], select the USB video source device, apply and then add it.
- Page 16 Lumens Network Camera CameraAccount: admin Password: 9999 The status displays “OK” to indicate that the device can be used as a signal source input. Click [Add] to add an IP video source to the device...
- Page 17 4.3.4 Audio Source Manager Function Descriptions Click [Refresh] to search for a USB audio device connected to the LC300 4.3.5 Video Administrators can choose to record a single PGM (main program out) screen or record up-to 4 video inputs. Each recording can be set with individual encoding settings 4.3.5.1 Encoder Manager Function Descriptions...
- Page 18 4.3.5.2 Record Manager Function Descriptions Click [Add] to configure video/audio sources and encoders Maximum recording time: 12 hours Resolution settings will affect the split-screen supported by PGM. Please refer to the following limitations PGM Maximum Resolution Description Split-screen Quantity 4K 50/60fps 1 channel 1080p 50/60fps...
- Page 19 4.3.6 Scene 4.3.6.1 Scene Provides 5 overlay styles, background images, and scenes. You can also add your own styles. Item Function Descriptions Select, upload or delete an image overlay. Click [ ] to select a file then click [Apply] to upload and apply this overlay style.
- Page 20 Item Function Descriptions Select a scene to be set Scene Selection If the layout style of the scene needs to be changed, please refer to 4.3.6.1 Scene Set [Camera Preset Position]. Each supports up-to 9 camera preset positions or start/stop tracking Camera Preset Setting ...
- Page 21 4.3.7 Storage Set up primary storage and back up / NAS storage and display hard drive information Item Function Descriptions Local storage: Click drop-down menu and select the local storage Record Disk hard drive Settings Formats supported: FAT/ FAT32/ NTFS/ ext3/ ext4/ exFAT Display hard drive information, free space, and capacity.
- Page 22 Importing calendar periodically You can synchronize schedules from network servers (e.g. Google Calendar) Please refer to the videos of How to series on Lumens’ YouTube channel for related settings Enable/disable the scheduled standby and wake-up functions. Set Stand by and Wake up...
- Page 23 4.3.9 Backup Auto backup service automatically uploads videos to a designated storage. Set the upload destination and test the connection. Item Function Descriptions Auto upload: Disable / Upload after a recording is complete / Upload periodically Mode: FTP/ SFTP/ NAS/ USB Storage/ Panopto/ Kaltura FTP/ Kaltura SFTP/ Kaltura HTTPS/ Opencast HTTP/ Opencast HTTPS/ WebDAV http/ WebDAV https Backup Settings...
- Page 24 4.3.10 About Displays device-related Information: Firmware version, device serial number, and technical support link...
-
Page 25: Online Director
4.4 Online Director LC300 and LC300S have a built-in Online Director, which allows you to monitor recordings and the output video. Three login methods below are available: Select Online Director from the HDMI Multiview real-time operation menu Log into the web interface and select the Online Director icon at the upper right corner of the settings page ... - Page 26 Audio volume Quickly select the required production layout, or customize the Scenes background and scene style Camera Control Control Lumens IP cameras 4.4.1 REC Record Setting Item Function Descriptions After checking the box, press the record button to start/stop Synchronize...
- Page 27 Index A timestamp can be added after the recording starts Capture Capture a photo Single-channel Stream Stream without starting recording Button 4.4.2 Video Function Descriptions Preview Channel 1 ~ 4 signal sources screen. Click to select the required output signal source ...
- Page 28 Zoom In/ Out Zooms in/out Focus Set up auto or manual focus Set the tracking function on/off Tracking This function is only works with Lumens tracking cameras PTZ Speed Set the speed of Pan Tilt Zoom movement...
-
Page 29: File Management
4.5 File Management Perform the following functions via the file management interface: Upload, download, delete, replay video files and edit recording information. 4.5.1 Multiview Output Interface Item Function Descriptions Preview Select a video file for play out and control on the Preview screen Program Display the Director screen or switch to synchronize with the Preview screen Switch the Program screen to the LIVE Director screen or the Preview... - Page 30 4.5.2 Webpage Interface The default web interface page is the system settings page. Click the video management icon on the top-right corner to access the video management page. Video management Item Function Descriptions Video Click to access the video management page Management Photo Click to access the picture management page...
- Page 31 File Management Description Uploading Check the thumbnails of the videos to upload. Click [ ] and the videos will be uploaded to the location set in Upload Settings. Please refer to [System Management/Upload Settings] for related settings. Upload Status Description: Icon Upload Status Icon...
- Page 32 Photo Management You can manage the photo files captured by pressing SNAPSHOT. Folders will be named with the shooting date automatically; all photos shot on the same date will be stored in the same folder. Just like Video Management, you can also upload, download, and delete photos in Photo Management subpage.
-
Page 33: Chapter 5 Troubleshooting
Chapter 5 Troubleshooting This chapter describes problems you may encounter while using LC300 and LC300S. If you have questions, please refer to related chapters and follow all the suggested solutions. If the problem still occurrs, please contact your distributor or the service center. Problems Solutions Please confirm that the power cord used is of DC 19V... -
Page 34: Addendum 1
Addendum 1 Frequently used port No. Port No. Description Applicable for RTMP push to most platforms, such as YouTube, 1935/TCP Vimeo, and Twitch 80/TCP Applicable for RTMP push to Periscope 443/TCP Applicable for RTMPS push to Facebook 1935/TCP Applicable for RTMP push to LinkedIn 1936/TCP 2935/TCP Applicable for RTMPS push to LinkedIn...
Need help?
Do you have a question about the CaptureVision LC300 and is the answer not in the manual?
Questions and answers