Advertisement
Advertisement
Table of Contents

Subscribe to Our Youtube Channel
Related Manuals for Snow Peak Fubi TP-720


Summary of Contents for Snow Peak Fubi TP-720
- Page 1 Instruction Manual : Ver 1.00 TP-720 Fubi...
- Page 2 Thank you for purchasing this Snow Peak product. This product is a shelter designed for camping. For safety, read the following instruction manual before use. Please keep it safe for future reference. Finally, if you find anything that you do not understand in the description or any problems with the product, please stop use immediately and contact the retailer or Snow Peak Customer Service.
- Page 3 ●Before using the product, check each part for abnormalities. If you find any abnormalities, stop using the product immediately and contact the retailer where you purchased the product or Snow Peak Customer Service to request inspection or repairs. ●Pay close attention to the weather. If extreme weather is forecast, pack up camp and evacuate to a safe place.
-
Page 4: Preparations Before Use
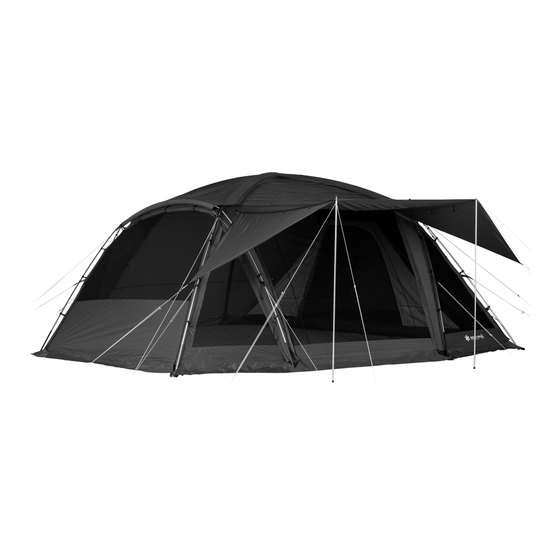
Part names Shield roof Ridge pole Front panel C pole Cross pole Side door panel Preparations before use Waterproofing treatment with seam taping has been applied to the stitching of the product. However, seam tape could not be applied to the ventilator and fasteners on the main body and a portion of the bottom sheet of the inner room due to their inherent design. - Page 5 Rope with a rope tensioner, peg down position Fix the rope and determine the peg down positions as shown below. 2 m / 6.6' rope 2 m / 6.6' rope 3.5 m / 11.5' rope 3.5 m / 11.5' rope 2 m / 6.6' rope 2 m / 6.6' rope 4 m / 13.1' rope...
-
Page 6: Setup Procedure
Setup procedure To help ensure safety, this procedure should always be carried out by two or more people. Spread out the main body on a flat area where the tent will be set up. Pay attention to orientation of the front and back panel when spreading. * Check that the snap hooks of all the six building tapes are connected. - Page 7 In the same way as in step ②, insert other cross pole (pole with yellow and gray tips) into the sleeve with yellow tape. * When inserting the pole into the sleeve, push in the pole. If you pull the pole, the connection part of the pole will come out in the sleeve and pinch the fabric.
- Page 8 Open the zipper on the front panel (1), and have (2) one person lift up the cross pole from below. (2) In the meantime, the other person should pull the sleeve toward him/herself. (3) (1) (1) (3) (3) Front panel Insert the ring pin with the yellow peg down loop into the tip (yellow) of the cross pole.
- Page 9 Move to the front panel side and insert the ring pin with the black peg down loop into the tip (black) of the C pole. Tip of the C pole (black) C pole Ring pin Black peg down loop Front panel side In the same way as in steps ⑨...
- Page 10 Hold the ring pin with the navy blue peg down loop and insert it into the tip of the ridge pole (navy blue). * At this time, insert the ring pin into the tip of the pole without pulling the pole. If you pull the pole, the joints of the pole will come off and damage the product.
- Page 11 The O-ring tapes attached to the pole intersections or to the poles itself need to be wrapped to the pole as shown in the figure. Attach ropes to this O-ring, referring to the length of the rope shown in the figure on page 30, [Rope with a rope tensioner, peg down position]. (Total 14 locations) Back panel Front panel...
- Page 12 Peg down the peg down loops in each corner in the alphabetical order shown below. Peg down the attached tension rope firmly. To flip open the front panel, use the separately sold upright pole (TP-080) or wing pole 210 cm / 6.9' to set up with the included forked end rope. Adjust the direction of the rope so that there are no wrinkles.
- Page 13 When removing the building tape You can remove the building tape to prevent children from getting their feet caught on them. In normal circumstances, do not remove the building tape because doing so will reduce the strength of the shelter. Six building tapes attached to the hems of the shelter When removing the building tape, replace the pegs...
- Page 14 Attaching the shield roof Spread the shield roof on the back of the main body with the PU coated surface (shiny surface) facing up and check the front and back. (Bilateral symmetry) Front side (side with a roof window) Front side S-hook (rope with a rope tensioner) Front side S-hook...
- Page 15 Have two people hold the S-hook (rope with a rope tensioner) on the front side of the shield roof, and cover the top of the Fubi body with the shield roof. Back Front Open the zipper on the side door panel to make it easier to attach the shield roof. Attach the black Velcro tape (male) at the center of the side door panel side of the shield roof to the black Velcro tape (female) at the center of the C pole sleeve.
- Page 16 Reattach the snap hook to the O-ring so that the rope with a rope tensioner of the back side snap hook passes under the ridge pole (A), and attach the front side S-hook (rope with a rope tensioner) to the corresponding O-ring (B).
- Page 17 Attach the S-hook of the rubber loop attached to the shield roof to the corresponding O-ring. Cross pole Back side S-hook (rubber loop) Front side S-hook (rubber loop) C pole O-ring O-ring...
- Page 18 Attach the Velcro tape on the back side of the shield roof, which corresponds to the cross pole, to the cross pole, and attach the S-hook (rubber loop) for the cross pole to the O-ring. Velcro tape S-hook for cross pole O-ring (rubber loop) Attach the Velcro tape in the center of the shield roof back side.
- Page 19 Attaching the inner room The ground sheet and inner room can be attached to either the left or right side of the Fubi body. This manual explains how to attach it on the right side. Spread the ground sheet with the PU coated surface (shiny surface) facing up, and place it in the inner room position with the woven name tag facing the indoor side.
- Page 20 Hang the two S-hooks (rubber loops) on both ends of the back side of the inner room to the O-rings on the Fubi body. Hang one S-hook at the top of the back side of the inner room to the O-ring on the Fubi body.
- Page 21 Hang the two S-hooks at the top of the inner room onto the corresponding O-rings as shown below. Hang the tape (tape with a hook, peg down tape) attached to each bottom corner of the inner room onto the corresponding peg or O-ring. Tip of the C pole (uncolored) Tip of the cross...
- Page 22 Pull the slider or tape in the order of A→B→C shown below to remove the slack at the top of the inner room. * Do not pull the tape too hard at this time. Pulling too hard may cause damage to the Fubi body.
-
Page 23: Disassembly Procedure
Disassembly procedure (This product should always be assembled/disassembled by two or more people.) To disassemble, basically perform the setup procedure in reverse. Make sure there is nothing inside the inner room and the main body before starting the disassembly process. It will be easier to roll up the fabric if you remove the inner room, shield roof, ground sheet, and pole from the shelter, and slightly open the zipper at the inner room entrance. - Page 24 Precautions for disassembly and storage ●Make sure that the product is sufficiently dry before storing it. ●If there is strong wind in the area, wait for the wind to subside before disassembling the shelter. ●If you have attached an inner room, be sure to remove the inner room and any other products from the shelter before disassembling it.
-
Page 25: Maintenance And Storage
In other cases, Snow Peak will repair the product for an appropriate fee. The decision to repair or replace the product will be at our discretion. Snow Peak will not repair the product for any damage that occurred due to the following: 1.Material deterioration caused by age / 2.Damage caused by modifications or rough handling / 3.Damage caused by... -
Page 26: Specifications
●Transportation and repair costs are determined as follows. 1. Within warranty: The transportation cost (both ways) and repair cost will be covered by Snow Peak. 2. Outside warranty: The transportation cost (both ways) and repair cost will be covered by the customer.
Need help?
Do you have a question about the Fubi TP-720 and is the answer not in the manual?
Questions and answers