Minelab X-TERRA 705 Instruction Manual
Hide thumbs
Also See for X-TERRA 705:
- Quick start manual (23 pages) ,
- Instruction manual (14 pages) ,
- Owner's manual (9 pages)
Table of Contents
Advertisement
Quick Links
Field Guide
Power
Minus
Turns the detector On/Off.
Adjusts settings, and scrolls
to the left through the
Mode
discrimination segments.
Toggles between Coin &
Menu
Treasure Mode (
) and
Prospecting Mode (
).
Enters the Menu.
Activates Target ID Stabiliser.
Accesses and scrolls through
Selects the automatic option
the detecting settings.
for Ground Balance and Noise
Pinpoint/Detect
Cancel.
Pinpoint assists in locating
Patterns
the exact position of a target
Scrolls through the different
prior to recovery.
Discrimination Patterns.
Detect exits menu settings
and returns to detection.
All Metal
Plus
Toggles between the
selected discrimination
Adjusts settings, and scrolls
pattern and the All Metal
to the right through the
pattern.
discrimination segments.
Minelab Electronics Pty Ltd
Tel: +61 (0)8 8238 0888
Email: minelab@minelab.com.au
Minelab International Ltd
Tel: +353 (0)21 423 2352
Email: minelab@minelab.ie
Accept/Reject
Minelab MEA General Trading LLC
Accepts or rejects
discrimination segments.
Tel: +971 4 254 9995
Ground Balance
Email: minelab@minelab.ae
Accesses the Ground Balance
Menu.
Track
Toggles between Ground
Balance and Tracking Ground
Minelab Americas Inc
Balance.
Backlight
Tel: +1 630 401 8150
Turns the Backlight On/Off.
Email: info@minelabamericas.com
Instruction Manual
Advertisement
Chapters
Table of Contents

Subscribe to Our Youtube Channel
Related Manuals for Minelab X-TERRA 705


Summary of Contents for Minelab X-TERRA 705
- Page 1 Email: minelab@minelab.com.au Minelab International Ltd Tel: +353 (0)21 423 2352 Email: minelab@minelab.ie Power Minus Accept/Reject Minelab MEA General Trading LLC Turns the detector On/Off. Adjusts settings, and scrolls Accepts or rejects to the left through the discrimination segments. Mode Tel: +971 4 254 9995 discrimination segments.
-
Page 2: Table Of Contents
CONTENTS How Detectors Work 28 Menu Operation VFLEX Technology 29 Adjusting Menu Settings Assembling Your X‑TERRA 705 30 Sensitivity List of Parts 31 Adjusting Sensitivity Connecting the Coil 32 Noise Cancel Shaft Assembly 33 Choosing a Noise Cancel Channel Armrest Assembly 34 Threshold Connecting the Control Box 35 Adjusting Threshold... -
Page 3: How Detectors Work
Audio Transmit Supply Analog Signal The 2nd generation X‑TERRA detectors continue to incorporate Minelab’s proven VFLEX Technology. VFLEX uses state of the art digital and mixed‑signal PRIMARY MICRO components to enhance standard single frequency (IN CONTROL BOX) DIGITAL SIGNAL PROCESSING (DSP) - Page 4 A Concentric coil is the Double D coils are standard coil supplied available also. They with the X-TERRA 705 provide improved ground and is an all purpose rejection and have a coil with excellent different detection profile.
- Page 5 ASSEMBLING YOUR X‑TERRA 705 List of Parts Before assembling your X‑TERRA 705 please check that the package includes these parts: Coil Skidplate (fitted to coil) Lower shaft Middle shaft Upper shaft Armrest Stand Control box Control box screw Rubber washers (2) Plastic wing nut Plastic bolt Armrest screw...
- Page 6 Connecting the Coil Plug the two rubber washers into the holes on either side of the lower shaft yoke. Slide the yoke into the yoke bracket on top of the coil. Ensure that the spring loaded pin in the lower shaft is pointing downwards. Insert the plastic bolt through the yoke and the yoke bracket.
-
Page 7: Assembling Your X-Terra
Ensure that the end of the strap will be fastened outwards from your arm. The X-TERRA 705 is designed to be used in either the left or right hand. This diagram shows the velcro strap threaded outwards for the left arm. -
Page 8: Coil Cable Assembly
Coil Cable Assembly Wind the coil cable around the lower and middle shaft enough times to take up the slack. Use the velcro tabs to keep the coil cable in place against the shaft. It is recommended that one tab is used on the lower shaft close to the coil and the other tab on the middle shaft before the cable reaches across to the control box. -
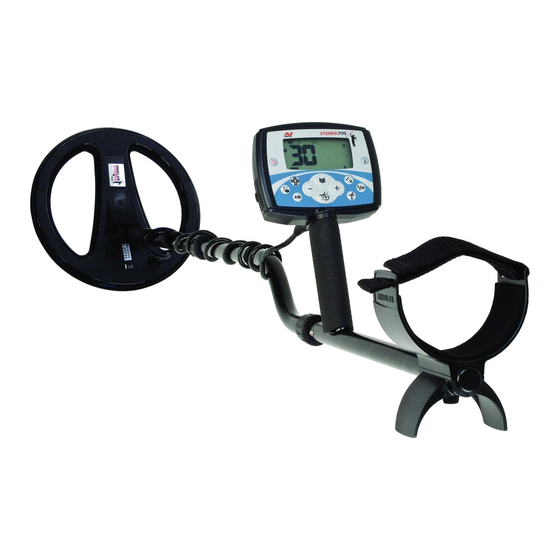
Page 9: Keypad Layout
KEYPAD LAYOUT Power Turns the detector On/Off. Patterns Scrolls through the different Discrimination Patterns (Coin & Treasure Mode only). Mode This button has three functions. Toggles between Coin & Treasure Mode ( ) and Prospecting Mode ( Activates Target ID Stabiliser. Selects the automatic option for Ground Balance and Noise Cancel. - Page 10 Liquid Crystal Display (LCD) area Backlight Turns the Backlight On/Off. The Backlight provides greater screen clarity in dim conditions. The Backlight glows during the startup sequence. Turning Off will extend battery life. Accept/Reject Accepts or rejects certain metals by turning on/off individual discrimination segments (Coin &...
-
Page 11: Lcd Layout
LCD LAYOUT Target ID Stability Headphones are not included with the This icon indicates that Target ID Stability has been X-TERRA 705 (Accessories, p. 52). selected (Target ID Stability, p. 20). Headphones Backlight This icon indicates that headphones are connected and... - Page 12 Coin & Treasure Mode This icon indicates that the Coin & Treasure Mode has been selected (Coin & Treasure Mode, p. 18). Prospecting Mode This icon indicates that the Prospecting Mode has been selected (Prospecting Mode, p. 19). Tracking This icon indicates that Tracking Ground Balance has been selected (Adjusting Ground Balance, p.
-
Page 13: Turning The Detector On
TURNING THE DETECTOR ON Press Power It is recommended to only turn the detector on, when outdoors, away from sources of A short start‑up sequence will display electromagnetic disturbance. and a tune will be heard. There are many metallic objects inside Once on, the detector will be in the a house (e.g. - Page 14 Please note that not all LCD icons are displayed at the same time. The X-TERRA 705 can save separate settings for each mode. When the Detecting Mode is changed, the menu settings that have changed will flash for three seconds.
-
Page 15: Holding The Detector
HOLDING THE DETECTOR To hold the detector, thread your arm through To adjust the length of the shafts, undo the the armrest and strap. Grasp the handle of the twistlocks, compress the spring pins of the detector and rest your forearm in the armrest. shafts and move them up or down to suit. -
Page 16: Sweeping The Coil
Try sweeping the coil slower in Prospecting Mode for improved target detection and separation from ground mineralisation signals. 1” (2.5cm) coil parallel to the ground The X-TERRA 705 coil is waterproof. (Care of Your X‑TERRA 705, p. 54) -
Page 17: Simple Detecting Exercise
A SIMPLE DETECTING EXERCISE Buried metal objects are referred to as targets. Don’t worry if the detector is not producing Before attempting to pinpoint or recover real a sound over the nail — this is because the targets, it is important to understand how to detector begins in the default Pattern 1, a interpret the audio and visual signals of setting which rejects signals from common... -
Page 18: Detector Audio
DETECTOR AUDIO Target Response Threshold (Background sound) (Metal Object Response) This is the background ‘buzz’ produced by the This is the sound given by the detector when detector, used to help distinguish between a target is located and not discriminated desired and undesired objects. -
Page 19: Coin & Treasure Mode
COIN & TREASURE MODE Coin & Treasure Mode is used for detecting valuable objects including old and modern coins, jewellery and artefacts. Undesired objects such as pull‑tabs and bottle caps may be rejected. This mode can be used in a variety of environments such as parks and salt water beaches. -
Page 20: Prospecting Mode
PROSPECTING MODE Prospecting Mode is used to find metal such as gold nuggets and relics in highly mineralised, ‘difficult’ areas. Targets are identified by audio only. The number on the display is not related to the target; instead, it shows the Iron Mask value, as does the Discrimination Scale. -
Page 21: Target Id
TARGET ID Buried metal objects are referred to as targets. Target ID The numeric identifier of Target signals contain ferrous and conductivity a particular metal object information. underneath the ground. As the coil is passed over a target, the detector digitally processes the target signal and displays this as a number. -
Page 22: Pattern Discrimination Scale
(Editing Discrimination Patterns, p. 25). 4 ferrous 24 nonferrous The X-TERRA 705 has 28 ID segments. The target IDs range from –8 to 48, increasing in steps of 2. Rejected segments appear as black, accepted segments disappear altogether (allowing signals from metal objects). -
Page 23: Preset Discrimination Patterns
PRESET DISCRIMINATION PATTERNS The X‑TERRA 705 has an All Metal Pattern, four All Metal Pattern preset Discrimination Patterns and Iron Mask. Accepts signals from all types of metals, everything from jewellery to rusty nails (all target IDs). No target signals are The combinations of accepted and rejected rejected. - Page 24 Example targets only Iron Mask level = 5 Iron Mask Level = 20 Iron Mask Level =5 Ferrous Gold The Iron Mask only uses 20 segments of the Discrimination scale.
-
Page 25: Choosing A Discrimination Pattern
CHOOSING A DISCRIMINATION PATTERN Pattern All Metal Shortcut Discrimination The X‑TERRA 705 has In Coin & Treasure Mode an All Metal shortcut use Patterns available in both modes. toggle between In Coin & Treasure Mode, Pattern 1, Pattern 2, press All Metal Pattern 3 and Pattern 4. -
Page 26: Editing Discrimination Patterns
EDITING A DISCRIMINATION PATTERN The Preset Discrimination Patterns may be edited to create custom patterns. Method 1 – to reject a specific Target ID using an actual target When a target is detected a discrimination segment will flash, indicating its position on the discrimination scale, and the target’s ID number will appear on the LCD. -
Page 27: Pinpointing
PINPOINTING When a signal is heard, it is an advantage to identify the exact position of the target. coil This is best determined by using Pinpoint this target will Enabling Pinpoint instructs the X‑TERRA 705 produce a loud, to temporarily disengage discrimination and high tone sound become a non‑motion detector. -
Page 28: Pinpoint Sizing
It is important to remember that activating Pinpoint Sizing whilst directly over the target may completely The X-TERRA 705 updates the Target ID mask the target. and Depth whilst Pinpointing in Coin & Treasure Mode. -
Page 29: Menu Operation
MENU OPERATION The X‑TERRA 705 operates in two display states – Detection and Settings. Detection (display state) Settings (display state) In Coin & Treasure Mode, the Target The X‑TERRA 705 has a range of ID, discrimination segments and depth settings that should be adjusted to automatically translate target signals. -
Page 30: Adjusting Menu Settings
ADJUSTING MENU SETTINGS Detection Settings Sensitivity Noise Cancel Exits Settings, and returns to a blank detection display Threshold Ground Balance can only be accessed via the Ground Balance button. Volume Sensitivity has a range of 1–30. Threshold has a range of –5 to 25. Volume has a range of 0–30. -
Page 31: Sensitivity
SENSITIVITY The X‑TERRA 705 is highly sensitive and has Always choose the highest stable Sensitivity a wide Sensitivity adjustment range. It is setting to ensure optimum performance. Do important to set the correct Sensitivity level this by holding the coil stationary; increase the for your detecting conditions. -
Page 32: Adjusting Sensitivity
ADJUSTING SENSITIVITY Recommended Sensitivity Settings Difficult ground or noisy conditions 1–8 Park with trash New user Salt water beach Coin & Treasure Mode (Default) Park with no trash Prospecting Mode (Default) Experienced user 23–30... -
Page 33: Noise Cancel Channel
NOISE CANCEL Manual The detector may become noisy or erratic due to electrical interference from powerlines, Press Menu/Select and choose electrical equipment or other detectors Noise Cancel operating close by. This interference is Use the + and – buttons to select the interpreted as a crackling or popping noise. -
Page 34: Choosing A Noise Cancel Channel
CHOOSING A NOISE CANCEL CHANNEL Manual Auto... -
Page 35: Threshold
THRESHOLD Threshold is the constant background sound The Threshold volume should be set to the produced by the detector to help distinguish preferred level. It is important to note that between desirable and undesirable targets. small surface objects, as well as large deep objects, will produce very small changes in the When a rejected target is detected, the Threshold sound. -
Page 36: Adjusting Threshold
ADJUSTING THRESHOLD Audible Target Response Audible Target Response Volume Volume = 30 = 30 Target #2 Target #2 Target #1 Threshold Target #1 Threshold If the Threshold is set to 0, the Threshold If the Threshold is set to a positive value, high audio/sound is disabled and detector enough for you to hear the faint hum, the will produce target signals sounds only. -
Page 37: Volume
VOLUME Volume is the level of sound emitted by the When the detector battery is low (indicated detector when a target is detected. The Volume by the low battery icon) the speaker volume control limits the maximum volume of limit will be automatically reduced. This saves target signals. -
Page 38: Adjusting Volume
ADJUSTING VOLUME Audible Target Response Audible Target Response Volume Target #2 Target #2 Volume Target #1 Target #1 Threshold Threshold When Volume and Threshold settings are used together, there is greater control over target audio response. -
Page 39: Tones
TONES Target Tones Press Menu/Select and choose Tones The number of Target Tones may be selected Use the + and – to select either 1, 2, 3, 4, or from the Tones menu. There are five different Multiple Target Tones (99). options listed in the table below. -
Page 40: Adjusting Tones
ADJUSTING TONES Adjusting Target Tones in Coin & Treasure Mode Adjusting Threshold Tone in Prospecting Mode... -
Page 41: Ground Balance
GROUND BALANCE Adjusting Ground Balance The X‑TERRA 705 is capable of operating in two different types of grounds, magnetic (e.g. The Ground Balance setting can be adjusted inland parks and goldfields) and conductive in three ways; automatically, manually or (wet areas of salt water beaches). Ground with Tracking. - Page 42 Adjusting Ground Balance Adjust Ground Balance with Auto, Manual or Track (p. 42) Ground Balance (Beach) Press and hold Ground Balance for three seconds to activate Ground Balance (Beach)
-
Page 43: Adjusting Ground Balance
ADJUSTING GROUND BALANCE Auto Press Mode to activate Automatic Ground Balance, and begin to continuously Using the detector in All Metal, find a clear lower and raise the coil over the ground. area of ground without any targets. The letters AU will appear and the menu Hold the coil parallel and 4”... - Page 44 ADJUSTING GROUND BALANCE Auto 4” (10 cm) Manual Minimum Sound High If Ground Balance is between two numbers, select the lowest number. Tracking Tracking can be activated in either the detection or the Ground Balance screen. When Pinpoint is activated, Tracking Ground Balance is automatically disabled.
-
Page 45: Tracking Ground Balance Offset
TRACKING GROUND BALANCE OFFSET This setting is recommended for experienced users. Tracking GB Offset allows you to set the Tracking Ground Balance slightly positive or negative allowing a performance advantage under certain conditions. For example, this can be useful in mineralised ground with hot rocks. -
Page 46: Battery Behaviour
8 V and therefore cannot be used with the X-TERRA 705. The graph below is a representation of how 1.5 V and 1.2 V batteries may discharge over time. How the detector is used will affect how long the batteries last for. -
Page 47: Factory Presets
FACTORY PRESETS Menu Factory Preset Mode Factory Preset Mode Specific, General and Mode The X‑TERRA 705 allows the user to reset Dependent settings are all saved when the settings for the current detect mode only. X‑TERRA 705 is switched off (p. 12). Select the detect mode which To return to all of the preset needs to be reset. - Page 48 Menu Factory Preset Press Press and hold once Mode Factory Preset Press Press and hold once Patterns Factory Preset Press and hold Press once...
-
Page 49: Coil Identification
Press and hold Accept/Reject Frequency to view the coil identification screen. Release Accept/Reject to return Double D to settings. High Frequency Press Pinpoint/Detect to return to detection. Release The X-TERRA 705 operates with Concentric (c) and Double D (d) coils. -
Page 50: Error Messages
ERROR MESSAGES Coil Unplugged The coil is not connected to the detector. Coil Error The coil is not communicating with the control box. Coil Incompatible The coil is communicating with the control box but the detector is not recognising it. Turn the detector off before connecting a standard coil. -
Page 51: Sounds
SOUNDS Threshold Positive Acknowledgement This is the background ‘buzz’ given by the The detector emits a short beep for detector to help distinguish between accepted every valid key press. and rejected targets. Negative Acknowledgement Blanking The detector emits a low double beep When a rejected target is detected, the to indicate an invalid keypress. -
Page 52: Recovering The Target
RECOVERING THE TARGET A trowel, knife or small spade are good tools for recovering targets. Once a target has been located, clear the surface of loose material and check again for a signal. If there is no signal then the target is amongst the surface material. -
Page 53: Accessories
ACCESSORIES The use of headphones while detecting, has many advantages. They block out external noise such as wind and traffic, allowing you to listen more closely to target signals. Headphones also minimise disturbance to other people in the area and they extend battery life. - Page 54 Short Shaft Accessory Coils A short shaft is available to decrease the length Are available in different types (Concentric and of the detector. Double D), sizes and frequencies. These coils are suitable for different ground conditions and specific targets. Environmental Cover Protects the control box from environmental conditions such as rain and dirt.
-
Page 55: Care Of Your X-Terra
Non‑ cloth with mild soap detergent. rechargeable Lithium batteries may be used. Always remember to turn the detector off before changing coils. Coils from other models of Minelab detectors will not function with the X‑TERRA 705 (Accessories, p. 52). -
Page 56: Terra 705 Specifications
Audio Tones for Target IDs 1, 2, 3, 4, Multiple Low Battery Audio Alarm User Interface Keys 11 + Power LCD Icons Shaft Colour Black In the interests of product improvement, Minelab reserves the right to make changes without notice. -
Page 57: Service Repair Form
SERVICE AND REPAIR FORM Owners Name Address Telephone Day ( Home ( Fax ( Email Todays Date Detector / Model Serial Number Purchased From Purchase Date Faulty Part(s) DESCRIPTION OF FAULT Please explain how we can replicate the problem in order to fix your detector. - Page 58 The X-TERRA 705 is a high-precision instrument beginner and expert treasure hunter get the This document contains proprietary From our origins in 1985, Minelab have specialised in advanced electronic incorporating Minelab’s proven single best performance out of the X-TERRA 705.
Need help?
Do you have a question about the X-TERRA 705 and is the answer not in the manual?
Questions and answers