Table of Contents
Advertisement
Available languages
Available languages
Advertisement
Chapters
Table of Contents

Subscribe to Our Youtube Channel
Related Manuals for Aiwa XR-M75


Summary of Contents for Aiwa XR-M75
- Page 1 ~lTK& DIGITAL AUDIO...
-
Page 2: Precautions
WARNING when: TO REDUCE THE RISK OF FIRE OR ELECTRIC - The unit is moved from a cold spot to a warm spot - The heating system has just been turned on SHOCK, DO NOT EXPOSE THIS APPLIANCE - The unit is used in a very humid room RAIN OR MOISTURE. -
Page 3: Table Of Contents
Owner’s record Foryourconvenience, record the model number and serial number (you will find them on the rear of your set) in the space provided below. Please refer to them when you contact your Aiwa dealer in case of difficulty. Model No. -
Page 4: Connections
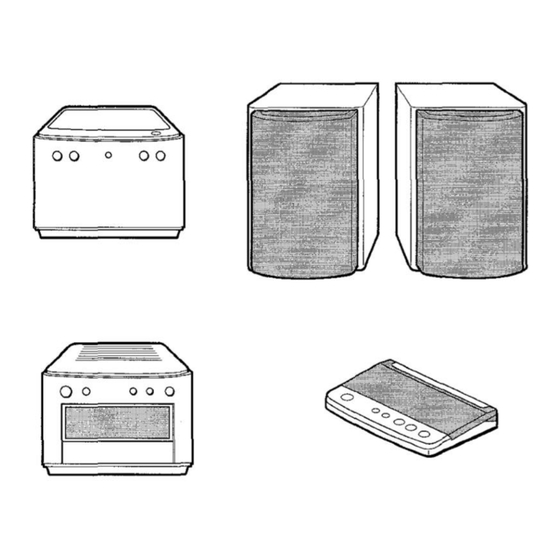
“R” jack and the cord from the left speaker to the “L Before connecting the AC cord jack. The rated voltage of your system shown on the rear panel is 120 V AC. Check that the rated voltage matches your local voltage. - Page 5 You may also place the CD player and the tuner/arnplifier units AM antenna to the AM LOOP terminals. side by side according to your preference. In this case, make sure that the flat cable does not obstruct ‘M antenna ventilation openings, as shown below. Always...
-
Page 6: Before Operation
CD, and tune in to a desired broadcasting station. There are also a button and a control used to make adjustments to the volume level and sound quality to suit your preferences on the control panel. The >... -
Page 7: Setting The Clock
This instructions manual clearly describes the buttons available for each operation. To restore the 12-hour standard, p~ess the button again. -
Page 8: Sound
25, it is automatically set to 25 the next time the power or left to select one of the three, or the off position within 4 is turned on. seconds. ENHANCING THE TREBLE SOUND The BBE system enhances the clarity of high-frequency sound. -
Page 9: Manual Tuning
Each time the button is pressed, the frequency changes. When a station is received, “TUNE” is displayed for a moment. During FM stereo reception, [1[~1)) is displayed. 1[1011) search for a station quickly (Auto Search) Keep the 1<< or >1 button (or the ++... -
Page 10: Presetting Stations
To clear a preset station Select the preset number of the station to be cleared. Then, press button, and press the II button within 4 seconds. u,>b TUNER/ The preset numbers... -
Page 11: Operation
1<4 button. To remove the disc, stop play and press the A OIPEN/CLOSE button. Other method to start play Press the CD button on the control panel, load a dllsc, and then press the > button. Display window in stop mode... - Page 12 To select the 12th track, press the +1 O and 2 buttons. “RANDOM” lights up on the display. To select the 20th track, press the +1 O, +10 and O buttons, To cancel random play, repeat the above. Selected track...
-
Page 13: Timer Play
“FM” or “AM. ” Before turning off the power, repeat step 6 to prepare the source, You can change the band later at step 6. and adjust the volume and tone. -
Page 14: Setting The Sleep Timer
VCRs, TV, etc.). Press the SLEEP button twice while pressing the SHIFT button Connect the red plug to the R jack, and the white plug to the L on the remote control so that “NO SLEEP” in displayed. jack. When connecting... -
Page 15: Listening To External Sources
EXTERNAL EQUIPMENT through these jacks. Use a cable with RCA phono plugs to connect audio equipment. To record the CD sound on an MD Connect an MD recorder to the CD DIGITAL OUT (OPTICAL) jack. -
Page 16: General
Is the signal weak? ~ Connect an outdoor antenna. The reception contains noise interferences or the sound is distorted. After playing a disc, store the disc in its case. Do not leave the Is the system up external noise or multipath distotiion? picking disc in places that are hot or humid. -
Page 17: Specifications
Please check the laws on copyright relating to recordings from Antenna terminals 75 ohms (unbalanced) discs, radio or external tape for the country in whicl~ the machine is being used. tuner section 530 kHz to 1710 kHz (10 kHz Tuning range... -
Page 18: Parts Index
PARTS INDEX Instructions about each part on the main unit or remote control are indicated on the pages shown below. .c.mww~ STOP (11) ~ OPEN/CLOSE (11) H<, FMSKIP (9,10,11) DEMO (5) TUNER/BAND (9,10) CONTROL OPEN/CLOSE VOLUME SOUND MODE (8) TAPE/AUX(15) - Page 20 PRECAUCIONES exposition de Ias clavijas del enchufe. Periodos de no utilization— Desconecte el cable dealimentacion de CA o el cable de bateria del automovil si la unidad no va a ser utilizada durante varies meses o mas, Cuando el cable de...
- Page 21 ..m ..........8 - La unidad muestra cambio considerable funcionamiento. RECEPCION DE RADIO - La unidad se ha ca(do o la caja se ha estropeado. SINTONIZACION MANUAL ..........9 NO TRATE DE REPARAR LA UNIDAD USTED MISMO. PREAJUSTE DE EMISORAS ........... 10 tzww2aaesAi%?#w f?”...
- Page 22 “L”. Antes de conectar el cable de alimentacion La tension nominal de su unidad, indicada en el panel posterior, es de 120 V CA. Compruebe que esta tension coincide con la de la red local. IMPORTANTE...
- Page 23 Ios altavoces. No ponga la antena de FM cerca de objetos metalicos o rieles de cortinas. No ponga la antena deAM cerca de otros equipos opcionales, el propio sistema estereo, el cable de alimentacion...
- Page 24 Tambien existe un boton y un control en el panel de control que se utilizan para realizar ajustes al nivel del vo[umen y la calidad del sonido y ajustarlos a sus preferencias.
- Page 25 Para usar la funcion del boton, simplemente ptilselo. Si la alimentacion se interrumpe durante mas de unas 12 horas, Para usar la funcion de la placa que hay sobre el botonj pulse el deberan resetearse todos Ios ajustes almacenados en la boton al mismo tiempo que pulsa el boton SHIFT.
- Page 26 Ios agudos y Ios graves. segundos. Puede establecerse desde MIN (minimo) a 49, y POP: Mas presencia de votes y en la gama de registro medio. despues a MAX (maximo). JAZZ: Frecuencias inferiors acentuadas para musicstipojazz. El volumen permanecera en la memoria aun cuando la unidad sea apagada.
- Page 27 SINTONIZACION MANUAL Cuando una emision en FM estereo contenga ruido Pulse el boton MODE TUNER mientras pulsa el boton SHIFT del mando a distancia. “MONO’r aparecera en la pantalla. El ruido se reduce aunque la recepcion sea monoaural. Para restaurar...
- Page 28 Pulse el boton TUNER/BAND para seleccionar una banda. Tras ello pulse el boton -. TUNER/ > Cada vez que se pulse el boton, se selecciona la emisora con el BAND siguiente numero mas alto. TUNER/ BAND Para borrar una presintonia.
- Page 29 Para comprobar el tiempo restante Pulse el boton REMAIN mientras pulsa el boton SHlf:T del mando a distancia durante la reproduction. Se mostrara el tiempo que falta hasta que se termine la reproduction de todas Ias pistas.
- Page 30 Para seleccionar la pista 12, pulse Ios botones +10 y 2. “RANDOM” aparece en la pantalla. Para seleccionar la pista 20, pulse Ios botones +1 O, +10 y O. Para cancelar la reproduction aleatoria, repita 10 anterior. Ntimero de pista...
- Page 31 Il. La duration para el periodo activado por temporizador puede establecerse entre 5 y 240 minutes en pasos de 5 minutes. Prepare la fuente y la fuente. Para escuchar un disco compacto, inserte el disco. POWER Para escuchar...
- Page 32 Cada vez que se pulsa el boton, la hors cambia entre 5 y 240 Utilice un cable con conectores RCA para conectar la pletina de minutes en pasos de 5 minutes.
- Page 33 Para grabar en una cinta Conecte un aparato con pletina de cintas a Ias tomas LINE OUT. Realice la reproduction del sonido a grabar (CD o radio) e inicie TOMA PARA REALZADOR...
- Page 34 El hacerlo asr puede ocasionar ventilation de la parte trasera y no vuelva a poner en marcha funcionamientos defectuosos, el sistema hasta que se enfrie. Ocurre un error en la pantalla o un mal funcionamiento, Cuidado de Ios discos compactos un mensaje de error.
- Page 35 Terminals de antena 75 ohmios (desequilibrados) NOTA Seccion Este equipo ha sido puesto a prueba y se encontro que cumple sintonizador de AM Rango de sintonizacion 530 kHz to 1710 kHz (pasos de con Ios Ifmites para un aparato...
- Page 36 DE LAS PARTES ~ OPEN/CLOSE (11) I<<, PFISKIP (9,10,11) DEMO (5) TUNER/BAND (9,10) CONTROL OPEN/CLOSE IISET(7,1O,I1) CLEAR (10,11) pPRESET (10,11) VOLUME ,B-/TUNlNG DOWN/Ul (7,9,10,11) SOUND MODE (8) TuNER/BAND(9,10) TAPE (15) (15j CD(l~) ‘ REMAIN (11) ESPAliOL...
- Page 38 Surface de montage – Posez I’appareil sur une surface plane mise a la terre correcte du mat, de la structure de supporl et du fil et Iisse. d’amenee allant a I’unite de decharge de I’antenne, ainsi que sur...
- Page 39 Registre du proprietaire Inscrivez clans Ies cases ci-dessous Ie numero du modele et Ie numero de serie de votre chalne (qui sent indiques sur Ie dos de avez besoin de celle-ci). Vous Ies aurez ainsi sous la main si vous contacter votre distributeur Aiwa en cas de difficult.
- Page 40 Remarquez que Ie connecter ne peut &re branche que clans ~ri:e &a@?& Au haut- IUR!F une seule direction avec Ie c~ble plat tourne vers la gauche. parleur gauche Au haut- parleur droit Ie plat toniseur/ e ventilation Apres avoir branche au connecter,...
- Page 41 FM 75 Q. Pour installer I’antenne AM sur une surface Fixez la griffe clans la rainure. Pour placer Ies antennes Pour connecter tout autre appareil optionnel + page 14. Antenne d’alimentation FM : Etendez cette antenne horizontalement...
- Page 42 Ie panneau de contr61e qui peuvent s’utiliser pour faire des reglages niveau de volume et de la qualite du son selon vos preferences. La touches sur I’unite du Iecteur de disques compacts fait immediatement...
- Page 43 Le manuel d’instructions decrit clairement Ies touches disponibles pour chaque operation. Pour passer au format de 24 heures, appuyez sur la touche Pour retourner au format de 12 heures, appuyez de nouveau c Si I’appareil ne va pas &re utilise pendant...
-
Page 44: Du Son
I’origine. Dans ce cas, REGLAGE DU VOLUME annuler Ie systeme T-BASS. Tournez Ie cadran VOLUME sur Ie panneau de contr61e, ou appuyez sur Ies touches de reglage VOLUME sur la EQ (EGALISEUR) telecommande. Le niveau du volume est affiche pendant 4 secondes. -
Page 45: Accord Manuel
I’intervalle AM est de 10 kHz/pas. vous utilisez cet apparei! clans un endroit ou Ie systeme deallocation des frequencies est de 9 kHz/pas, changez I’intervalle d’accord. Appuyez sur la touche POWER tout en appuyant sur la touche TUNER/BAND,... -
Page 46: Des Stations
Puis Lorsqu’une station est memorisee, un numero de prereglage appuyez sur la touche et sur la touche I I clans Ies 4 secondes est attribue a cette station. Utilisez ce numero de prereglage qui suivent. pour capter directement cette station. -
Page 47: Utilisation
SHIFT sur la telecommande. Le temps qui reste avant la fin de la lecture de toutes Ies plages est affiche. Pour retablir I’affichage du ternps de lecture, repetez Ie precede anterieur. Selection d’une plage avec la telecommande... - Page 48 SHIFT > LECTURE ALEATOIRE Appuyez sur Ies touches numeriques et sur la Toutes Ies plages du disque peuvent @tre Iues de fagon aleatoire. touche +10 pour programmer une plage. Appuyez sur la touche RANDOM tout en appuyant Exemple: sur la touche SHIFT sur la telecommande.
-
Page 49: Par La Minuterie
Utilisez la telecommande. Appuvez sur la touche POWER pour eteindre Appuyez plusieurs fois sur la touche TIMER tout I’appareil apres avoir regle Ie volume du son de en appuyant la touche SHIFT la tonalite. Uelecommande pour afficher 0. reste affiche apres I’extinction de I’appareil (minuterie... -
Page 50: De La Minuterie De Sommeil
Iecteurs de musique laser, magnetoscope, TV, etc.). Pour annuler la minuterie de sommeil Connectez la fiche rouge a la prise R et la fiche blanche a la Appuyez deux fois sur la touche SLEEP tout en appuyant sur la prise L. -
Page 51: Ecoute De Sources Externes
MOYEN D’UN APPAREIL analogiques pour toutes Ies fonctions. OPTIONEL UtiliSeZ Un cable pourvu de fiches phono RCA afin de connecter Ies appareils audio. Pour enregistrer un disque compacte clans un minidisque Ne connectez pas d’appareil... -
Page 52: Soins Et Entretien
N’utilisez Le cordon secteur est-il connecte correctement? pas de solvants forts tels que I’alcool, de la benzine ou du diluant Y a-t-ii une mauvaise connexion? (+ page 4) car ils pourraient endommager la finition de I’appareil. -
Page 53: Specifications
Ies Iimites 531 kHz a 1602 kHz etablies pour un appareil numerique de classe B, selon la Section (par pas de 9 kHz) 15 des reglements FCC. Ces Iimites ont pour but de fournir une Sensibility utilizable 350 @!/m protection raisonnable... -
Page 54: Index
INDEX Vous trouverez clans Ies pages indiquees ci-apres Ies instructions concernant chaque fonction sur I’unite principal ou sur la telecommande. ““’’’’’’’”b STOP (11) A OPEN/CLOSE (11) I++, FHSKIP (9,10,11) DEMO (5) PHONES TUNER/BAND (9,10) POWER (6,7) CONTROL OPEN/CLOSE IISET(7,1O,11) CLEAR (10,11) - Page 56 AIWA CO.,LTD. “ Printed in China...
Need help?
Do you have a question about the XR-M75 and is the answer not in the manual?
Questions and answers