Table of Contents
Advertisement
Quick Links
Advertisement
Table of Contents

Subscribe to Our Youtube Channel
Related Manuals for AgfaPhoto DV-5000Z


Summary of Contents for AgfaPhoto DV-5000Z
- Page 1 DV-5000Z User manual...
-
Page 2: Precautions
Do not point the camera directly at the sun or other intense light sources which could damage your eyesight. Do not try to open the case of the camera or attempt to modify this camera in any way. Highvoltage internal components create the risk of electric shock when exposed. -
Page 3: Table Of Contents
Shutter Release......................16 Using the Flash ......................17 Setting the White Balance ..................... 17 Using the Self-Time ....................... 18 Playback ........................19 To zoom out to the original view: ................... 20 Protect Files ........................21 Erasing Flies........................22 AgfaPhoto DV-5000Z... - Page 4 Folder structure in the built-in memory or on the memory card ........33 Specifications ..................34 Customer care ..................35 Disposal of Waste Equipment by Users in Private Households in the European Union 36 FCC Compliance and Advisory..................36 AgfaPhoto DV-5000Z...
-
Page 5: Introduction
Thank you for purchasing this AgfaPhoto digital camera. Please read these operating instructions carefully in order to use the digital camera correctly. Keep the instructions in a safe place after reading so that you can refer to them later. Getting Ready Take some time to become well acquainted with your new AgfaPhoto DV-5000Z camera before using it. -
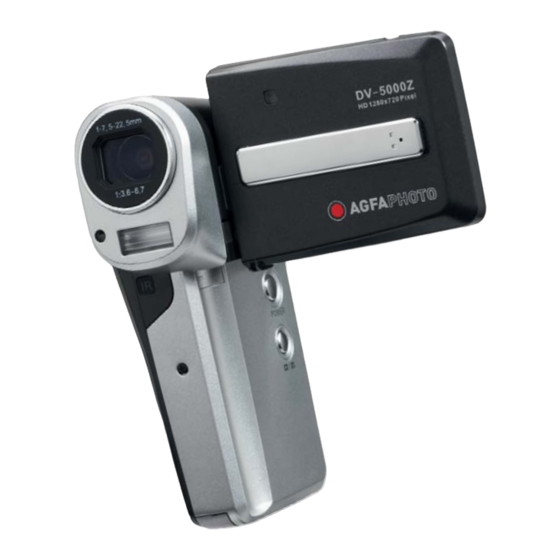
Page 6: Parts And Operating Controls
Parts and Operating Controls Ext. Microphone Jack 1. Auto-focus LED 2. Video-Light Lens 1. Recording indicator 2. Power LED Flash LCD Panel (open) Built-in Single Microphone Infrared remote control sensor ( remote control optional ) AgfaPhoto DV-5000Z... - Page 7 Zoom T/W Video Capture Button Photo Capture Button 5-way Navigation Control Menu / Return button Power button Setup / Playback button Speaker Battery/SD Card Compartment Tripod Mount YPbPr RCA A/V-out USB / Power / Charger Connection YUV A/V-out AgfaPhoto DV-5000Z...
-
Page 8: Loading The Battery
The cover door will snap open. 2. Turn the battery so that the label is facing to the right and the three gold contacts on the battery are positioned upwards and to the rear of the camera. -
Page 9: Cautions
Cautions: To protect and prolong the life of the battery pack, do not charge it for more than 24 hours at a time. This is a Lithium-Ion battery pack; there is no need to completely use or discharge it before recharging. -
Page 10: Inserting The Sd Memory Card
The cover will snap shut. To remove the SD memory card Push the edge of the SD card until it springs out from the SD memory card slot. Then, carefully remove the SD card. Without the SD memory card, video and photos taken will be saved to the built- in memory of your Digital movie camera. -
Page 11: Using The Lcd Display
"Recording Video" and "Photo Shooting Mode." To hide the icons, push Menu, then select Setup and scroll down to Icon. A submenu will appear. Scroll to "No" and select it. Now your LCD panel will not display any icons. -
Page 12: Operation Modes
LCD panel and also a recording icon to the left of the counter. The counter times the recording length and displays it while recording. To stop recording, press the Video Capture Mode button. Mode Indicators... -
Page 13: Navigating The Main Menu
Whether you are in the Video Capture or Photo Capture Mode, press the Menu button to open the main menu for that mode. When you are in a menu, use the 5 Way Navigation Control (Up, Down, Left, Right, Enter/OK) buttons to navigate through the menu. -
Page 14: Setting The Date And Time
5 Way Navigation Control. 2. Press OK/Enter on Date & Time. 3. Use the Left/Right buttons on the 5 Way Navigation Control to select the year, month, date, hour or minute for adjustments. 4. When each item has been selected, press the Up/Down button to increase or decrease the values of the year, month, day, hour and minute. -
Page 15: Recording Video
(See the user guide on the CD for details.) 6. Press the Zoom T button to zoom in on your subject or the Zoom W button to obtain a wider-angle shot. 7. When you are ready to record video, press the Video Capture button. To stop recording press the Video Capture button once again. -
Page 16: Photo Shooting Mode
Photo Shooting Mode Press the Photo Capture button to take photos. The Digital video camera doubles as a still camera and allows you to take sharp, vibrant color pictures. Press the Photo Capture Mode button after considering the following: 1. Ensure you have set the proper flash mode (see "Using the Flash"). -
Page 17: Using The Flash
2. Scroll to Flash and press OK/Enter on the 5 Way Navigation Control. 3. A submenu will appear. Use the Up and Down keys on the 5 Way Navigation Control to choose the flash mode needed: on, off or automatic. -
Page 18: Using The Self-Time
10 seconds. 8. The LCD panel will display a countdown sequence from 10 to 1 while the white LED light flickers at an increasing rate leading up to the time the shot is taken. Tip: After pointing the lens towards your subject(s), flip the LCD screen so that you can see yourself on the LCD panel during the countdown and at the time of the shot. -
Page 19: Playback
6. While the video is playing, press the OK/Enter button to pause or resume video playback. Pause/Play indicators will display in the top and bottom bars of the LCD panel. To control the volume, use the Up/Down buttons on the 5- Way Navigation Control. (To mute, turn volume down all the way.) 7. -
Page 20: To Zoom Out To The Original View
To view photos on the LCD panel: 1. Press the Setup/Playback button. 2. Use the Right/Left buttons on the 5 Way Navigation Control to scroll to the Photo Icon. 3. Press the OK/Enter button. A list of thumbnails will appear. -
Page 21: Protect Files
In the list of photo/video thumbnails, the file you have just locked will display a locked icon in its upper-left corner. If it is not locked, you will see no such icon in the upper-left corner of the photo/video thumbnail. -
Page 22: Erasing Flies
Erasing Flies You can erase unwanted photo/video files to free up memory space in the built- in memory or on your memory card. To erase photos/videos: 1. Press the Setup/Playback button. 2. Use the Right/Left buttons on the 5 Way Navigation Control to scroll to photo/video. -
Page 23: Video And Photo Menu
The resolution of your photo is determined by the image size (the number of pixels comprising both the height and width of the photo). If you are planning to print, then use a higher image resolution to preserve the clarity and detail. The larger your image size, the more intense the resolution and file size will be and the fewer the number of pictures that can be stored on your memory card. -
Page 24: Night Shot
White Balance Pictures taken indoors without the flash often experience color imperfections. This is because the whites in the photo will not appear pure white when shooting under fluorescent lighting or photos may appear orange under domestic incandescent lighting. Use white balance to give accurate lighting to your shots. -
Page 25: Flash
To set the White balance: 1. Press the Menu button. 2. Scroll down to WB (White Balance) and press the OK/Enter button on the 5 Way Navigation Control. 3. A submenu will appear. 4. Choose from the following settings: A. Auto B. -
Page 26: Effect
5. Choose the effect you want by pressing the OK/Enter button. 6. Press Menu to return to Photo Capture Mode. Note: White Balance and Effect jointly affect the color of your photos. Exposure Value Often the default exposure time built into the digital camera is insufficient because your subject may be darker or brighter than the background. -
Page 27: Self-Timer
Icon Here you can choose to display or shut off the display of all icons on the LCD panel such as flash status, battery power supply remaining, or the zoom bar. To hide/show Icons on the LCD panel: 1. -
Page 28: Setup Menu
Set the current date and time for files. Note: Date and time stamps will not be stamped on photos or videos. To set the Date/Time: 1. Scroll to Date & Time using the Up/Down buttons on the 5 Way Navigation Control. 2. Press the OK/Enter button. -
Page 29: Flicker
Flicker Due to indoor fluorescent lighting, a flicker can develop during the use of your digital camera. This flicker can be reduced by setting the frequency of your digital camera to the same frequency as the fluorescent lighting in your region. -
Page 30: Format
Format Choose to erase all media from the built in memory and also from the SD card. Selecting Format will erase all media from the built-in memory if there is no SD card present. However, if your SD card is inserted and you select Format, all media from the SD card itself will be erased IN ADDITION to the contents of the built-in memory. -
Page 31: Language
The main default language for your Digital movie camera is English. Initialize Gives you the option to assign the default factory settings to your digital camera. This operation will fully reset your camera’s settings. To restore factory settings: 1. Scroll to Default using the Up/Down buttons on the 5 Way Navigation Control. -
Page 32: Viewing Photos And Videos On Tv
To view videos or photos on a TV: 1. Turn off your Digital movie camera before making any connections to the TV. 2. Connect the video and audio plugs of the USB A/V-In cable to the input jacks of the TV. -
Page 33: Installing The Optional Photo/Video Software
After installing each program, the opening Auto-run screen will show. 5. Click Exit and remove the CD. You will be asked to restart your computer now or later. Choose the option you prefer. Folder structure in the built-in memory or on the memory card If you’re using Windows 2000/XP/Vista, your memory card will automatically be... -
Page 34: Specifications
DESCRIPTION Lens F:W=F/3.6, T=F/6.7; f=7.5~22.5mm; VA=50.78°~18.77°; Focus distance: Macro (5~10cm @1.4X), 1X (30cm ~ ? ), 2X (40 cm~ ), 3X (55cm~ ), Shutter Speed: 2~1/1000 sec. Image Sensor 5 megapixel CMOS sensor LCD Display 2.5" LTPS Output Interface USB 2.0, DC in, AV-out/Earphone, AV-in/ext. Mic, YPbPr... -
Page 35: Customer Care
Germany AgfaPhoto is used under license of Agfa-Gevaert NV & Co. KG. Agfa-Gevaert NV & Co. KG. does not manufacture this product or provide any product warranty or support. For service, support and warranty information, contact the distributor or manufacturer. -
Page 36: Disposal Of Waste Equipment By Users In Private Households In The European Union
The separate collection and recycling of your waste equipment at the time of disposal will help to conserve natural resources and ensure that it is recycled in a manner that protects human health and the environment. For...
Need help?
Do you have a question about the DV-5000Z and is the answer not in the manual?
Questions and answers