Table of Contents
Advertisement
Quick Links
Advertisement
Table of Contents

Related Manuals for Suunto Ocean


Summary of Contents for Suunto Ocean
- Page 1 SUUNTO OCEAN USER GUIDE 2024-07-10...
-
Page 2: Table Of Contents
1. SAFETY................................6 2. Getting started.............................. 8 2.1. Touch screen and buttons......................8 2.2. Adjusting settings..........................9 2.3. Software updates........................... 10 2.4. Suunto app............................10 2.5. Optical heart rate..........................11 3. Settings................................12 3.1. Button and screen lock........................12 3.2. Automatic display brightness...................... 12 3.3. - Page 3 5.5. Gases..............................52 5.5.1. Edit gas..........................53 5.5.2. Diving with multiple gases....................54 5.6. Wireless tank pressure support ....................54 5.6.1. How to install and link a Suunto Tank POD..............55 5.6.2. Tank pressure........................56 5.6.3. Gas consumption.......................57 5.6.4. Gas time..........................58 5.7. Algorithm settings.......................... 59 5.7.1.
- Page 4 Suunto Ocean 5.7.4. Altitude setting........................63 5.7.5. Safety stop time........................64 5.7.6. Last stop depth........................64 5.8. Diving with Suunto Ocean......................64 5.8.1. Safety stops......................... 64 5.8.2. Decompression dives...................... 65 5.8.3. Surface and no-fly time....................68 5.8.4. Example - Single gas mode.................... 68 5.8.5.
- Page 5 Suunto Ocean 9.15. Alti & Baro............................95 9.16. Compass............................96 9.16.1. Calibrating compass......................96 9.16.2. Setting declination......................96 9.17. Timer..............................97 9.18. Dive stats............................98 10. SuuntoPlus™ guides..........................99 11. SuuntoPlus™ sports apps........................100 12. Care and support............................. 101 12.1. Handling guidelines........................101 12.2. Battery............................101 12.3.
-
Page 6: Safety
WARNING: Do not use Suunto USB Cable in areas where flammable gases are present. Doing so may cause an explosion. WARNING: Do not disassemble or remodel Suunto USB Cable in any way. Doing so may cause an electric shock or fire. - Page 7 CAUTION: Only use the provided charging cable when charging your Suunto Ocean. CAUTION: DO NOT use the USB cable when Suunto Ocean is wet. This may cause an electrical failure. Ensure the cable connector and the connector pin area on the device are dry.
-
Page 8: Getting Started
CAUTION: Only use the provided charging cable when charging your Suunto Ocean. 2.1. Touch screen and buttons Suunto Ocean has a touch screen and three buttons you can use to navigate through displays and features. Swipe and tap swipe up or down to move in displays and menus •... -
Page 9: Adjusting Settings
Suunto Ocean While recording an exercise: Upper button press to pause the activity (to access the exercise options) • long press to change activity • Middle button press to change displays • long press to open exercise options menu •... -
Page 10: Software Updates
NOTE: When the update is complete, the release notes will be visible in Suunto app. 2.4. Suunto app With the Suunto app, you can further enrich your Suunto Ocean experience. Pair your watch with the mobile app to sync your activities, create workouts, get mobile notifications, insights and more. -
Page 11: Optical Heart Rate
For higher accuracy and quicker responses to changes in your heart rate, we recommend • using a compatible chest heart rate sensor such as Suunto Smart Sensor. WARNING: The optical heart rate feature may not be accurate for every user during every activity. -
Page 12: Settings
Suunto Ocean 3. Settings From the watch face, swipe up or long press the lower button to get access to all of the watch settings via the Control panel. TIP: The settings menu can be accessed directly if you long press the middle button while you are in the watch face view. -
Page 13: Tones And Vibration
3.4. Bluetooth connectivity Suunto Ocean uses Bluetooth technology to send and receive information from your mobile device when you have paired your watch with the Suunto app. Same technology is also used when pairing PODs and sensors. However, if you do not want your watch to be visible for Bluetooth scanners, you can activate or deactivate the discovery setting from the settings under Connectivity »... -
Page 14: Do Not Disturb Mode
You can use the Find my phone feature to find your phone when you do not remember where you left it. Your Suunto Ocean can ring your phone if they are connected. As Suunto Ocean uses Bluetooth to connect to your phone, the phone needs to be in Bluetooth range so that the watch can ring it. -
Page 15: Alarm Clock
Suunto Ocean Once you have paired with Suunto app, your watch gets updated time, date, time zone and daylight-saving time from mobile devices. In the Settings, under General » Time/date, tap Auto time update to toggle the feature on and off. -
Page 16: Language And Unit System
You can change your watch language and unit system from the settings under General » Language. 3.11. Watch faces Suunto Ocean comes with several watch faces to choose from, both digital and analog styles. To change the watch face: 1. Select Customize from the Settings or in the Control panel. -
Page 17: Calibrating Bike Pod
From this list, you can remove (unpair) the device if needed. Select the device you want to remove, and tap Forget. For information on how to pair your Suunto Ocean with the Suunto Tank POD, see 5.6.1. How to install and link a Suunto Tank POD. -
Page 18: Calibrating Foot Pod
You should re-calibrate the power pod from time to time. 3.14. Flashlight Your Suunto Ocean has an extra bright backlight that you can use as a flashlight. To activate the flashlight, swipe up from watch face or press the lower button and select Control panel. -
Page 19: Storm Alarm
A significant drop in barometric pressure typically means a storm is coming and you should take cover. When the storm alarm is active, Suunto Ocean sounds an alarm and displays a storm symbol when the pressure drops 4 hPa (0.12 inHg) or more during a 3-hour period. -
Page 20: Fusedalti
FusedSpeed benefits you the most when you need highly reactive speed readings during training, for example, when running on uneven terrain or during interval training. If you temporarily lose the GPS signal, for example, Suunto Ocean is able to continue showing accurate speed readings with the help of the GPS calibrated accelerometer. -
Page 21: Altitude Diving
See 5.7.4. Altitude setting for altitude setting. NOTE: Suunto Ocean is not intended for use at altitudes greater than 3000 m (9800 ft). 3.19. Position formats The position format is the way your GPS position is displayed on the watch. All the formats relate to the same location, they only express it in a different way. -
Page 22: Device Info
Suunto app. After a hard reset, you must go through the initial setup of your Suunto watch. Performing a factory reset on your watch may be performed in the following situations: a Suunto Customer Support representative has asked you to do so as part of the •... - Page 23 NOTE: The factory reset deletes the previous pairing information your watch might have had. To start the pairing process with the Suunto app again, we recommend you delete the previous pairing from the Suunto app and your phone's Bluetooth - under Paired devices.
-
Page 24: Recording An Exercise
Suunto Ocean 4. Recording an exercise In addition to 24/7 activity monitoring, you can use your watch to record your training sessions or other activities to get detailed feedback and follow your progress. To record an exercise: 1. Put on a heart rate sensor (optional). -
Page 25: Sport Modes
POI, the GPS accuracy is changed to Best. To navigate during exercise: 1. Create a route or POI in Suunto app and sync your watch if you haven't done so already. 2. Select a sport mode that uses GPS. 3. Scroll down and select Navigation. -
Page 26: Find Back
4.2.1. Find back If you are using GPS when recording an activity, Suunto Ocean automatically saves the starting point of your exercise. With Find back, Suunto Ocean can guide you directly back to your starting point. To start Find back: 1. -
Page 27: Battery Power Management
4. Scroll up and start your exercise. 4.4. Battery power management Your Suunto Ocean has a battery power management system that uses intelligent battery technology to help ensure your watch does not run out of power when you need it most. -
Page 28: Multisport Exercise
CAUTION: Only use the provided charging cable when charging your Suunto Ocean. 4.5. Multisport exercise Your Suunto Ocean has predefined Triathlon sport modes that you can use to track your Triathlon exercises and races but if you need to track another sort of multisport activity, you can easily do so directly from the watch. -
Page 29: Swimming
4.7. Interval training Interval workouts are a common form of training consisting of repetitive sets of high and low intensity efforts. With Suunto Ocean, you can define in the watch your own interval training for each sport mode. When defining your intervals, you have four items to set: Intervals: on/off toggle that enables interval training. -
Page 30: Autopause
The voice feedback comes from your phone so your watch must be paired with Suunto app. To activate voice feedback before an exercise: 1. -
Page 31: Feeling
And don't forget, regardless of your planned training, that you should always take time to warm up before an exercise. The five different intensity zones used in Suunto Ocean are: Zone 1: Easy Exercising in zone 1 is relatively easy on your body. When it comes to fitness training, intensity this low is significant mainly in restorative training and improving your basic fitness when you are just beginning to exercise, or after a long break. -
Page 32: Heart Rate Zones
HR, you should adjust the default value accordingly. Suunto Ocean has default and activity-specific HR zones. The default zones can be used for all activities, but for more advanced training, you can use specific HR zones for running and cycling activities. -
Page 33: Pace Zones
Suunto Ocean NOTE: You can also set your maximum HR from the settings under General » Personal. Set default HR zones Set your default HR zones from the settings under Training » Intensity zones » Default HR zones for all sports. -
Page 34: Power Zones
Suunto Ocean Suunto Ocean has five default pace zones that you can use or you can define your own. Pace zones are available for running and cycling. Set pace zones Set your activity specific pace zones from the settings under Training » Intensity zones »... -
Page 35: Using Hr, Pace Or Power Zones When Exercising
Suunto Ocean 5. Press the middle button to select the new power value. 6. Swipe right or press and hold the middle button to exit the power zones view. 4.11.4. Using HR, pace or power zones when exercising NOTE: You need to have a power pod paired with your watch to be able to use power zones when exercising, see 3.13. -
Page 36: Scuba Diving
5.1. Dive safety Suunto Ocean is a dive computer designed to be used for recreational scuba diving and freediving. The device displays essential information before, during and after the dive to enable safe decision making. Suunto Ocean can be used as a standalone product or in combination with the Suunto Tank POD, which measures the tank pressure and transmits the pressure reading information to the dive computer. - Page 37 WARNING: Check your dive computer regularly during a dive. If you believe or conclude that there is a problem with any computer function, abort the dive immediately and safely return to the surface. Contact Suunto customer support and return your computer to an authorized Suunto Service Center for inspection.
-
Page 38: Dive Setup
Check before every dive trip from www.suunto.com/support, if Suunto has released a new software update for your device. When a new software update is available, you must install it before diving. Updates are made available to improve your user experience and are part of Suunto's philosophy of continuous product development and improvement. -
Page 39: Dive Modes
NOTE: The Dive start depth can be defined under Dive settings in scuba modes and under Dive options in freedive mode. NOTE: Suunto Ocean does not enter dive state if you are already in another exercise view. WARNING: The automatic dive start is a precaution feature. We recommend that you always start the dive by entering the selected dive mode to confirm your gas and dive settings. -
Page 40: Pre-Dive Screen And Dive Options
Suunto Ocean Lower button short press: Change switch window item • Lower button long press: Lock buttons • See 3.1. Button and screen lock. 5.2.4. Pre-dive screen and dive options The pre-dive screen is the same for all dive modes, but each mode has several dive mode specific options that can be adjusted to your diving needs. -
Page 41: Main Dive View
Tank POD: The Tank POD menu is for linking and unlinking available Tank PODs to your gas. See 5.6.1. How to install and link a Suunto Tank POD. Sensors: Pair your heart rate sensor to record your diving. See 3.13. Pairing pods and sensors. -
Page 42: Key Information During Diving
Suunto Ocean 1. Decompression information 2. Ascent speed with color coding 3. Dive time 4. Depth 5. Switch window with changeable information 6. Arch illustrating key information: no deco limit, tank pressure, time to surface, stop time 5.2.6. Key information during diving... - Page 43 Suunto Ocean Deco time: If exceeding the NDL time, an alarm is triggered and the NDL time is replaced with the optimum ascent time in minutes (TTS). A Deco badge appears, the NDL arch turns to orange indicating the same TTS time, and the ceiling value appears in the switch window. The ceiling value indicates the decompression stop depth.
-
Page 44: Switch Window For Scuba Diving
Tank pressure: The arch shows the tank pressure if the watch is paired with a Suunto Tank POD. The range is determined by the Tank POD pressure reading value at the start of a dive and it can be 250 bar or 350 bar. - Page 45 Suunto Ocean Switch window Switch window content Explanation Max depth The maximum depth reached during the current dive. Clock The time in a 12- or 24-hour format, based on the time format you set under Time/date settings. Battery The remaining battery level as percentage.
- Page 46 Oxygen tolerance unit. It is used to measure the whole-body toxicity, caused by prolonged exposure to high oxygen partial pressures. Suunto Ocean alarms you when the daily recommended limit reaches 250 (caution) and 300 (warning).
-
Page 47: Dive Settings
GPS signal won’t be found. Dive route You can track your dive route with Suunto Ocean. The underwater route tracking is based on GPS, accelerometer, gyroscope, magnetometer and pressure sensor. The algorithm has been developed by using large amount of data from real dives, data analytics and machine... - Page 48 3.0 m (9.8 ft). Dive end time Once you are shallower than the set start depth for the dive, Suunto Ocean will start calculating the elapsed time at the surface. You can set your desired time under Dive end time.
-
Page 49: Dive Alarms
Suunto Ocean NOTE: If you surface and then dive again within the set end time, Suunto Ocean counts it as one dive. Brightness The brightness setting determines the overall intensity of display brightness during dive activities: Low, Medium (default) or High (default). The brightness setting is specific to the dive mode, and does not affect other dive modes, outdoor modes or the general brightness setting. - Page 50 Suunto Ocean Alarm Explanation How to resolve the alarm? Decompression ceiling Descend deeper than the broken by more than 0.6 m displayed ceiling value. (2 ft) on a decompression dive. Partial pressure of oxygen Immediately ascend or exceeds the maximum level change to a gas with lower (>1.6).
-
Page 51: User Configurable Dive Alarms
Suunto Ocean Alarm Explanation How to resolve the alarm? NDL is less than 5 minutes. Ascend shallower to avoid mandatory decompression stops. The decompression ceiling Descend to the ceiling is broken for more than 3 depth indicated in the min and your decompression switch window. -
Page 52: System Errors
In the unlikely event that the dive computer malfunctions during a dive, follow the emergency procedures provided by your certified dive training agency to immediately and safely ascend. Contact Suunto customer support if you experience a system error. -
Page 53: Edit Gas
When diving with nitrox gas mixture, both the percentage of oxygen in your tank and the oxygen partial pressure limit must be entered into Suunto Ocean. This ensures correct nitrogen and oxygen calculations and the correct maximum operating depth (MOD), which is based on your entered values. -
Page 54: Diving With Multiple Gases
Suunto Ocean From the Edit gas menu you can also pair your Suunto Tank POD. See 5.6.1. How to install and link a Suunto Tank POD for information about the wireless tank pressure pairing. 5.5.2. Diving with multiple gases When diving with Multigas mode, Suunto Ocean allows gas changes between the enabled gases in the Gases menu. -
Page 55: How To Install And Link A Suunto Tank Pod
NOTE: To ensure the most accurate tank pressure readings, Suunto recommends that you install Suunto Tank POD so it is on the same side as you wear your Suunto Ocean. 2. After installing the Tank POD and opening the valve, wait for the green LED on the Tank POD to flash. -
Page 56: Tank Pressure
5.6.2. Tank pressure Once your Suunto Ocean is linked to a Suunto Tank POD, you can follow the tank pressure both in the switch window and on the arch in the tank pressure view. See 5.2.6. Key information during diving on how tank pressure is shown on the arch. -
Page 57: Gas Consumption
The Gas consumption data on the screen refers to your real-time consumption rate of gas during a dive at the depth you are at. To calculate your personal breathing rate, Suunto Ocean uses respiratory minute volume (RMV) which is the volume of gas your lungs experience per minute, measured in L/min or cu ft/min. -
Page 58: Gas Time
To calculate gas volume, Suunto Ocean uses the following formula: To compensate for any poor signal between the Suunto Tank POD and Suunto Ocean, the average gas consumption in the dive summary is calculated as follows: NOTE: When diving with multiple gases, the average gas consumption value is calculated using the total dive time. -
Page 59: Algorithm Settings
Bühlmann algorithm have been developed over the years and adopted by many dive computer manufacturers. Suunto Ocean is using Suunto’s Bühlmann 16 GF dive algorithm that is based on the Bühlmann ZHL-16C model that we have implemented our own code for. - Page 60 Suunto Ocean When the ascent continues, the GF moves from 30% to 70%. GF 70 indicates the amount of supersaturation allowed when you get to the surface. The lower the GF High value is, the longer shallow stop is needed to off-gas before surfacing. In the following illustration, GF High is set to 70% and the leading tissue compartments react to the 70% limit of M-value.
- Page 61 If GF High % is set to a lower value, the diver spends more time in shallow water and the total dive time gets longer. The default conservatism setting in Suunto Ocean is 40/85. You can adjust the settings to more aggressive or conservative than the default value. For recreational divers, more conservative values mean a lower NDL value to avoid decompression requirements.
-
Page 62: Deco Profile
During any ascent involving decompression stops, Suunto dive computers calculate the point at which the control compartment crosses the ambient pressure line (that is the point at which the tissue’s pressure is greater than the ambient pressure), and off-gassing starts. -
Page 63: Altitude Setting
This 'additional' nitrogen is released gradually over time and equilibrium is restored. Suunto recommends that you acclimatize to a new altitude by waiting at least three hours before making a dive. -
Page 64: Safety Stop Time
TIP: Consider setting the last stop depth to 6 m (19.6 ft) when you dive in rough sea conditions and stopping at 3 m (9.8 ft) is challenging. 5.8. Diving with Suunto Ocean 5.8.1. Safety stops A three (3) minute Safety stop is always recommended for every dive over 10 meters (33 ft). -
Page 65: Decompression Dives
Once the timer shows zero, the stop is done and you can ascend to the surface. NOTE: If you ignore the safety stop, there will be no penalty. However, Suunto always recommends that you perform a safety stop for every dive to minimize the risk of DCI. - Page 66 Suunto Ocean WARNING: YOUR ACTUAL ASCENT TIME MAY BE LONGER THAN DISPLAYED BY THE DIVE COMPUTER! The ascent time will increase if you: (1) remain at depth, (2) ascend slower than 10 m/min (33 ft/min), (3) make your decompression stop deeper than at the ceiling, and/or (4) forget to change the used gas mixture.
- Page 67 Suunto Ocean does not lock after you confirm the algorithm deviation trigger alert. Suunto Ocean continues showing the original decompression plan even if the decompression stop is violated.
-
Page 68: Surface And No-Fly Time
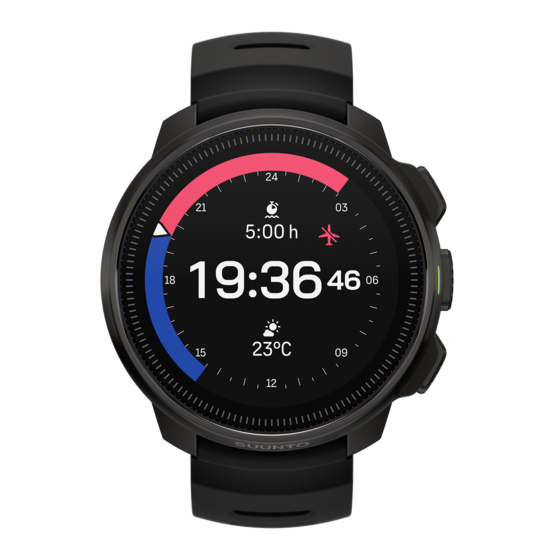
5.8.3. Surface and no-fly time After a dive, Suunto Ocean displays surface time since the previous dive and a countdown time for recommended no-fly time in the watch face and in the dive stats widgets. You will see a red airplane icon and a red arch on the watch face as long as the no-fly time is present. - Page 69 (if linked to Suunto Tank POD), diving with the right gas and you understand the MOD of the active gas. If the Suunto Tank pod battery is low or you have forgotten to change tanks and the tank pressure is low, you’ll see warnings on the pre-dive screen.
-
Page 70: Example - Multigas Mode
Suunto Ocean 6. When you are between 2.4 and 6 m (7.9 and 20 ft), a safety stop timer will appear and count down until the suggested stop. Once the stop is performed, a Stop done notification will appear. 5.8.5. Example - Multigas mode The following example shows a decompression dive to 40 m in Multigas mode and with the following gases: NX28 (main gas), NX99 decompression gas. - Page 71 Suunto Ocean 5. Gas change at 6 m. The decompression time is always calculated with the assumption that you use all the gases found in the Gas list. Once ascending to 6 m, a gas change to NX99 will be suggested. Once switch is made, the information of the current gas appears. If you decide to dismiss the gas change, the decompression information will not be accurate.
-
Page 72: Freediving
Suunto Ocean 6. Freediving With the Freedive mode, Suunto Ocean can be used as a freediving instrument. You can find the freedive mode from the shortlist called Freediving (Depth). Many of the functions are the same as in the other diving modes, but there are also many functionalities specific only for freediving. -
Page 73: Button Functions During Freediving
Suunto Ocean Timer: Start and reset stopwatch. 6.2. Button functions during freediving Your Suunto Ocean has three buttons that have different functionalities when short pressing or long pressing them during the exercise. In Freediving mode, the buttons have the following functions: Upper button long press: Adjust brightness level (Low/Medium/High) •... -
Page 74: Freedive Alarms
Suunto Ocean Switch window Switch window content Explanation Temperature The current temperature in degrees Celsius or Fahrenheit, depending on unit settings. Max depth The maximum depth reached during the current dive. Clock The time in a 12- or 24-hour format, based on the set time format under Time/date settings in the watch. -
Page 75: Snorkeling And Mermaiding
Dive time alarms can be defined in minutes and seconds to a maximum of 99 min. 6.5. Snorkeling and mermaiding You can use your Suunto Ocean for snorkeling and mermaid diving. These two activities are normal sport modes and are selected just like any other sport mode, see 4. Recording an exercise. - Page 76 The default view for Snorkeling and Mermaiding is the Surface view. While recording the exercise, you can browse between the different views by pressing the middle button. Suunto Ocean automatically switches between surface and dive state. If you are more than 1 m (3.2 ft) below the surface, the underwater view is activated.
-
Page 77: Dive Logs
Gas list of active and enabled gases • Start and end pressure if linked with Suunto Tank POD • Avg gas consumption for each gas if linked with Suunto Tank POD • Current Gradient Factors • CNS and OTU values •... -
Page 78: Navigation
Before you can use offline maps in your watch, you need to set up a wireless network connection in Suunto app and download the selected map area to your watch. You will get a notification on your watch when the map download is complete. -
Page 79: Altitude Navigation
Suunto Ocean 1. Select a sport mode that uses GPS. 2. Scroll down and select Map. 3. Select which map style you want to use and confirm with the middle button. 4. Scroll up and start your exercise as normal. -
Page 80: Bearing Navigation
10. Press the lower button and select End navigation to end the navigation. 8.4. Routes You can use your Suunto Ocean to navigate routes. Plan your route with Suunto app and transfer it to your watch with the next sync. - Page 81 NOTE: If you only navigate the route, nothing will be saved or logged in Suunto app. 7. Press the lower button and scroll to End navigation to stop navigating if you only navigate the route.
-
Page 82: Points Of Interest
A point of interest, or POI, is a special location, such as camping spot or vista along a trail, you can save and navigate to later. You can create POIs in Suunto app from a map and do not have to be at the POI location. Creating a POI in your watch is done by saving your current location. -
Page 83: Navigating To A Poi
POI. NOTE: If you only navigate to the POI, nothing will be saved or logged in Suunto app. 7. If you only navigate the route, press the lower button and select End navigation to stop navigating. -
Page 84: Poi Types
POI details and actions such as saving your current location or selecting another POI to navigate to, as well as ending navigation. 8.5.3. POI types The following POI types are available in Suunto Ocean: Begin Parking... - Page 85 Suunto Ocean Restaurant Food Cafe Cave Mountain Peak Rock Cliff Avalanche Valley Hill Road Trail River Water Waterfall Coast Lake Kelp forest Marine reserve Coral reef Big fish Marine mammal Wreck...
- Page 86 Suunto Ocean Fishing spot Beach Forest Meadow Coast Stand Shot Scrape Big game Small game Bird Prints Crossroads Danger Geocache Sight Trailcam...
-
Page 87: Widgets
You can select which widgets you want to use in your watch by turning them on and off in Suunto app. You can also select in which order you want the widgets to show in your watch by sorting them in the app. -
Page 88: Media Controls
Clear all messages in the notification widget. 9.3. Media controls Your Suunto Ocean can be used to control the music, podcast, and other media played on your phone or being cast from your phone to another device. NOTE: You need to pair your watch with your phone before you can use Media controls. -
Page 89: Recovery, Hrv (Heart Rate Variability)
Different situations and conditions such as a relaxed holiday, physical and mental exertion or developing flu can lead to changes in HRV. TIP: Please refer to www.suunto.com or Suunto app to learn more about HRV recovery. 9.6. Progress The progress widget provides you with data that helps you to increase your training load over... -
Page 90: Training
To get your fitness level estimated, record a run or walk with a duration for at least 15 minutes while wearing your Suunto Ocean. The widget also views your estimated fitness age. Fitness age is a metric value that reinterprets your VO₂max value in terms of age. -
Page 91: Recovery, Training
Suunto Ocean is not intended for diagnosing or monitoring medical conditions. You can measure your blood oxygen levels with Suunto Ocean. From the watch face view, swipe up or press the lower button to scroll to the Blood oxygen widget. -
Page 92: Steps And Calories
Suunto Ocean 2. Toggle on Sleep tracking. You can choose to have your watch in Do Not Disturb mode during your sleeping hours and also choose if you want to measure your Blood oxygen and HRV tracking during your sleep. -
Page 93: Sun & Moon
Suunto Ocean Your watch counts steps using an accelerometer. The total step count accumulates 24/7, also while recording training sessions and other activities. However, with some specific sports, such as swimming and cycling, steps are not counted. The top value in the widget shows the total step count for that day and the bottom value is the estimated amount of active calories you have burned so far during the day. -
Page 94: Logbook
Suunto Ocean If you select the widget, you get more details such as the time when the sun rises and sets, and also the current moon phase. 9.13. Logbook Your watch provides an overview of your training activity via a logbook. -
Page 95: Alti & Baro
Automatic alti-baro profile Weather and altitude changes both cause a change in air pressure. To handle this, Suunto Ocean automatically switches between interpreting changes in air pressure as altitude or weather changes based on your movement. -
Page 96: Compass
9.16. Compass Suunto Ocean has a gyro-assisted compass that allows you to orient yourself in relation to magnetic north. The tilt-compensated compass gives you accurate readings even if the compass is not horizontally level. -
Page 97: Timer
Suunto Ocean Paper maps point to true north. Compasses, however, point to magnetic north – a region above the Earth where the Earth’s magnetic fields pull. Because magnetic North and true North are not at the same location, you must set the declination on your compass. The angle in between magnetic and true north is your declination. -
Page 98: Dive Stats
NOTE: During the no-fly time, flying or traveling to higher altitude should be avoided. Previous dive gives you an overview of your latest dive. If you select the activity, Suunto Ocean provides you with more details and also the possibility to delete the activity from your logbook. -
Page 99: Suuntoplus™ Guides
3. Go back to the start view and start your exercise as normal. 4. Press the middle button until you reach the SuuntoPlus™ guide, which is shown as a separate display. NOTE: Ensure that your Suunto Ocean has the latest software version and that you have synced your watch with Suunto app. -
Page 100: Suuntoplus™ Sports Apps
6. After you have stopped the exercise recording, you can find the SuuntoPlus™ sports app result in the summary, if there was a relevant result. You can select which SuuntoPlus™ sports apps you want to use in the watch in Suunto app. Visit Suunto.com/Suuntoplus to see which sports apps are available for your watch. -
Page 101: Care And Support
12.3. Disposal Please dispose of the device in accordance with local regulations for electronic waste. Do not throw it in the garbage. If you wish, you may return the device to your nearest Suunto dealer. -
Page 102: Reference
Regulatory Information” delivered together with your Suunto Ocean or available at www.suunto.com/userguides. 13.2. CE Hereby, Suunto Oy, declares that the radio equipment type DW223 is in compliance with Directive 2014/53/EU. The full text of the EU declaration of conformity is available at the following internet address: www.suunto.com/EUconformity. - Page 103 Suunto Ocean...
- Page 104 SUUNTO CUSTOMER SUPPORT www.suunto.com/support www.suunto.com/register Manufacturer: Suunto Oy Tammiston Kauppatie 7 A, FI-01510 Vantaa FINLAND © Suunto Oy 07/2024 Suunto is a registered trademark of Suunto Oy. All Rights reserved.
Need help?
Do you have a question about the Ocean and is the answer not in the manual?
Questions and answers