
Related Manuals for INNOLIVING INMD-DBP-6191


Summary of Contents for INNOLIVING INMD-DBP-6191
- Page 1 MISURATORE DI PRESSIONE AUTOMATICO DA BRACCIO UPPER ARM AUTOMATIC BLOOD PRESSURE MONITOR INMD-DBP-6191 MANUALE D’USO USER MANUAL...
- Page 2 MISURATORE DI PRESSIONE AUTOMATICO DA BRACCIO Vi ringraziamo per aver acquistato il misuratore di pressione arteriosa INMD-DBP-6191. Per un corretto utilizzo del prodotto, si consiglia di leggere attentamente le seguenti istruzioni e avvertenze e di conservare questo manuale per eventuali consultazioni future.
- Page 3 AVVERTENZE 1. Non confondere l’autosorveglianza con l’autodiagnosi. Le misurazioni della pressione sanguigna dovrebbero essere interpretate solo da un professionista sanitario che conosce la storia clinica del paziente. 2. Contattare il proprio medico se i risultati dei test indicano regolarmente letture anomale. Non cercare di auto-trattare questi sintomi senza consultare prima il medico.
- Page 4 che al polso è comunque utile ed importante. 6. Le persone affette da costrizione vascolare, disturbi epatici o diabete, persone con pacemaker cardiaci o un polso debole, e le donne in gravidanza dovrebbero consultare il proprio medico prima di misurare la propria pressione sanguigna da sole.
- Page 5 11. Il bracciale non dovrebbe essere posizionato sul braccio del lato di una mastectomia. Nel caso di una mastectomia bilaterale, utilizzare il lato del braccio meno dominante. 12. La pressurizzazione del bracciale può causare temporaneamente la perdita di funzione degli apparecchi di monitoraggio utilizzati contemporaneamente sullo stesso arto.
- Page 6 batterie. Non tentare di modificare il prodotto senza l’autorizzazione del fabbricante. 19. Utilizzare solo il bracciale approvato per questo prodotto. L’uso di altri bracciali potrebbe causare misurazioni errate. 20. Il sistema potrebbe produrre letture errate se conservato o utilizzato al di fuori dei range di temperatura e umidità...
- Page 7 26. Non inserire le batterie con le loro polarità allineate in modo errato. 27. Smaltire correttamente le batterie; osservare le leggi e i regolamenti locali. 28. Utilizzare solo un adattatore di Classe II raccomandato, a doppio isolamento, conforme alle norme EN 60601-1 ed EN 60601-1-2. Un adattatore non autorizzato potrebbe causare incendi e scosse elettriche.
- Page 8 32. Le attrezzature di comunicazione RF portatili (incluse periferiche come cavi per antenne ed antenne esterne) dovrebbero essere utilizzate a non meno di 30 cm da qualsiasi parte del misuratore di pressione, inclusi i cavi specificati dal PRODUTTORE. Altrimenti, potrebbe verificarsi una degradazione delle prestazioni di questo apparecchio.
- Page 9 di utilizzarlo. Non utilizzare il dispositivo o il bracciale se uno di essi risulta danneggiato, perché ciò potrebbe causare lesioni. 39. Nel caso si avverta una sensazione di disagio durante una misurazione o altri fastidi, premere il pulsante “START/STOP” per rilasciare immediatamente l’aria dal bracciale.
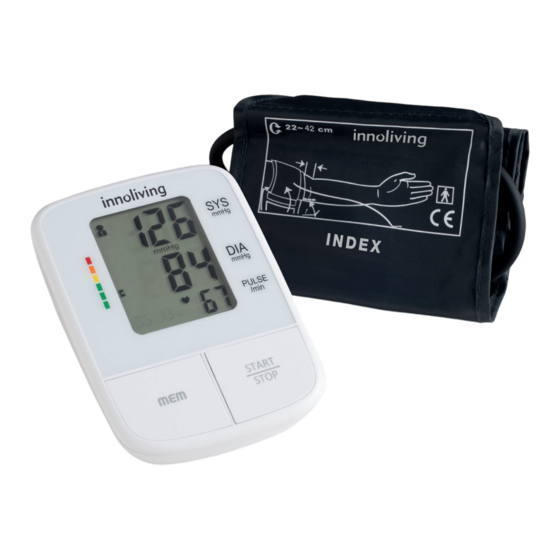
- Page 10 Bracciale 1. Bracciale 2. Ingresso del tubo 3. Tubo dell’aria Display 1. Gruppo 1 2. Gruppo 2 3. Pressione sistolica 4. Pressione diastolica 5. Indicatore battito cardiaco irregolare 6. Pulsazioni 7. Indicatore frequenza cardiaca 8. Data/Ora 9. Indicatore batteria 10. Media delle ultime 3 misurazioni 11.
-
Page 11: Impostazioni Di Sistema
IMPOSTAZIONI DI SISTEMA Con il dispositivo spento, premere il pulsante “START/STOP” per circa 3 secondi per attivare le impostazioni di sistema. L’icona del gruppo di utenti lampeggerà. 1. SELEZIONE DEL GRUPPO DI UTENTI In questa modalità, è possibile scegliere in quale gruppo di utenti (Gruppo 1 o Gruppo 2) memorizzare le misurazioni che si andranno ad eseguire. -
Page 12: Impostazione Del Formato Dell'ora
3. IMPOSTAZIONE DEL FORMATO DELL’ORA Premi nuovamente il pulsante “START/STOP” per entrare nella modalità di impostazione del formato dell’ora. Imposta il formato dell’ora regolando il pulsante “MEM”. “EU” significa Ora Europea, “US” significa Ora degli Stati Uniti. 4. SALVATAGGIO DELLE IMPOSTAZIONI In qualsiasi modalità... -
Page 13: Installazione Delle Batterie
INSTALLAZIONE DELLE BATTERIE 1. Aprire il coperchio del vano batterie sul retro del dispositivo 2. Inserire nell’apposita sede le 3 batterie alcaline di tipo AAA incluse, rispettando le polarità indicate. 3. Chiudere il vano batterie con il coperchio (vedere Figura A). Figura A POSIZIONE CORRETTA PER LA MISURAZIONE 1. -
Page 14: Misurazione Della Pressione
2. Inserire il lembo del bracciale all’interno dell’anello in metallo, per circa 5 centimetri, con la parte in velcro rivolta verso l’esterno. 3. Infilare il bracciale sul braccio sinistro e mantenerlo all’altezza del cuore. 4. Avvolgere il bracciale in modo che il lembo inferiore sia posizionato approssimativamente a 1-2 cm sopra l’articolazione del gomito. - Page 15 sullo schermo lampeggerà “ “, segnalando la rilevazione dei battiti cardiaci. NOTA: Rimanere rilassati durante il test. Evita di parlare o muovere parti del corpo. ATTENZIONE: Se la pressione nel bracciale diventa troppo estrema durante il test, premere il pulsante “START/STOP” per spegnere l’alimentazione. La pressione nel bracciale si dissiperà...
- Page 16 più veloce rispetto al ritmo medio rilevato durante la misurazione della pressione sanguigna sistolica e diastolica. Consultare il proprio medico se il simbolo di battito cardiaco irregolare “ ” appare frequentemente con i risultati di test. 6. Premere il pulsante START/STOP per spegnere il dispositivo. Attendere 3 minuti o più...
- Page 17 CANCELLAZIONE DEI DATI IN MEMORIA È possibile cancellare i dati in memoria di un gruppo di utenti selezionato quando si è in modalità di “Controllo dei dati in memoria”. Tenere premuto per circa 3 secondi il pulsante “START/STOP” per cancellare tutti i dati presenti in memoria relativi al gruppo di utenti selezionato.
- Page 18 MISURAZIONE DELLA PRESSIONE STATICA A dispositivo spento, tenere premuto il pulsante “START/STOP”, poi installare le batterie. Continuare a tenere premuto il pulsante “START/STOP” finché lo schermo LCD non si illumina completamente, quindi rilasciare il pulsante. Quando sullo schermo LCD compaiono i due zeri, il misuratore di pressione sanguigna è...
-
Page 19: Risoluzione Dei Problemi
RISOLUZIONE DEI PROBLEMI PROBLEMA POSSIBILE CAUSA RISOLUZIONE Il bracciale è troppo stretto Avvolgere correttamente il bracciale. o troppo allentato; oppure il cinturino del braccio è legato in modo scorretto. Muovere il braccio durante la Rimani tranquillo, mantieni il braccio misurazione fermo e non spostare il dispositivo. -
Page 20: Informazioni Sulla Pressione Sanguigna
Gonfiaggio improprio Misura nuovamente. Se non riesci a risolvere il problema contatta il servizio di assistenza. La pressione supera i Allacciare il bracciale prima di procedere alla 300 mmHg misurazione. La pressione supera i 15 Controlla se il bracciale e/o il tubo dell’aria sono mmHg per 3 minuti annodati o se il collegamento del tubo dell’aria è... - Page 21 INDICATORE DELLA CLASSIFICAZIONE DELLA PRESSIONE SECONDO L’OMS Il misuratore di pressione è dotato di un indicatore della classificazione della pressione arteriosa basato sulle linee guida stabilite dall’Organizzazione Mondiale della Sanità. Ciascun segmento dell’indicatore a barre corrisponde a una classificazione della pressione sanguigna come di seguito indicato: Ipertensione grave Ipertensione moderata Ipertensione lieve...
-
Page 22: Manutenzione, Pulizia E Conservazione
MANUTENZIONE, PULIZIA E CONSERVAZIONE Evitare di far cadere, sbattere o lanciare il dispositivo. Proteggere il dispositivo da eventuali urti. Proteggere dalla luce diretta del sole e dall’umidità Per pulire l’unità principale utilizzare un tessuto morbido e pulire delicatamente con un detergente delicato. Utilizzare un panno umido per rimuovere lo sporco e il detergente in eccesso. -
Page 23: Caratteristiche Tecniche
CARATTERISTICHE TECNICHE Descrizione del prodotto Misuratore di pressione automatico da braccio Modello DBP-6191 Display Display LCD (dimensioni: 46mm X 62.1mm) Metodo di misurazione Metodo oscillometrico Pressione 0 mmHg – 299 mmHg Pressione sistolica 60 mmHg – 260 mmHg Range di misurazione Frequenza diastolica 40 mmHg –... - Page 24 Questo misuratore di pressione sanguigna è conforme alla normativa europea e porta il marchio CE “CE 0123”. Questo misuratore di pressione sanguigna è 3 x ba anche conforme principalmente ai seguenti standard (inclusi ma non limitati a): 3 x 1,5 Mode NORMATIVA SULLA SICUREZZA: Fabb...
-
Page 25: Simboli Utilizzati
Fabbricata da / Manufactured by: DONG GUAN ANDALI ELECTRONIC CO., LTD. No. 102, YUNHE East Ro3, South District, Dongguan City, China Importata da / Imported by: Innoliving Spa Via Merloni 2/B - 60131 Ancona, Italia Data di fabbricazione/Mfg. Date: Peso / Weight: 3 x 11,5 g MADE IN CHINA... - Page 26 Mantenere lontano dalla luce solare diretta Data di fabbricazione Dispositivo medico Grado di protezione Intervallo di umidità per il trasporto e lo stoccaggio Intervallo di temperatura per il trasporto e lo stoccaggio INFORMAZIONI AGLI UTENTI ai sensi del Decreto Legislativo N° 49 del 14 Marzo 2014 “Attuazione della Direttiva 2012/19/UE sui rifiuti di apparecchiature elettriche ed elettroniche (RAEE)”.
- Page 27 GUIDA EMC Il dispositivo soddisfa i requisiti EMC dello standard internazionale IEC 60601-1-2. I requisiti sono soddisfatti nelle condizioni descritte nella tabella seguente. Il dispositivo è un prodotto medico elettrico ed è soggetto a misure precauzionali speciali riguardanti l’EMC che devono essere pubblicate nelle istruzioni per l’uso.
- Page 28 Tabella 2 Guida e dichiarazione del fabbricante – immunità elettromagnetica Il dispositivo è destinato all’uso nell’ambiente elettromagnetico specificato di seguito. Il cliente o l’utente del dispositivo dovrebbe assicurarsi che venga utilizzato in un ambiente del genere. Prova di immunità Livello di prova Livello di confor- Ambiente elettromagnetico della IEC 60601...
- Page 29 RF radiata 3 V/m o 10 V/m 3 V/m o 10 V/m Le attrezzature di comunicazione RF IEC 61000-4-3 Da 80 MHz a 2.7 Da 80 MHz a 2.7 portatili e mobili non dovrebbero essere GHz 80% AM a 1kHz GHz 80% AM a utilizzate più...
- Page 30 Tabella 3 Guida e dichiarazione del fabbricante – immunità elettromagnetica Oggi, molti dispositivi wireless RF vengono utilizzati in varie strutture sanitarie dove vengono utilizzati appa- recchi e/o sistemi medici. Quando vengono utilizzati in prossimità di apparecchi e/o sistemi medici, la sicurezza di base e le prestazioni essenziali dei dispositivi e/o sistemi medici possono essere influenzate.
- Page 31 è influenzata dall’assorbimento e dalla riflessione da parte di strutture, oggetti e persone. JOYTECH Healthcare Co., Ltd. No.365, Wuzhou Road 311100 Hangzhou, Zhejiang Province PEOPLE’S REPUBLIC OF CHINA Shanghai International Holding Corp. GmbH (Europe) Eiffestraße 80, 20537 Hamburg, GERMANY Innoliving Spa Via Merloni, 2/B – 60131 Ancona – Italy www.innoliving.it...
- Page 32 UPPER AUTOMATIC ARM BLOOD PRESSURE MONITOR Thank you for purchasing the INMD-DBP-6191 blood pressure monitor. This manual is designed to help end users use the DBP-6191 blood pressure monitor safely and effectively. The device must be used in accordance with the instructions provided in this manual.
- Page 33 contact your doctor. Avoid self-treating these symptoms without consulting a physician. 3. Consult your physician about the best time to measure blood pressure if you’re taking medication. Never alter your prescription without consulting your doctor first. 4. Individuals with severe circulatory issues may experience discomfort.
- Page 34 9. Avoid placing the cuff over any wounds to prevent further injury. 10. NEVER place the cuff on an arm being used for intravenous infusion or any other form of vascular access, therapy, or arteriovenous shunt (A-V). Inflating the cuff in such cases may temporarily restrict blood flow, potentially causing harm.
- Page 35 or cuff yourself. Only replace batteries when necessary, and do not modify the product without authorization from the manufacturer. 19. Always use the approved cuff provided with the product. Using other cuffs may result in inaccurate readings. 20. Ensure that the system is stored and used within the temperature and humidity ranges specified by the manufacturer to prevent inaccurate readings.
- Page 36 26. Ensure correct battery polarity when inserting batteries into the device. 27. Dispose of batteries properly in accordance with local laws and regulations. 28. Use only a recommended Class II adapter with double insulation, compliant with EN 60601-1 and EN 60601-1-2 standards.
- Page 37 any part of the blood pressure monitor, including cables specified by the MANUFACTURER. Otherwise, degradation of this device’s performance may occur. 33. The software identifier refers to the software evaluation report, and the file code is JYRJ20101200. 34. Follow the instructions in this manual for proper placement of the cuff.
- Page 38 PRODUCT’S DESRIPTION Main unit 1. LCD 2. Cuff connection port 3. “MEM” button 4. “START/STOP” button 5. USB Adapter jack Cuff 1. Arm cuff 2. Air plug 3. Air tube...
-
Page 39: System Settings
Display 1. Group 1 2. Group 2 3. Systolic blood pressure 4. Diastolic blood pressure 5. Irregular heartbeat indicator 6. Pulse rate 7. Heart rate indicator 8. Time/Date 9. Low battery indicator 10. Last 3 tests average 11. Arm shake indicator 12. -
Page 40: Time/Date Setting
2. TIME/DATE SETTING Press the “START/STOP” button again to enter the YEAR SETTING mode. The values can be adjusted using the “MEM” button. Press the “START/STOP” button again to enter the MONTH/DAY SETTING mode. The values can be adjusted using the “MEM” button. The user can continue by setting the day, hour, minutes, and 12/24-hour format in the same manner. -
Page 41: Use The Device
NOTE: If the unit is left on and unused for 3 minutes, it will automatically save all information and turn off. USE THE DEVICE CAUTIONS • Sit in a quiet environment for at least 5 minutes before the test. • Do not stand during the test. Sit in a relaxed position with the arm at heart level. -
Page 42: Correct Posture For Measurement
CORRECT POSTURE FOR MEASUREMENT 1. For accurate measurement, remove any clothing or shirts from the arm area. Take off any garments that may constrict the upper arm. 2. Rest for a few minutes before the test. 3. Sit in a quiet place, preferably at a desk or table in an upright position with your back straight, your arm resting on a firm surface, and your feet flat on the ground without crossing them (refer to Figure B). -
Page 43: Blood Pressure Measurement
5. Tighten the cuff around the arm so that the Velcro closure is secure. The cuff should not be too tight or too loose. BLOOD PRESSURE MEASUREMENT 1. After preparing and wearing the cuff, before taking the measurement, take 3-5 deep breaths and relax. Avoid talking and moving your arms. 2. - Page 44 CAUTION: If the cuff pressure becomes excessively uncomfortable during the test, press the “START/STOP” button to turn off the device. The cuff pressure will rapidly decrease once the unit is powered off. 4. Four audible signals will indicate the end of the measurement. The screen will then display the systolic and diastolic blood pressure readings.
- Page 45 SETTINGS> chapter for further details. MEMORY DATA CHECK With the device powered off, you can check previous test results using the “MEM” button. Once the test results are accessed, press the “MEM” button to scroll through all stored test results. The LCD screen will display the last stored measurement as reading NO.01.
-
Page 46: Low Battery Indicator
NOTE: Once the memory is cleared, the deleted data cannot be recovered. LOW BATTERY INDICATOR When the battery is running low and unable to inflate the cuff for the test, you will hear 4 short warning beeps. Simultaneously, the “ “... -
Page 47: Troubleshooting
measurement again. ARM SHAKE INDICATOR If there is arm movement during the measurement, the “ “. icon may flash. This indicates that the measurement results may be inaccurate, and the situation will be recorded at the end of the measurement as a reminder. TROUBLESHOOTING ISSUE POSSIBLE CAUSE... -
Page 48: Blood Pressure Information
Error display Cause Solution Unable to detect Fasten the cuff before proceeding with the diastolic and systolic measurement. pressure. Cuff too loose. Fasten the cuff before proceeding with the measurement. Improper inflation. Measure again. If you cannot resolve the issue, contact customer service. - Page 49 discuss with your doctor what your “normal blood pressure” is.. WHO BLOOD PRESSURE CLASSIFICATION INDICATOR The blood pressure monitor is equipped with a classification indicator based on established guidelines from the World Health Organization. Each segment of the bar indicator corresponds to a blood pressure classification as follows: Severe hypertension Moderate hyperten- sion...
-
Page 50: Maintenance, Cleaning And Storage
MAINTENANCE, CLEANING AND STORAGE Avoid dropping, banging, or throwing the device. Protect the device from possible impacts. Protect from direct sunlight and humidity. To clean the main unit, use a soft tissue and wipe gently with a mild detergent. Use a damp cloth to remove dirt and excess cleaner. The cuff is a delicate component, handle it with care. -
Page 51: Technical Specifications
TECHNICAL SPECIFICATIONS Product description Fully automatic upper arm blood pressure monitor Model DBP-6191 Display LCD display (dimensions: 46mm X 62.1mm) Measurement method Oscillometric method Pressure From 0 mmHg to 299 mmHg Systolic pressure From 60 mmHg to 260 mmHg Measurement range Diastolic pressure From 40 mmHg to 200 mmHg Heart rate... -
Page 52: Safety Regulations
This blood pressure monitor complies with European regulations and bears the CE mark “CE 0123”. This blood pressure monitor also complies primarily with the following standards (including but not limited to): SAFETY REGULATIONS: EN 60601-1 Medical electrical equipment - Part 1: General requirements for safety. -
Page 53: Battery Information
Fabbricata da / Manufactured by: DONG GUAN ANDALI ELECTRONIC CO., LTD. No. 102, YUNHE East Ro3, South District, Dongguan City, China Importata da / Imported by: Innoliving Spa Via Merloni 2/B - 60131 Ancona, Italia Data di fabbricazione/Mfg. Date: Peso / Weight: 3 x 11,5 g MADE IN CHINA... - Page 54 Keep out of direct sunlight Manufacturing date Medical device Protection grade Humidity range for transportation and storage Temperature range for transportation and storage INFORMATION TO USERS according to Legislative Decree No. 49 of March 14, 2014 “2012/19/ UE Implementation of the Directive on Waste Electrical and Electronic Equipment (WEEE) “. The crossed-out dustbin symbol indicates that the product at the end of its life must be collected separately from other waste.
-
Page 55: Emc Guide
EMC GUIDE The device satisfies the EMC requirements of the international standard IEC 60601-1-2. The requirements are satisfied under the conditions described in the table below. The device is an electrical medical product and is subject to special precautionary measures with regard to EMC which must be published in the instructions for use. - Page 56 Table 2 Guidance and declaration of manufacturer-electromagnetic immunity The device is intended for use in the electromagnetic environment specified below. The customer or the user of the device should assure that it is used in such an environment. Immunity test IEC 60601 test level Compliance level Electromagnetic environment - guidance Electrostatic discharge ±8 kV contact...
- Page 57 Radiated RF EM fields. 3 V/m or 10 V/m 3 V/m or 10 V/m Portable and mobile RF communications IEC 61000-4-3 80 MHz - 2.7 GHz 80 MHz - 2.7 GHz equipment should be used no closer to any 80% AM at 1kHz 80% AM at 1kHz part of the device, including cables, than the recommended separation distance...
- Page 58 Tabella 3 Guidance and declaration of manufacturer-electromagnetic immunity Nowadays, many RF wireless equipment has being used in various healthcare locations where medical equip- ment and/or systems are used. When they are used near medical equipment and/or systems, the medical equip- ment and/or systems’...
- Page 59 JOYTECH Healthcare Co., Ltd. No.365, Wuzhou Road 311100 Hangzhou, Zhejiang Province PEOPLE’S REPUBLIC OF CHINA Shanghai International Holding Corp. GmbH (Europe) Eiffestraße 80, 20537 Hamburg, GERMANY Innoliving Spa Via Merloni, 2/B – 60131 Ancona – Italy www.innoliving.it...
- Page 60 Innoliving Spa Via Merloni, 2/B 60131 Ancona Italy Tel 071.2133550 www.innoliving.it MADE IN CHINA 0123...
Need help?
Do you have a question about the INMD-DBP-6191 and is the answer not in the manual?
Questions and answers