DANA SUMO TM4 Installation Manual
Motor control unit
Hide thumbs
Also See for SUMO TM4:
- Troubleshooting manual (182 pages) ,
- Installation manual (42 pages)

Related Manuals for DANA SUMO TM4


Summary of Contents for DANA SUMO TM4
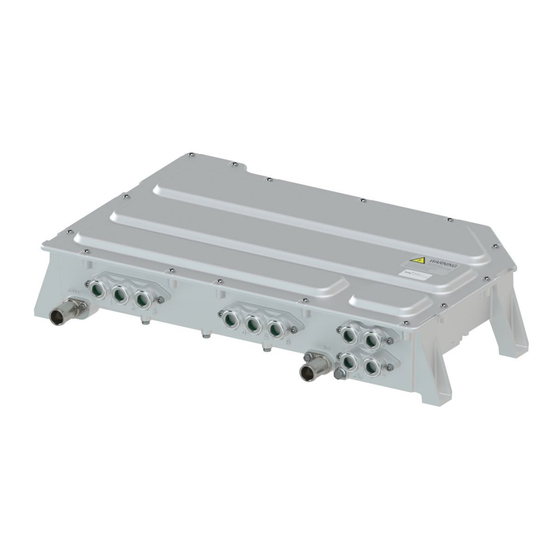
- Page 1 Installation Guide Actual product version may vary Motor Control Unit (MCU): CO200-A3 TG-0259_8 TM4 CO200-A3 Installation Guide...
- Page 2 Product information Product series: TM4 SUMO™ Model numbers: CO200-A3 Document information Reference: TG-0259 TM4 CO200-A3 Installation Guide Release date: 2022-10-24 Version number: Template information Reference: IN-8032_3 CONFIDENTIAL TG-0259_9 TM4 CO200-A3 Installation Guide © Dana TM4 inc., 2020-2022 Page 2 of 42...
-
Page 3: Table Of Contents
2 Transport and storage conditions ..................10 3 Receiving and unpacking the MCU ..................11 Safety warnings related to handling Dana TM4 products ........... 11 Inspecting and moving the MCU ................. 11 4 Installing the MCU in the vehicle ..................12 Planning to install the MCU .................. - Page 4 4.6.2 CAN protocol and TM4 ODIN ................37 4.6.3 Embedded software packages ................41 4.6.4 Customizing system parameters ................. 42 5 Customer service ........................ 42 CONFIDENTIAL TG-0259_9 TM4 CO200-A3 Installation Guide © Dana TM4 inc., 2020-2022 Page 4 of 42...
- Page 5 CAN MCU interface (CAN 1) base ranges ............38 Table 15 CAN MCU interface (CAN 2) base ranges ............38 Table 16 Embedded software package files ............... 41 CONFIDENTIAL TG-0259_9 TM4 CO200-A3 Installation Guide © Dana TM4 inc., 2020-2022 Page 5 of 42...
- Page 6 INV-HP2HV_0206-XX (A3): CAN bus termination ..........36 Figure 17 INV-HP2HV_0206-18 / INV-HP2HV_0206-20: CAN bus termination ....36 Figure 18 Device Communication Configuration – CO200-A3 (CAN1) ....... 40 CONFIDENTIAL TG-0259_9 TM4 CO200-A3 Installation Guide © Dana TM4 inc., 2020-2022 Page 6 of 42...
-
Page 7: Introduction
Receiving and unpacking – general guidelines on how to safely unpack, lift and inspect the product. • Installing the MCU in the vehicle – how to safely install and secure the product. • Customer service – Dana TM4 customer service contact details. • What’s new This guide has been modified as follows: •... -
Page 8: Disclaimer
Installation Guide Disclaimer All installation instructions, limits and warnings given in the technical documentation supplied by Dana TM4 must be respected in order to ensure that the system runs optimally and is not at risk of damage by misuse. Operating the system outside of the established limits constitutes misuse and may invalidate any warranty. -
Page 9: Definitions, Acronyms And Abbreviations
Refer to the latest published version of documentation and/or software package on the Extranet site. Documentation specific to your system is available on the Extranet site. External standard not supplied by TM4. CONFIDENTIAL TG-0259_9 TM4 CO200-A3 Installation Guide © Dana TM4 inc., 2020-2022 Page 9 of 42... -
Page 10: Transport And Storage Conditions
On leaving Dana TM4 facilities, the product is void of all coolant and all connectors are covered. The packaging is designed to protect the content against damage from vibrations and impacts and is able to withstand maritime conditions during transportation. -
Page 11: Receiving And Unpacking The Mcu
• Note: If the packaging and/or the product is damaged, take photographs of the damage, save all packaging materials and immediately notify the carrier as well as Customer Service at Dana TM4. See Section 5 for Dana TM4 contact information. -
Page 12: Installing The Mcu In The Vehicle
Follow all instructions in this guide on how to lift and install the MCU. • Call Dana TM4 Customer Service if in doubt (see Section 5 for contact details). • 4.1.1 Respecting CSC and MKC markings on interface drawings Before installing the product, refer to any CSC and MKC markings on the product interface drawing [8]. -
Page 13: Using Separate Brackets To Support Mcu And Motor
Ensure that any warning labels on the product remain visible at all times and not removed or obscured by cables or accessories. Also take care to avoid obstructing the vent (see Figure 1) on the MCU casing. CONFIDENTIAL TG-0259_9 TM4 CO200-A3 Installation Guide © Dana TM4 inc., 2020-2022 Page 13 of 42... -
Page 14: Securing The Mcu
Mishandling of this product may damage the product and/or cause injury or death. • All limitations and specifications communicated by Dana TM4 regarding the product must be respected. Do not attempt to open or repair this product. In case of damaged casing or suspected product •... -
Page 15: Installing The Cooling System
A parallel cooling system is recommended for the TM4 SUMO™ system, but information is also given on a possible serial cooling configuration, see Section 4.4.3. Note: Dana TM4 does not supply any cooling equipment or accessories. 4.4.1 Safety warnings related to handling the cooling agent Read all safety warnings associated with handling the cooling agent before working with the cooling system. -
Page 16: Parallel Configuration
As the cooling units are supplied by the vehicle integrator and the cooling system setup involves fine-tuning and testing at the customer site, Dana TM4 has no specific recommendations on how to achieve optimal configuration but coolant liquid pressure must not reach or exceed 30 PSI. -
Page 17: Coolant Inlet/Outlet Specifications
Two different types of coolant should not be mixed. • As the cooling unit, cooling hose and cooling agent are not supplied by Dana TM4, the vehicle integrator has full responsibility for following specifications and operating methods given by the manufacturers of each of these parts. -
Page 18: Electrical Installation
Always measure the voltage between the positive high-voltage DC bus (+) and the negative high-voltage DC bus (-) using appropriate protection and insulation before manipulating the product. CONFIDENTIAL TG-0259_9 TM4 CO200-A3 Installation Guide © Dana TM4 inc., 2020-2022 Page 18 of 42... -
Page 19: General Information For Installing And Handling Cables/Harnesses
Ensure that the brackets/fasteners used to support/secure the cables do not compromise cable • integrity. • Never apply perpendicular loads on the connectors/cables when using cable fasteners as this could compromise ingress protection (i.e. IP6K9K). CONFIDENTIAL TG-0259_9 TM4 CO200-A3 Installation Guide © Dana TM4 inc., 2020-2022 Page 19 of 42... -
Page 20: Suggested Installation Sequence
Full guidelines on how to achieve to this are given in the LV 123 standard [14]. Refer to Section 4.5.8.2 for the high-voltage battery fuse specification. CONFIDENTIAL TG-0259_9 TM4 CO200-A3 Installation Guide © Dana TM4 inc., 2020-2022 Page 20 of 42... -
Page 21: Table 3 Grounding Strap Installation
Note: The location of the second end connection point of the grounding strap given here is an example as the actual location will depend on the type of application being used by the vehicle integrator. One screw is provided by Dana TM4 for grounding purposes. -
Page 22: Phase Cables
Table 4 for standard and reversed mappings. Using the harness you have prepared or purchased from Dana TM4, refer to the product interface drawing [8] for illustrated cable installation information. -
Page 23: Motor Sensor Interface Harness
IMPORTANT NOTE: Disable the high-voltage and auxiliary batteries before connecting or disconnecting the motor sensor interface harness. A motor sensor interface harness is required between the motor and the MCU; when using Dana TM4 products together in a system, you can order a motor sensor interface harness of a pre-determined length to be delivered with the system, contact Customer Service for available lengths and part numbers. -
Page 24: Table 5 Motor Sensor Connector Pinout Mapping From Tm4 Mcu A3 To Tm4 Motors
Preparing the motor sensor interface harness Dana TM4 provides the plug and contacts required for integrators to provide their own motor sensor interface harness to connect an A3 MCU to an A3 motor; pinout information is given in Table 5. -
Page 25: Figure 9 Motor Sensor Interface Location - Base Of The Mcu
Using the motor sensor harness delivered with your Dana TM4 system, or the harness you have prepared for use with a non-TM4 motor, connect the cable to the MCU using its dedicated mating location. -
Page 26: Connecting The Vmu Interface Harness
VMU interface harness. 4.5.7.1 Preparing the VMU/ECU interface harness A VMU or client ECU interface harness (not supplied by Dana TM4) is required between the Motor Control Unit (MCU) and the Vehicle Management Unit (VMU). The VMU interface harness contains all required signals to interface the MCU with the VMU including the enable signal and the CAN ports. -
Page 27: Table 6 Vmu/Ecu Interface Harness - Plug Pinout Specifications
Generic Low side output 1A, can be used as PWM PWM2_OUT Low side output 20-16 Generic Low side output 1A, can be used as PWM CONFIDENTIAL TG-0259_9 TM4 CO200-A3 Installation Guide © Dana TM4 inc., 2020-2022 Page 27 of 42... -
Page 28: Figure 12 Suggested Hvil Safety Circuit
Disclaimer: Note that if you choose not to implement this circuit, TM4 is not responsible for any effects of hazardous behaviour or system malfunction during maintenance or due to a situation requiring an emergency stop. Figure 12 Suggested HVIL safety circuit CONFIDENTIAL TG-0259_9 TM4 CO200-A3 Installation Guide © Dana TM4 inc., 2020-2022 Page 28 of 42... -
Page 29: Table 7 Hvil - Absolute Maximum Rating
To install the harness on the MCU, align the connector head with the connector on the casing; push until you feel a click indicating that the head locked in place: do not use force to insert the connector head. CONFIDENTIAL TG-0259_9 TM4 CO200-A3 Installation Guide © Dana TM4 inc., 2020-2022 Page 29 of 42... -
Page 30: Connecting The High-Voltage Battery
It is important to ensure that no voltage is present on the high-voltage battery wires between both polarities and from each polarity to chassis before manipulation. CONFIDENTIAL TG-0259_9 TM4 CO200-A3 Installation Guide © Dana TM4 inc., 2020-2022 Page 30 of 42... -
Page 31: Table 8 High-Voltage Battery Short-Circuit Technical Data
The vehicle integrator must add a pre-charge mechanism to protect the capacitor bank and limit the pre- charge current as specified in Table 9. Table 9 High-voltage battery – Pre-charge circuit specifications Specifications Units Values Pre-charge current limit CONFIDENTIAL TG-0259_9 TM4 CO200-A3 Installation Guide © Dana TM4 inc., 2020-2022 Page 31 of 42... -
Page 32: Table 10 High-Voltage Battery - Cable Specifications
Based on a temperature of 85 °C. The colour orange is recommended for safety purposes when handling high voltage levels. The external cables used for high-voltage must be shielded. CONFIDENTIAL TG-0259_9 TM4 CO200-A3 Installation Guide © Dana TM4 inc., 2020-2022 Page 32 of 42... - Page 33 Using the prepared harness or harnesses in the product variant using the two HV battery connectors, refer to the product interface drawing [8] for illustrated cable installation information. See Figure 14 for location of high-voltage connectors on MCU casing. CONFIDENTIAL TG-0259_9 TM4 CO200-A3 Installation Guide © Dana TM4 inc., 2020-2022 Page 33 of 42...
-
Page 34: Figure 14 High-Voltage Battery - Cable Connector Location
When using a single DC input, ensure that the DC connector is always connected in the lower connection port with the upper connection port protected by the blanking plug provided by TM4 in Kit-0149. CONFIDENTIAL TG-0259_9 TM4 CO200-A3 Installation Guide © Dana TM4 inc., 2020-2022 Page 34 of 42... -
Page 35: Connecting The Auxiliary Battery To The Mcu
Table 12 Auxiliary battery – Fuse specifications Specifications Units Values (12 V/24 V) Current rating Fuse type Fast-acting Figure 15 Auxiliary battery – Fuse block diagram CONFIDENTIAL TG-0259_9 TM4 CO200-A3 Installation Guide © Dana TM4 inc., 2020-2022 Page 35 of 42... -
Page 36: 4.5.10 Can Interface
INV-HP2HV_0206-XX (A3): CAN bus termination CAN1 = Terminated CAN2 – Not terminated Figure 17 INV-HP2HV_0206-18 / INV-HP2HV_0206-20: CAN bus termination CAN1 & CAN2 = Not terminated CONFIDENTIAL TG-0259_9 TM4 CO200-A3 Installation Guide © Dana TM4 inc., 2020-2022 Page 36 of 42... -
Page 37: 4.6 Software Installation
TM4 ODIN and set up the CAN connection, see the TM4 ODIN Technical Guide [3]. Note: Dana TM4 is not responsible for any damage to the system caused by misuse or modification of the application code. -
Page 38: Table 14 Can Mcu Interface (Can 1) Base Ranges
(TM4 ODIN) 0x069F Can2BaseAddr4 Customer specific messages 0x0450- (CAN extension pack) 0x0457 Can2BaseAddr5 Diagnostic messages 0x712 (UDS when EnableUds = 1 and 0x71A UdsCanPort = 2) CONFIDENTIAL TG-0259_9 TM4 CO200-A3 Installation Guide © Dana TM4 inc., 2020-2022 Page 38 of 42... - Page 39 In the first software versions, only the System Type MOTOR (highlighted in Figure 18) is available. Later software versions will also give the user access to the System Type VMU. CONFIDENTIAL TG-0259_9 TM4 CO200-A3 Installation Guide © Dana TM4 inc., 2020-2022 Page 39 of 42...
-
Page 40: Figure 18 Device Communication Configuration - Co200-A3 (Can1)
CAN base address is mapped to the following parameter names: Can1BaseAddr1 / Can2BaseAddr1 = HighPrioBaseAddress • Can1BaseAddr2 / Can2BaseAddr2 = LowPrioBaseAddress • Can1BaseAddr3 / Can2BaseAddr3 = OdinCan1BaseAddress / OdinCan2BaseAddress • CONFIDENTIAL TG-0259_9 TM4 CO200-A3 Installation Guide © Dana TM4 inc., 2020-2022 Page 40 of 42... -
Page 41: Embedded Software Packages
TM4 ODIN; the name of the embedded application and the version of the current application are displayed in the status bar. Ensure that the version of the software corresponds to the latest version available on the Dana TM4 Extranet site [15]. CONFIDENTIAL TG-0259_9 TM4 CO200-A3 Installation Guide ©... -
Page 42: Customizing System Parameters
13 At this point, the Basic TM4 ODIN file (.odn4) can be opened from the TM4 ODIN menu File/Open to view customer TM4 MCU parameters. Contact Dana TM4 Customer Service if you require help programming the system using TM4 ODIN. For customer service contact details, see Section 5.
Need help?
Do you have a question about the SUMO TM4 and is the answer not in the manual?
Questions and answers