
Related Manuals for REVENT RVRL5080


Summary of Contents for REVENT RVRL5080
- Page 1 English model RVRL5080 Installation Guide Read and Save These Instructions Need Help? For videos go to our YouTube channel youtube.com/@reventfans Questions? Call 1-877-543-8698 (English) or 1-800-615-5439 (French)
- Page 2 ..Installation page 12 ..... Care And Cleaning ..page 12-13 Frequently Asked Questions page 14 ..... 5-Year Limited Warranty Specifications RVRL5080 performance at 4" ducting Duct Static Pressure Air ow Sound Energy (in wg) (cfm) (sones) (watts) Size <0.3 19.2...
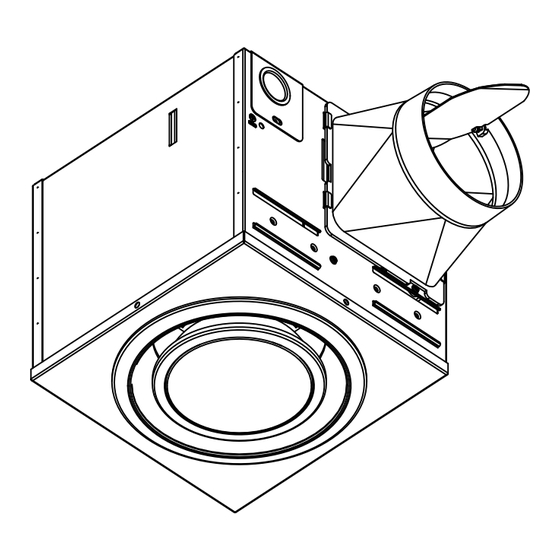
- Page 3 What’s Inside The Box VENT HOUSING/LIGHT 4” DAMPER Qty:1 Qty:1 Qty:1 CUTOUT TEMPLATE, PERFECT CUT EVERY TIME! English PLANTILLA DE RECORTE ¡CORTE PERFECTO SIEMPRE! model RVLR80 Installation Guide RVP-717-00-01 Read and Save These Instructions USA and International Patents and Patents Pending See Patents at www.ReVentfans.com Patentes estadounidenses e internacionales y patentes pendientes Ver patentes en www.ReVentfans.com...
- Page 4 Safety Information 1.) WARNING - TO REDUCE THE RISK OF FIRE, ELECTRIC SHOCK, OR INJURY TO PERSONS, OBSERVE THE FOLLOWING: a) Installation work and electrical wiring must be done by qualified person(s) in accordance with all applicable codes and standards, including fire-rated construction.
- Page 5 Planning Your Installation When installing the ventilation fan in a new construction site, install the main body of the FAN and duct work during the rough-in construction of the building. The SHIELD should be installed after the finished ceiling is in place. When installing in existing construction, use the provided cutout TEMPLATE for the ceiling.
- Page 6 Connecting the Duct ● Install a circular duct to outlet and secure it with duct tape or clamps. ● Install the duct to the outlet with a gradient 1°~2° to the outside as shown. ● The ducting from this FAN to the outside of the building has a strong effect on ●...
- Page 7 Select Your CFM On your FAN, select between 50 and 80 CFM. Generally, 50 CFM is used with a 50 sq ft size room and 80 CFM is used with a 50-80 sq ft room. However, either selection will work for any room. If your room is 80 square feet and you choose the 50 CFM/<0.3 Sone setting, then you should put your fan on a timer and run it at least 30 minutes to allow enough time to fully clear and dry the room.
- Page 8 Installation WARNING: Disconnect all AC Power Breakers or Fuses before attempting to cut into your ceiling. 1.) Attach FAN to ceiling joists with BRACKETS using ROUNDHEAD WOOD SCREWS. conduit ducting SHORT BRACKET (can be cut down) framing joist framing joist SHORT LONG BRACKET...
- Page 9 WARNING: Disconnect the AC power before any work is done to any part of the circuit ReVent is connected to. If you do not understand this warning, seek the services of a qualified licensed electrician. WARNING: Copper to copper only. Do not use aluminum wire.
- Page 10 6.) Connect wiring using the provided QUICK CONNECTS. Wire nuts can 2-WIRE QUICK 4-WIRE QUICK be used instead of CONNECT CONNECT quick connects Qty:2 Qty:3 Wire connection for FAN and LIGHT on separate switches: line line line in line in ground neutral VENT...
- Page 11 SWITCHES NOT INCLUDED, MUST BE PURCHASED SEPARATELY Always follow all safety instructions included with the switch you purchase. Do not exceed maximum electrical ratings. ReVent ® light white ground white black black fan switch light switch (purchased separately) (purchased separately)
- Page 12 8.) Remove FAN cover by removing 4 screws on the sides. reattach screws reattach FAN cover 9.) Use included TEMPLATE to cut opening into drywall, then install drywall. use this TEMPLATE to draw a circle with a pencil CUTOUT TEMPLATE, PERFECT CUT EVERY TIME! PLANTILLA DE RECORTE ¡CORTE PERFECTO SIEMPRE! use drywall jab saw RVP-717-00-01...
- Page 13 11.) Plug VENT HOUSING/LIGHT into FAN, bend clamps up, then insert VENT HOUSING/LIGHT into FAN. drywall insert VENT HOUSING /LIGHT into FAN bend clamps up VENT HOUSING/ LIGHT plug VENT HOUSING/ LIGHT into FAN Care and Cleaning WARNING: To reduce the risk of electric shock, fire, or injury to persons, disconnect or turn off the breaker and lock the power supply at the panel to prevent the power from being turned on before servicing or cleaning the unit.
- Page 14 Q: Can I install my bathroom ventilation FAN directly over a bathtub or shower? A: Yes, but your FAN must be rated for over a shower/bath installation (all ReVent models are) and must be on a GFCI protected circuit. Consult a qualified licensed electrician about ground fault protected safety circuits.
- Page 15 For videos go to our YouTube channel youtube.com/@reventfans Questions? Call 1-877-543-8698 (English) or 1-800-615-5439 (French) info@reventfans.com ReVent is a product of GTR Technologies Inc. All rights reserved. ® USA and International Patents and Patents Pending. See Patents at www.ReVentfans.com PART# RVP-165-00-05 032824...
- Page 17 Français Modèles n RVRL5080 Guide d’installation Veuillez lire ces instructions et les conserver. Avez-vous besoin d’aide? Pour obtenir des vidéos, rendez-vous sur notre chaîne YouTube youtube.com/@reventfans Avez-vous des questions? Téléphonez au 1 800 615-5439 (français) ou au 1 877 543-8698 (anglais).
- Page 18 ..... Entretien et nettoyage page 12-13 ..Foire aux questions page 14 ..... Garantie limitée de 5 ans Fiche technique RVRL5080 performances avec conduits de 4 po Pression statique Débit d’air Niveau de Consommation Format du (po d’eau) (pi /min) bruit (sone) d’énergie (watts)
- Page 19 Contenu de la boîte BOÎTIER DE VENTILATEUR 4 PO REGISTRE VENTILATION/LAMPE Qté : 1 Qté : 1 Qté : 1 CUTOUT TEMPLATE, PERFECT CUT EVERY TIME! English PLANTILLA DE RECORTE ¡CORTE PERFECTO SIEMPRE! model RVLR80 Installation Guide RVP-717-00-01 Read and Save These Instructions USA and International Patents and Patents Pending See Patents at www.ReVentfans.com Patentes estadounidenses e internacionales y patentes pendientes...
- Page 20 Consignes de sécurité 1) AVERTISSEMENT : AFIN DE RÉDUIRE LES RISQUES D’INCENDIE, DE DÉCHARGE ÉLECTRIQUE OU DE BLESSURES, VEUILLEZ RESPECTER CES CONSIGNES : a) Les travaux d’installation et de câblage électrique doivent être réalisés par une personne qualifiée selon tous les codes et les normes applicables, y compris pour la résistance au feu.
- Page 21 IMPORTANT : Il pourrait être approprié de consulter un électricien qualifié à propos du câblage du ventilateur d’aération. AVERTISSEMENT : Afin de réduire les risques de décharge électrique, débranchez l’alimentation électrique avant de faire l’entretien. ATTENTION : Cet article doit être mis à la terre adéquatement. Allez à...
- Page 22 Plusieurs configurations d’installation sont possibles pour ce ventilateur d’aération. Ces configurations ne sont pas toutes illustrées. Si la configuration requise diffère de celles qui sont illustrées, consultez un entrepreneur qualifié pour déterminer le type d’installation qui convient le mieux à votre projet. Si vous remplacez un ventilateur existant, assurez-vous que le nouveau VENTILATEUR couvrira adéquatement l’ouverture existante.
- Page 23 Sélection du débit d’air Sur le VENTILATEUR, sélectionnez 50 pi³/min ou 80 pi³/min. En général, un débit de 50 pi³/min convient à une pièce de 50 pi² et un débit de 80 pi³/min, à une pièce de 50 à 80 pi². Toutefois, ces deux réglages peuvent convenir à...
- Page 24 Installation AVERTISSEMENT : Débranchez tout disjoncteur ou fusible de l’alimenta- tion CA avant d’entreprendre le découpage du plafond. 1) Fixez le VENTILATEUR aux solives du plafond en utilisant les SUPPORTS et les VIS À BOIS À TÊTE RONDE. conduit conduit électrique SUPPORT COURT...
- Page 25 à conduits. AVERTISSEMENT : Débranchez l’alimentation électrique CA avant d’entreprendre toute procédure au circuit sur lequel le ventilateur ReVent est relié. Si vous ne comprenez pas bien cet avertissement, consultez un électricien qualifié. AVERTISSEMENT : Effectuez des branchements cuivre sur cuivre seulement.
- Page 26 6) Branchez le câblage en utilisant les RACCORDS RAPIDES fournis. Des capuchons de RACCORD RAPIDE RACCORD RAPIDE connexion peuvent À 2 FILS À 4 FILS être utilisés au lieu des raccords rapides. Qté : 2 Qté : 3 Branchement du VENTILATEUR et de la LAMPE à des commutateurs distincts. Mise à...
- Page 27 INTERRUPTEURS NON COMPRIS (VENDUS SÉPARÉMENT) Respectez toujours les consignes de sécurité fournies avec l’interrupteur que vous achetez. Ne dépassez pas la capacité électrique nominale. ventilateur ReVent ventilateur éclairage blanc mise à la blanc noir noir terre interrupteur du ventilateur interrupteur de l’éclairage (vendu séparément)
- Page 28 8) Enlevez le couvercle du VENTILATEUR en déposant les 4 vis se trouvant sur les côtés. Remettre les vis. Remettre le couvercle du VENTILATEUR. 9) Servez-vous du GABARIT pour découper une ouverture dans la plaque de plâtre, puis installez celle-ci. Utiliser ce GABARIT pourtracer un cercle à...
- Page 29 11) Branchez le BOÎTIER DE VENTILATION/la LAMPE dans le VENTILATEUR, repliez les pinces, puis insérez le BOÎTIER DE VENTILATION/la LAMPE dans le VENTILATEUR. VENTILATEUR Plaque de plâtre Insérer le BOÎTIER DE VENTILATION/la LAMPE dans le VENTILATEUR. Replier les pinces. BOÎTIER DE VENTILATION/LAMPE Brancher le BOÎTIER DE VENTILATION/la LAMPE...
- Page 30 R : Oui, mais le VENTILATEUR doit être homologué comme tel (tous les modèles ReVent le sont) et raccordé à un DDFT (disjoncteur différentiel de fuite à la terre). Vous devez également faire appel à un électricien qualifié.
- Page 31 Avez-vous des questions? Téléphonez au 1 800 615-5439 (français) ou au 1 877 543-8698 (anglais). info@reventfans.com ReVent est un produit de GTR Technologies Inc. Tous droits réservés. Brevets étatsuniens et internationaux en instance. Consultez les brevets sur www.ReVentfans.com PART# RVP-165-00-05 032824...
- Page 33 Español N.º de modelos RVRL5080 Guía de instalación Lea y guarde estas instrucciones ¿Necesita ayuda? Para más videos ingresa a nuestro canal de YouTube youtube.com/@reventfans ¿Tiene alguna pregunta? Llame al 1-877-543-8698 (inglés) o al 1-800-615-5439 (francés)
- Page 34 Página 12 ..... Cuidado y limpieza ..Página 12-13 Preguntas frecuentes Página 14 ..... Garantía limitada de 5 años Índice RVRL5080 rendimiento en conductos de 4" Tamaño del Presión estática Flujo de Sonido Energía (en wg) aire (cfm) (sones) (vatios) conducto <0.3...
- Page 35 Qué hay dentro de la caja CARCASA DE VENTILADOR 4” REGULADOR VENTILACIÓN/LUZ Cantidad: 1 Cantidad: 1 Cantidad: 1 CUTOUT TEMPLATE, PERFECT CUT EVERY TIME! English PLANTILLA DE RECORTE ¡CORTE PERFECTO SIEMPRE! model RVLR80 Installation Guide RVP-717-00-01 Read and Save These Instructions USA and International Patents and Patents Pending See Patents at www.ReVentfans.com Patentes estadounidenses e internacionales y patentes pendientes...
- Page 36 Información de seguridad 1) ADVERTENCIA: PARA REDUCIR EL RIESGO DE INCENDIO, DES- CARGA ELÉCTRICA O LESIONES, CUMPLA CON LO SIGUIENTE: a) El trabajo de instalación y el cableado eléctrico deben ser realizados por personas calificadas de acuerdo con todos los códigos y normas aplicables, incluida la construcción a prueba de incendios.
- Page 37 ADVERTENCIA: para reducir el riesgo de descarga eléctrica, desconecte el circuito de suministro eléctrico antes de realizar tareas de mantenimiento. PRECAUCIÓN: este producto debe estar correctamente conectado a tierra. Vaya a reventfans.com para obtener una copia de este manual. Planificación de la instalación Cuando instale el ventilador en un sitio de construcción nuevo, instale el cuerpo principal del ventilador y los conductos durante la construcción gruesa del edificio.
- Page 38 Conexión del conducto ● Coloque un conducto circular en la salida y asegúrelo con cinta para ductos o ● abrazaderas. ● Instale el conducto a la salida con un gradiente de 1° ~ 2° hacia el exterior, ● como se muestra en la imagen. ●...
- Page 39 Seleccione su CFM En su VENTILADOR, seleccione entre 50 y 80 CFM. Generalmente, se utilizan 50 CFM en una habitación de 50 pies cuadrados y 80 CFM en una habitación de 50 a 80 pies cuadrados. Sin embargo, cualquiera de las opciones funcionará en cualquier habitación. Si su habitación tiene 80 pies cuadrados y elige la configuración de 50 CFM/<0,3 Sone, entonces debe poner el ventilador en un temporizador y hacerlo funcionar durante al menos 30 minutos para dar tiempo suficiente para limpiar y secar completa-...
- Page 40 Instalación ADVERTENCIA: desconecte todos los disyuntores o fusibles de alimentación de corriente alterna antes de intentar cortar el techo. 1.) Fije el VENTILADOR a las vigas del techo con SOPORTES usando TORNIL- LOS PARA MADERA DE CABEZA REDONDA. conducto conductos SOPORTE CORTO (se VENTILADOR...
- Page 41 ADVERTENCIA: desconecte la alimentación de corriente alterna antes de realizar cualquier trabajo en cualquier parte del circuito al que está conectado el ventilador ReVent . Si no comprende esta advertencia, solicite ® los servicios de un electricista calificado y con licencia.
- Page 42 6.) Conecte el cableado utilizando las CONEXIONES RÁPIDAS proporcionadas. CONEXIÓN RÁPIDA CONEXIÓN RÁPIDA Se pueden utilizar tuercas para cables en DE 2 CABLES DE 4 CABLES lugar de conexiones Cantidad: 2 Cantidad: 3 rápidas Conexión de cable para ventilador y luz en interruptores separados: línea de línea línea en...
- Page 43 ReVent ® ventilador blanco puesta a blanco negro negro tierra interruptor de ventilador Interruptor de luz (comprado por separado) (comprado por separado) Los cables de La LUZ LED se VENTILADOR puede conectar no se pueden a un interruptor conectar a un de atenuación...
- Page 44 8.) Retire la cubierta del VENTILADOR quitando los 4 tornillos de los lados. vuelva a colocar los tornillos vuelva a colocarla cubierta del VENTILADOR 9.) Utilice la PLANTILLA incluida para cortar la abertura en el panel de yeso y luego instale el panel de yeso. usa esta PLANTILLA para dibujar un círculo con un lápiz CUTOUT TEMPLATE, PERFECT CUT EVERY TIME!
- Page 45 11.) Enchufe la CARCASA DE VENTILACIÓN/LUZ en el VENTILADOR, doble las abrazaderas hacia arriba y luego inserte la CARCASA DE VENTILACIÓN/LUZ en el VENTILADOR. VENTILADOR paneles de yeso inserte la CARCASA DE VENTILACIÓN/LUZ en el VENTILADOR doble las abrazaderas hacia arriba CARCASA DE VENTILACIÓN/LUZ Conecte la CARCASA DE...
- Page 46 P: ¿Puedo instalar el VENTILADOR para ventilación de mi baño directamente sobre la bañero o ducha? A: Yes, but your FAN must be rated for over a shower/bath installation (all ReVent models are) and must be on a GFCI protected circuit. Consult a qualified licensed electrician about ground fault protected safety circuits.
- Page 47 ¿Tiene alguna pregunta? Llame al 1-877-543-8698 (inglés) o al 1-800-615-5439 (francés) info@reventfans.com ReVent es un producto de GTR Technologies Inc. Todos los derechos ® reservados. Patentes estadounidenses e internacionales y patentes pendientes Ver patentes en www.ReVentfans.com PART# RVP-165-00-05 032824...
Need help?
Do you have a question about the RVRL5080 and is the answer not in the manual?
Questions and answers