
Related Manuals for ASI ALPACO CLASSIC


Summary of Contents for ASI ALPACO CLASSIC
- Page 1 INSTALLATION INSTRUCTIONS FOR ALPACO CLASSIC PARTITIONS 900 Clary Connector, Eastanollee, GA 30538 Phone: (706) 827-2700 Fax: (706) 827-2710 Website: www.globalpartitions.com Email: sales@globalpartitions.com...
- Page 2 ALPACO CLASSIC INSTALLATION Table of Contents Topic Page Layout and Wall Brackets Panel and Pilaster Preparation Securing Components and Head Rail Panel to Pilaster/Wall Assembly Pilaster/Wall Assembly Pilaster/Panel Alcove Assembly Head Rail Connection Details Door Hardware Inswing Assembly Door Hardware Outswing Assembly...
- Page 3 Panel Center Line backings of the walls and floor are adequate to support the secure mounting of the ALPACO Classic units. B. Review the layout drawings and package lists that have accompanied this order. C. Establish and mark panel center lines for wall brackets.
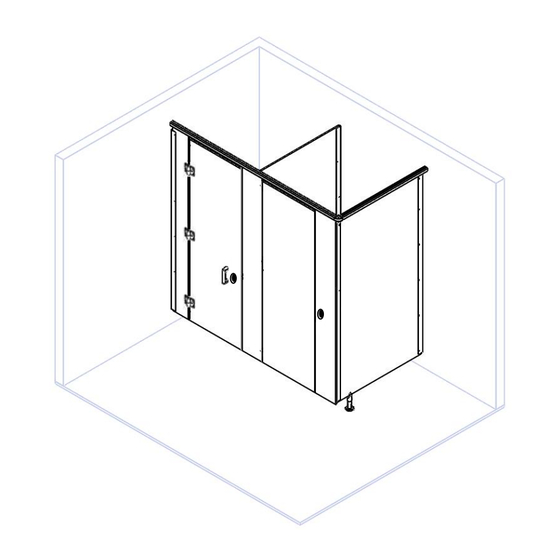
- Page 4 ALPACO CLASSIC INSTALLATION STEP 3: FIGURE 3 POSITION PANEL A. Assemble pedestal and adjust it to the desired height by turning clockwise or counterclockwise. B. Place the panel on a temporary support device. Set the panel into the wall bracket and unanchored pedestal.
- Page 5 ALPACO CLASSIC INSTALLATION STEP 5: FIGURE 5 SECURING PILASTERS AND PEDESTALS A. A temporary support device is highly recommended to place under each pilaster to assist in alignment. B. Plumb each pilaster and fasten the pilaster to the panel with U-brackets using through-bolts through the panel.
-
Page 6: Hardware List
ALPACO CLASSIC INSTALLATION PANEL TO PILASTER/WALL HARDWARE LIST ASSEMBLY PICTURE DESCRIPTION A. Plumb panel and fasten panel to wall bracket #10-24 x 3/8” NUT with through-bolts. To facilitate the through- #10-24 x 1/2" BOLT bolts, the holes of the panel should be drilled with a 1/4”... - Page 7 ALPACO CLASSIC INSTALLATION PILASTER/WALL HARDWARE LIST ASSEMBLY PICTURE DESCRIPTION #12 x 2.5" WALL A. Verify that the pilasters are both plumb and SCREW level before continuing. RED PLASTIC SHIELD B. Fasten the pilaster to the wall bracket using "U" BRACKET through-bolts and barrel nuts.
- Page 8 ALPACO CLASSIC INSTALLATION PILASTER/ PANEL ALCOVE HARDWARE LIST ASSEMBLY PICTURE DESCRIPTION A. For the perpendicular pilaster between two #10-24 x 3/8” NUT “U” brackets (the tee configuration), first #10-24 x 1/2" BOLT use a through-bolt through the two “U” brackets to fasten the pilaster to the wall #12 x 2.5"...
- Page 9 ALPACO CLASSIC INSTALLATION HEAD RAIL CONNECTIONS HEAD RAIL TO WALL CONNECTION HEAD RAIL “T” CONNECTION HEAD RAIL “L” CONNECTION 900 Clary Connector , Eastanollee, GA 30538 Phone: (706) 827-2700 Fax: (706) 827-2710 Page 8 Website: www.globalpartitions.com Email: sales@globalpartitions.com...
- Page 10 ALPACO CLASSIC INSTALLATION DOOR HARDWARE HARDWARE LIST ASSEMBLY - INSWING PICTURE DESCRIPTION A. Place door on temporary support device. HINGE ASSEMBLY Attach hinges to the pilaster & door using WITH COVER the #10 screws as shown in the hardware list.
- Page 11 ALPACO CLASSIC INSTALLATION DOOR HARDWARE ASSEMBLY - OUTSWING A. All Doors will require 3 hinges. B. Install additional door bumper on the outside of the door as required. C. All hinges are cammed. D. Holes will be predrilled for alignment.
-
Page 12: Latch Assembly
ALPACO CLASSIC INSTALLATION LATCH ASSEMBLY HARDWARE LIST PICTURE DESCRIPTION INDICATOR COVER WITH INSERT CENTER SHAFT INDICATOR DIAL INDICATOR DIAL PLACEMENT SLEEVE LATCH HANDLE #10-24 x 1/2" BOLT 900 Clary Connector , Eastanollee, GA 30538 Phone: (706) 827-2700 Fax: (706) 827-2710 Page 11 Website: www.globalpartitions.com... -
Page 13: Hinge Assembly
ALPACO CLASSIC INSTALLATION HINGE ASSEMBLY A. Cams are preset at an angle of 0°. ASI recommends using 0° angle because it also complies with Federal ADA codes and guidelines B. If changing the angle, use the Allen Wrench to detach the setscrew. Then rotate until hole line up with 20°... - Page 14 ALPACO CLASSIC INSTALLATION URINAL SCREEN HARDWARE LIST PICTURE DESCRIPTION ASSEMBLY #12 x 2.5" WALL A. Before proceeding, confirm that the backing of the wall SCREW is adequate to support the mounting of urinal screens. RED PLASTIC Check shop drawings for layout.
- Page 15 ALPACO CLASSIC INSTALLATION CARE AND MAINTENANCE OF BATHROOM PARTITIONS In order to provide bathroom partitions with proper care and maintenance, the following instructions must be followed: A. All surfaces must be kept clean with water and a mild soap solution only.
Need help?
Do you have a question about the ALPACO CLASSIC and is the answer not in the manual?
Questions and answers