
Related Manuals for Kirby AVALIR2


Summary of Contents for Kirby AVALIR2
- Page 1 OWNER’S MANUAL OWNER’S MANUAL quality • reliability • performance quality • reliability • performance...
- Page 2 ® questions, contact an independent authorized Kirby Distributor. ® This manual is available online in a selection of languages. Please visit www.kirby.com to view a manual in an alternate language. Or, contact The Kirby Company: consumer@kirby.com United States: 1-800-494-8586 (M-F, 8:00AM - 5:00 PM EST)
-
Page 3: Table Of Contents
TABLE OF CONTENTS ® Parts of the Kirby Home Care System ..............6 Getting Started ....................11 Assembling the Unit ....................11 Power Switch ......................12 Disposable Filter Bag ....................13 Moving the Unit with the Power Off ................14 Locking the Upright Handle ..................15 Lift The Unit ...................... - Page 4 READ THIS MANUAL BEFORE USING THIS PRODUCT. FAILURE TO FOLLOW THE INSTRUCTIONS AND SAFETY PRECAUTIONS IN THIS MANUAL CAN RESULT IN PERSONAL INJURY. INTENDED FOR HOUSEHOLD USE ONLY. Operating Instructions are available by contacting The Kirby Company or online at www.kirby.com...
- Page 5 Therefore, the warnings in this manual may not be all inclusive. If a tool, procedure, work method or operating technique that is not specifically recommended by The Kirby Company is used, you must ensure that the product will not be damaged or be made unsafe by the operation, maintenance or repair procedures that you choose.
- Page 6 • Use only Kirby cleaning solutions intended for use with the Multi-Surface ® Shampoo System. See the Kirby Home Care Products section of the manual. ® • Do not pick up anything that is burning or smoking, such as cigarettes, matches, or hot ashes.
-
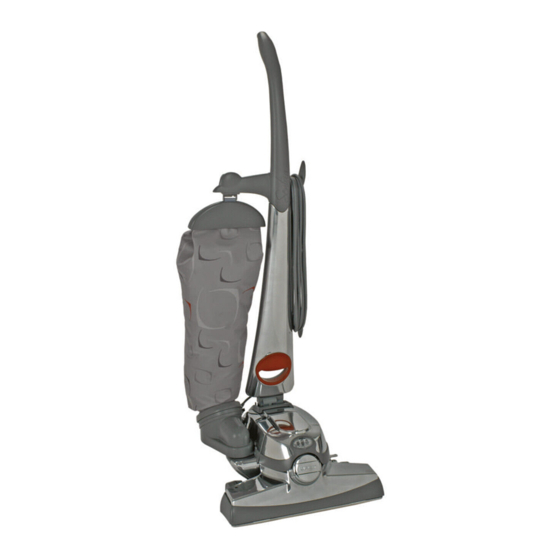
Page 7: Parts Of The Kirby Home Care System
PARTS OF THE KIRBY HOME CARE SYSTEM ® Part Outer Permanent Bag Bag Release Button Bag Support Strap Disposable Filter Bag Top Adaptor ® Mini Em-Tor Collector Brush Roll Performance Indicator Light Belt Lifter Air Exhaust Port Lower Carrying Grip... - Page 8 ...
- Page 9 ACCESSORIES & ATTACHMENTS Part Attachment Kaddy Portable Sprayer Portable Carry Handle Portable Shampooer Cap Utility Tool Inflator/Deflator Tool Extension Tubes Replacement Belt Duster Brush Upholstery Nozzle Wall and Ceiling Brush Suction Control Grip Crevice Tool Surface Nozzle Attachment Hose Air Intake Guard Zippbrush (optional) Turbo Accessory (optional)
- Page 10 ...
-
Page 12: Getting Started
Assembling the Unit Assemble the Upright Handle by sliding the two pieces together. Screw in the cord hook and spring to secure. Push the base of the Upright Handle into the connection on the top of the unit. Attach the Bag Latch Tab on the Outer Permanent Bag to the Upright Handle. -
Page 13: Power Switch
Press the bottom pedal on the Toe-Touch Control all the way down to raise the front of the unit. Raise the Headlight Hood. Rest the two hooks on the back of the Power Nozzle on the Attaching Bar on the front of the unit. Press the Power Nozzle against the unit and secure with the Accessory Lock. -
Page 14: Disposable Filter Bag
Disposable Filter Bag For best performance, use only genuine Kirby Disposable ® Filter Bags and replace them when dirt reaches the FULL line. A Disposable Filter Bag must be installed before vacuuming. To Remove a Used Disposable Filter Bag: Turn the unit off. Unplug the power cord from the wall outlet. -
Page 15: Moving The Unit With The Power Off
Moving the Unit with the Power Off Tech Drive ® power assist makes it easy to push or pull the unit when the motor is on. Tech Drive power assist should be put in ® neutral before moving the unit when the motor is off. Raise the front of the unit by pressing the bottom pedal on the Toe-Touch Control down. -
Page 16: Locking The Upright Handle
Locking the Upright Handle This unit has a Handle Tilt Latch Lever which locks the upright handle for carrying and storage. Firmly grasp the handle BEFORE unlocking the Handle Tilt Latch Lever. For vacuuming: The Handle Tilt Latch Lever should be unlocked in the center position for vacuuming. -
Page 17: Lift The Unit
Lift The Unit Move the Handle Tilt Latch Lever away from bag to lock the base in place. Use the handle on the bag arm to lift the unit. Or, use the Lower Carrying Grip in the center of the handle to lift the unit. - Page 18 Straight Suction Cleaning Disengage the Brush Roll to use straight suction cleaning to vacuum hard floors, throw rugs and delicate carpets. When using straight suction cleaning on bare floors, lower the Power Nozzle as close as possible to the floor without touching the floor.
-
Page 19: Outer Permanent Bag & Mini Em-Tor ® Collector
Removing the Outer Permanent Bag and the Mini Em-Tor Collector ® The Mini Em-Tor ® collector holds large, heavy particles that do not reach the Disposable Filter Bag. Grasp the base of the Mini Em-Tor ® collector and rotate it away from the unit and lift it off. -
Page 20: Upright & Portable Cleaner
Upright Cord Management A series of holders keeps the cord attached to the Upright Handle. Attach the cord by snapping it into the holders located at the base and side of the Upright Handle. With the upper cord hook in the up position, wrap the cord toward the rear of the unit and slide the cord under the holder on the hook. -
Page 21: Adjusting The Cleaning Height
Adjusting the Cleaning Height The Toe-Touch Control, located over the front wheel, raises and lowers the Power Nozzle. The numbered settings are for carpet and floors. The dotted settings are for accessories and other cleaning needs. Turn the unit on. Press the Toe-Touch Control Upper Pedal as often as necessary to lower the Power Nozzle to its lowest setting. -
Page 22: Converting To A Portable Cleaner
Converting to a Portable Cleaner The Portable Cleaner provides the full power of an upright vacuum with a shorter handle for convenient cleaning of stairs and mattresses. Turn off and unplug the unit. Put Tech Drive ® power assist in neutral. -
Page 23: Cleaning Carpeted Stairs
Cleaning Carpeted Stairs with the Portable Cleaner Put Tech Drive power assist in neutral by pressing down on ® the left “N” Neutral pedal. Place the unit on a carpeted step, supporting the rear of the unit. Turn the unit on after it is in place. Keep hair, loose clothing/jewelry, fingers, and all parts of body away from the unit openings and moving parts while operating. - Page 24 Put Tech Drive power assist in neutral by pressing down ® on the left “N” Neutral pedal. Raise the Headlight Hood. Flip out the handle on the Belt Lifter. Use it to turn the Belt Lifter counterclockwise until the red arrows line up. Turn the Accessory Lock counterclockwise to release the Power Nozzle.
-
Page 25: Installing Attachments On The Hose
Installing Attachments on the Hose To attach tools to the hose, push lightly while twisting the smaller end of the hose into the tool. Extension Tubes Attach one or two Extension Tubes for extended reach. Surface Nozzle Use on bare floors and under low furniture. Duster Brush Remove dust from contoured or irregular surfaces. - Page 26 Crevice Tool with Removable Brush Use the Crevice Tool with the brush to remove dirt from corners, button tufts, radiator coils and sliding window tracks. Remove the brush to clean cracks, crevices, corners, grooves and narrow openings. Suction Control Grip Slide the valve on the Suction Control Grip to adjust the level of suction.
-
Page 27: Blower/Inflator
Blower/Inflator Convert the Kirby ® system to a blower by attaching the hose to the Exhaust Port. Remove the Power Nozzle. See Page 22. Place the hooks on the back of the Air Intake Guard over the Attaching Bar on the front of the unit. Push the Air Intake Guard up against the unit and turn the Accessory Lock clockwise to secure. -
Page 28: Portable Sprayer
Portable Sprayer The Portable Sprayer is only used in the blower mode. See page 26. It is used to spray water-based liquids. Set up the Portable Sprayer. Unscrew the jar and fill it ¾ full with non-flammable liquid. Make sure the dip tube is attached to the Portable Sprayer before screwing the jar on tightly. - Page 29 Cleaning the Portable Sprayer Clean the Portable Sprayer immediately after use. Empty the jar. ONLY clean with warm soapy water. Never clean the Portable Sprayer with flammable cleaning fluids. Remove and wash the dip tube. (Make sure to reinstall it after cleaning) Press the two latches on the front of the nozzle jet, pull it out, and thoroughly rinse.
-
Page 30: Portable Shampooer
Vacuum the surface to be cleaned. Assemble the Portable Shampooer in the same manner as the Portable Sprayer. See page 27. Fill jar to the first line with water. Add Kirby ® Carpet Shampoo until the liquid reaches the second line on the jar. -
Page 31: Optional Accessories
Zippbrush The Zippbrush can be used for vacuuming upholstery and carpeted steps. It can be used to clean automotive interiors. For best results, do not press down heavily on the Zippbrush. Allow it to rotate at maximum speed by gently moving it over the surface being cleaned. -
Page 32: Multi-Surface Shampoo System: Carpets
Multi-Surface Shampoo System The Multi-Surface Shampoo System is used for the shampooing of carpets and the cleaning of hard surface floors. Converting to a Shampoo System for Carpets Maintain the cleanliness of carpets by shampooing regularly. Clean spots and high traffic areas more frequently. Vacuum carpet thoroughly before shampooing. - Page 33 Turn the Multi-Surface Shampoo System over and pull up on the Belt to loosen and remove the Rotary Mop. Slide the Belt from the Multi-Surface Shampoo System over the center of the carpet brush roll and insert it into the Multi- Surface Shampoo System.
- Page 34 Connect the hooks on the rear of the Multi-Surface Shampoo System to the Attaching Bar. Push the Multi-Surface Shampoo System up against the unit and turn the Accessory Lock clockwise to lock in place. Use the handle on the Multi-Surface Shampoo Nozzle Belt Lifter to turn it clockwise until the green arrows line up.
- Page 35 One tankful of solution filled to the third line will clean a large carpet area about 10 x 12 feet in size (3x3.5m). Use only Kirby cleaning solutions, such as Kirby ® ® Carpet Shampoo, intended for use with this product.
- Page 36 Shampooing Carpets Step on the upper pedal of the Toe-Touch Control until the Multi-Surface Shampoo System is at its lowest position. Turn the Suds Control Valve to the Carpet Setting. Turn the unit on. As the unit is moved back and forth, foam will release and the brush will work it into the carpet.
- Page 37 Cleaning The Multi-Surface Shampoo System Turn the Suds Control Valve to the off position. Push the Toe-Touch Control Bottom Pedal all the way down to raise the nozzle and tray. Let the unit run for several seconds to allow any remaining shampoo and water to spin off the brush.
- Page 38 Turn the Accessory Lock counterclockwise. Lift off the Multi-Surface Shampoo System and carry it to the sink. Rinse all areas of the Multi-Surface Shampoo System, and remove any lint from brush tufts. Shake excess water from the unit. Allow all parts to dry thoroughly. Rotate the Shampoo Tank away from the unit and lift off.
-
Page 39: Multi-Surface Shampoo System: Hard Floors
Multi-Surface Shampoo System: Hard Floors The Multi-Surface Shampoo System can be used to clean hard floors by inserting the Rotary Mop and cleaning with Kirby ® Hard Floor Cleaner. Before cleaning hard floors, vacuum or sweep the floor to remove large debris. - Page 40 Turn the Multi-Surface Shampoo System over and pull up on the belt to loosen and remove the Carpet Shampoo BrushRoll. Slide the Belt from the Multi-Surface Shampoo System over the center of the Rotary Mop and insert it into the Multi- Surface Shampoo System.
- Page 41 Press the Toe-Touch Control Bottom Pedal all the way down to raise the front of the unit. Connect the hooks on the rear of the Multi-Surface Shampoo System to the Attaching Bar. Push the Multi-Surface Shampoo System up against the unit and turn the Accessory Lock clockwise to lock in place.
- Page 42 Clean Hardwood or Laminate Floors Attach the empty Shampoo Tank to the Air Exhaust Port. It is not necessary to attach the elbow hose. Spray a fine mist of Kirby Hard Floor Cleaner Ready to Use ® on a small area of the floor. Do not over-wet floor.
- Page 43 Press the Toe Touch Control Upper Pedal repeatedly until the Rotary Mop contacts the floor. Move the Kirby system over ® the area to be cleaned. Spray additional cleaner as needed. If necessary, empty the Waste Tray during shampooing. Check the clear indicators on the edge of the Waste Tray Cover.
- Page 44 Clean Vinyl or Tile Floors Fill the Shampoo Tank with warm water to the first line. Add one tank cap full of Kirby Hard Floor Cleaner Concentrate. ® Using the large cap from the top of the tank, pour one...
- Page 45 Turn the Suds Control Valve clockwise to the Hard Floor Setting. Put Tech Drive power assist in neutral. Turn the ® unit on. As the unit is moved back and forth, cleaning solution will release and the Rotary Mop will scrub the floor. Turn the Suds Control Valve to the OFF position.
-
Page 46: Miracle Shine Kit
Bring a high gloss to hard surface floors with the Miracle Shine kit. Vacuum the floor and/or clean with the Multi-Surface Shampoo System for Hard Floors before applying Kirby ® Miracle Shine. Allow floor to dry completely. Convert the Kirby ®... - Page 47 Miracle Shine in an even layer. For best results, only go over the area with one or two quick passes; additional passes of the Kirby ® system may cause streaks. Spray additional solution...
- Page 48 Allow floor to completely dry before walking on surface. Disassemble and clean all parts of the Multi-Surface Shampoo System using a mixture of 50% ammonia and 50% water to remove any build up of Kirby ® Miracle Shine. Allow parts to dry before storage. If necessary,...
-
Page 49: Tile & Grout Kit
Attach the empty Shampoo Tank to the Air Exhaust Port. It is not necessary to attach the elbow hose. This setting allows airflow through the system. Working in small sections, lightly apply Kirby ® Tile & Grout Pre-Treat directly to discolored or stained grout lines. - Page 50 Make sure Tech Drive power assist is in neutral and turn ® the cleaner on. Press the Toe Touch Control Upper Pedal repeatedly until the Tile and Grout brush roll contacts the floor. Move the cleaner over the area to be cleaned. Spray additional cleaner as needed.
-
Page 51: Hard Floor Pad
Hard Floor Pad For additional floor protection from possible scratches, the optional Hard Floor Pad can be used when vacuuming bare floors. NOTICE For use on dry floors only. Turn the unit off. Step on the bottom pedal of the Toe-Touch Control to raise the Power Nozzle. -
Page 52: Turbo Accessory
Turbo Accessory The Turbo Accessory can be used as a sander, a polisher, or for scouring. The Turbo Accessory is used with the hose on the front of the unit. Turbo Sanding Assemble the Turbo Sander. First, unsnap the sander dust shroud and lift off. - Page 53 Grip the Turbo Accessory at the front and rear and turn the Kirby system on. Press the button on the top of the ® Turbo Accessory to turn on. While applying light pressure, move it over the surface slowly. Allow the Turbo Accessory to do the work. Don’t force it or lean heavily on it.
-
Page 54: Maintenance
MAINTENANCE ALWAYS turn off the unit and unplug it from the wall outlet prior to doing any maintenance. Changing the Power Nozzle Belt After removing the Power Nozzle, turn the Belt Lifter clockwise until the green arrows line up. Unlock the Rug Plate by unhooking the two latches on the rear of the Power Nozzle. - Page 55 One of the Brush Roll ends is larger than the other. The Brush Roll will only fit in the Power Nozzle one way. Center the belt on the Brush Roll. NOTICE Property Damage Risk. Use only genuine Kirby ® replacement parts. Failure to follow this warning could result in property damage.
- Page 56 MAINTENANCE Adjusting the Brush Roll Height The Brush Roll height is adjustable. The bristles, which wear down after long periods of use, can be extended. Follow the directions for changing the Power Nozzle belt on page 53. When the brush has been removed, select the Brush Roll height.
- Page 57 The new replacement cord should be attached to the unit first before it is plugged into the wall outlet. Headlight Replacement If one or more of the LED lights in the Headlight burn out, contact an authorized Kirby ® Distributor for replacement.
- Page 58 Servicing a double insulated appliance requires extreme care and knowledge of the system and should be done only by qualified service personnel. Replacement parts for this double insulated model must be genuine Kirby parts for ®...
-
Page 59: Troubleshooting
1. Make sure the Power Cord is plugged into an outlet and that the outlet has power. 2. Make sure the cord is fully inserted into the unit. 3. Check the Power Cord for damage. If it is damaged, have it replaced by an authorized Kirby Distributor. ®... - Page 60 3. Remove the Shampoo Tank from the unit and check that the foam filter is in place on the bottom of the large opening that connects to the Exhaust Port. 4. Use only Kirby Carpet Shampoo. Verify that the proper mixture of water and Kirby ® ®...
- Page 61 KIRBY HOME CARE PRODUCTS ® NOTICE Only use genuine Kirby ® cleaning products with the Kirby ® Home Care System. Failure to follow this warning could result in property damage. WARNING – To reduce the risk of fire and electric shock due to internal component...
- Page 62 Miracle Shine Bring a durable, high gloss to hard surface floors. Kirby Home Care Products are available from your authorized Kirby ® ® Distributor, online at www.kirby.com (where available), or by calling: United States: 1-800-437-7170 (M-F, 8:00AM - 5:00 PM EST)
- Page 63 INDEX Accessory Lock ... .23 Disposable Filter Bag ..13 Rotary Mop....38 Assembling the Unit .
- Page 64 Benelux 2092232 Italy 38610-00 0584961 Sweden Canada 98401 49181 127585 98546 0584961 137881 Japan 2638641 Switzerland 2011083 2742137 0584961 Kirby ® 162067 Korea United Kingdom Kirby 162071 ® 0822516 0433439 Kirby 162068 ® 0829774-0001 0584961 0829774-0002 1090578 0829774-0003 0830022 Other patents pending...
- Page 65 Have a Question? Need Assistance? Your local independent authorized distributorship is available to answer any questions regarding your purchase or the operation of your Kirby Home Care System. ® Or, contact The Kirby Company: consumer@kirby.com United States: 1-800-494-8586 (M-F, 8:00AM - 5:00 PM EST)
- Page 66 For assistance, contact your local Authorized Distributor. For assistance, contact your local authorized Distributor. The Kirby Company, a division of The Scott Fetzer Co., The Kirby Company, a division of The Scott Fetzer Co., 1920 West 114 th Street, Cleveland, OH 44102, U.S.A.
Need help?
Do you have a question about the AVALIR2 and is the answer not in the manual?
Questions and answers
Having trouble getting belt on
To install the belt on a Kirby AVALIR2:
1. Place the belt onto the middle of the brush roller.
2. Align the side rollers so both show the number “1”.
3. Press the brush roller into place.
4. Through the hole, locate the hook for the belt lifter tool.
5. Use the belt-on/belt-off tool to rotate the hook counterclockwise. This grabs the belt, adds tension, and lifts it into the “on” position.
6. Slide the bottom grill plate onto the front side of the power head using its two hooks, then roll it into place.
Make sure to check for and remove any hair or grime before reassembly.
This answer is automatically generated