
Related Manuals for ISG S200


Summary of Contents for ISG S200
- Page 1 User’s Guide S200 Portable Thermal Printer © May 2018 Identification Systems Group Document # 122041...
- Page 2 Copyright Declaration Information in this manual is subject to change without notice and does not represent a commitment on the part of Identification Systems Group. No part of this manual may be reproduced or transmitted in any form by any means, for any purpose other than the purchaser’s personal use, without the expressed written permission of Identification Systems Group.
- Page 3 Agency Compliance and Approvals 2014/30/EU(EMC), 2014/35/EU(LVD), 2011/65/EU(RoHS 2.0) EN 55032 Class B EN 55024 EN61000-3-2:2014 EN61000-3-3:2013 EN 60950-1 FCC part 15B, Class B This equipment has been tested and found to comply with the limits for a Class B digital device, pursuant to part 15 of the FCC Rules. These limits are designed to provide reasonable protection against harmful interference in a residential installation.
- Page 4 TP TC 004/2011 TP TC 020/2011 LP0002 Important safety instructions: 1. Read all of these instructions and keep them for later use. 2. Follow all warnings and instructions on the product. 3. Disconnect the power plug from the AC outlet before cleaning or if fault happened. Do not use liquid or aerosol cleaners.
- Page 5 CAUTION: Any changes or modifications not expressly approved by the grantee of this device could void the user's authority to operate the equipment. CE Statement: This equipment complies with EU radiation exposure limits set forth for an uncontrolled environment. This equipment should be installed and operated with minimum distance 20 cm between the radiator &...
- Page 6 RF exposure warning (For Bluetooth) The equipment complies with FCC RF exposure limits set forth for an uncontrolled environment. The equipment must not be co-located or operating in conjunction with any other antenna or transmitter. Canada, Industry Canada (IC) Notices This Class B digital apparatus complies with Canadian ICES-003 and RSS-210.
- Page 7 Ce périphérique a été évalué et démontré conforme aux limites SAR (Specific Absorption Rate – Taux d'absorption spécifique) par l'IC lorsqu'il est connecté à des dispositifs hôtes spécifiques opérant dans des conditions d’utilisation mobile. (Pour le Wi-Fi) Ce périphérique a également été évalué et démontré conforme aux limites d'exposition radio-fréquence par l'IC pour des utilisations par des opérateurs mobiles (les antennes sont à...
-
Page 8: Table Of Contents
Contents Introduction....................1 1.1 Product Introduction .................. 1 1.2 Product Features ..................2 1.2.1 Printer Standard Features ..............2 1.2.2 Printer Optional Features ..............3 1.3 General Specifications ................4 1.4 Print Specifications ................... 5 1.5 Media Specifications ................. 5 Operations Overview ................. - Page 9 Diagnostic Tool ..................26 Start the Diagnostic Tool ..............26 Printer Function ................27 Calibrating Media Sensor by Diagnostic Tool ......... 28 Auto Calibration ..............28 6.3.1 Setting Wi-Fi by Diagnostic Tool (Optional) ........29 Setting Bluetooth by Diagnostic Tool (Optional) ......30 Troubleshooting ..................
-
Page 10: Introduction
Our S200 portable is designed for a rough life, inside the IP54-rated environmental case to resist dust and water and with its rubber over-mold design prepared to take up to a five-foot fall and keep printing. -
Page 11: Product Features
1.2 Product Features 1.2.1 Printer Standard Features The printer offers the following standard features. Product standard feature Direct thermal printing (receipts & partial label) Black mark reflective sensor Head open sensor 3 operation buttons (On/off, feed/pause, and cover-open buttons) 5 LEDs: 1 for printer states (green or red); 3 for Battery capacity (green or orange);... -
Page 12: Printer Optional Features
Text, bar code, graphics/image printing: Supported bar codes Supported images 1D bar code 2D bar code CODABLOCK BITMAP, Code128 subsets mode, DataMatrix, BMP, A.B.C,Code128UCC, Maxicode, PDF-417, Aztec, MicroPDF417, (Max. 256 colors EAN128, Interleave 2 of code, graphics) 5,Code 39,Code 93, Barcode (GS1 Databar) -
Page 13: General Specifications
IP54-rated environmental case with ○ shoulder strap ○ Mini type USB cable ○ Mini type USB to RS232 cable ○ Li-ion battery ○ Belt strap ○ Fork truck mount ○ Cart mount ○ 1"/2" media adapter ○ Linerless mode 1.3 General Specifications General Specifications 3.5”... -
Page 14: Print Specifications
IP42 w/o protective case Drop 1.5m (5ft) Drop 2.0m (6.5ft) w/ IP54-rated environmental case with shoulder strap 1.4 Print Specifications Print Specifications S200 Print head resolution 203 dots/inch (8 dots/mm) Printing method Direct thermal (receipts & partial label) Dot size 0.005”... -
Page 15: Operations Overview
2. Operations Overview 2.1 Unpacking and Inspection This printer has been specially packaged to withstand damage during shipping. Please carefully inspect the packaging and printer upon receiving the bar code printer. Please retain the packaging materials in case you need to reship the printer. Unpacking the printer, the following items are included in the carton. -
Page 16: Printer Overview
2.2 Printer Overview 2.2.1 Front View 1. Media cover release button 2. Media cover 3. LED indicator 4. Feed/stop button 5. Power on/off button... -
Page 17: Interior View
2.2.2 Interior View 6. Tear edge 7. Print head 8. Platen roller 9. Black mark sensor... -
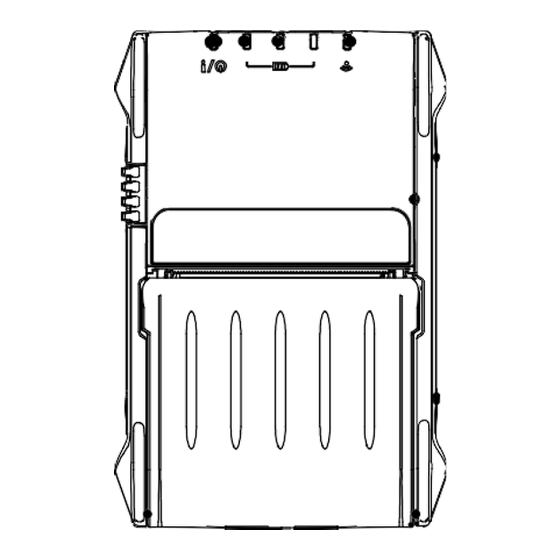
Page 18: Rear View
2.2.3 Rear View 10. Li-ion Battery 11. Battery open clasp 12. USB interface 13. Power jack 14. Interface cover... -
Page 19: Operator Control
2.3 Operator control 2.3.1 LED Indication and Keys Power on/off button Printer status LED indicator Battery charge level LED indicator Wireless status LED indicator Feed/Pause button Keys Function 1. Press and hold for 2-3 seconds to turn on the printer. 2. - Page 20 Status Indication Printer is ready Green (blinking) Printer is paused Sleep mode/ entered the sleep mode after being idle over 2 minutes. Printer status LED indicator Green (blinking every two seconds) Red (solid) Media cover is open Red (blinking) Printer error Green (blinking) Recharge the battery Amber (solid)
-
Page 21: Setup
3. Setup 3.1 Install the Battery 1. Insert the left side of battery to the slot on the rear of the printer. 2. Push the right side of the battery clasp down and lock the battery. Battery safety warning: DO NOT throw the battery in fire. DO NOT short circuit the contacts. DO NOT disassemble the battery. -
Page 22: Charge The Battery
3.2.1 Charge the Battery 1. Open the interface cover and plug the power cord in to the power jack. Note: Please switch OFF printer power prior to plugging in the power cord to printer power jack. When the battery is charging, please do not remove the battery from the printer, otherwise, please re-plug the power cord into a power outlet. -
Page 23: Charge By Charger Station (Optional)
3.2.2 Charge by Charger Station (Optional) 1. Plug the power cord to the power jack on the charger station. 2. Insert the battery along the slot to the right side of charger station as pictured. 3. Push the battery clasp and properly install the battery, it will start charging. -
Page 24: Communicate
Note: The four bay batteries charger station is also available for your reference. LED Color Description Green / Solid Battery is completely charged Red / Solid Battery is charging Red / Blinking Battery charging error No battery Battery is completely charged over 1.5~2 hrs. 3.3 Communicate 3.3.1 Connecting with the Communication Cable USB to USB Cable (Optional) -
Page 25: Connecting With Bluetooth (Optional)
USB to RS-232 Cable (Optional) 1. Open the interface cover and connect the printer to the computer with RS-232 cable. USB interface (printer) RS-232 port (PC) 3.3.2 Connecting with Bluetooth (Optional) Turn on the printer and make sure the Bluetooth Default of device is opened. -
Page 26: Loading The Media
3.4 Loading the Media 1. Open the printer media cover by pressing the media cover release button. 2. Place the media roll at the correct side and pull out enough paper over the tear edge. 3. Press the media cover on both sides to close it and make sure the media cover has closed correctly. -
Page 27: Accessories
4. Accessories 4.1 Install the Belt Clip Remove the battery on the rear of the printer and lock the belt clip on the hole above the battery. Press the ball on the belt clip to the hole as pictured. After reinstalled the battery, the printer can be hung on the belt. -
Page 28: Install The Ip54-Rated Environmental Case (Optional)
4.2 Install the IP54-rated environmental case with shoulder strap (Optional) Open the case top cover. Top cover Place the printer in the case. Note: The printing side must face the outside cover as indicated. Close the case top cover. The outside cover should be opened and fixed while printing. -
Page 29: Install The Media Adapter (Optional)
4.3 Install the media adapter (Optional) Open the printer top cover and install the media adapter in the media fixing hole as indicated. Media fixing hole The media adapters are installed in the media fixing hole on both sides. 3. The media which installed in the adapter can prevent the poor print quality. -
Page 30: Power-On Utilities
5. Power-on Utilities There are three power-on utilities to set up and test printer hardware. These utilities are activated by pressing FEED button ) then turning on the printer power simultaneously and release the button at different positions of LED indicator. Please follow the steps below for different power-on utilities. -
Page 31: Self-Test And Dump Mode
5.2 Self-test and Dump Mode Please follow the steps below. 1. Turn off the power switch. 2. Hold on the FEED button ) then turn on the power switch. 3. Release the FEED button ( ) when the indicator becomes blinking. - Page 32 Print speed (inch/sec) Print darkness Label size (inch) Gap distance (inch) Gap/black mark sensor intension Code page Country code ZPL setting information Print darkness Print speed (inch/sec) Label size Control prefix Format prefix Delimiter prefix Printer power up motion Printer head close motion Note: ®...
- Page 33 ◼ Dump mode Printer will enter dump mode after printing printer configuration. In the dump mode, all characters will be printed in 2 columns as following. The left side characters are received from your system and right-side data are the corresponding hexadecimal value of the characters.
-
Page 34: Printer Initialization
5.3 Printer Initialization Printer initialization is used to clear DRAM and restore printer settings to defaults. Printer initialization is activated by the following procedures. 1. Turn off the power switch. 2. Hold on the FEED button then turn on the power switch. 3. -
Page 35: Diagnostic Tool
6. Diagnostic Tool Diagnostic Utility is an integrated tool incorporating features that enable you to explore a printer’s settings/status; change a printer’s settings; download graphics, fonts and firmware; create a printer bitmap font; and send additional commands to a printer. With the aid of this powerful tool, you can review printer status and settings in an instant, which makes it much easier to troubleshoot problems and other issues. -
Page 36: Printer Function
6.2 Printer Function 1. Select the PC interface connected with bar code printer. The default interface setting is USB interface. If USB interface is connected with printer, no other settings need to be changed in the interface field. 2. Click the “Printer Function” button to setup. 3. -
Page 37: Calibrating Media Sensor By Diagnostic Tool
4. Click the “Calibrate Sensor” button. 5. Select the media type and click the “Calibrate” button. Note: The S200 can only support continuous, die-cut, receipt, and black mark media type. -
Page 38: Setting Wi-Fi By Diagnostic Tool (Optional)
6.4 Setting Wi-Fi by Diagnostic Tool (Optional) 1. Make sure the media is already installed and media cover is closed. (Please refer to section 3.4) 2. Turn on the printer power switch. 3. Open Diagnostic tool and set interface. (The default setting is USB) The default interface setting is USB interface. -
Page 39: Setting Bluetooth By Diagnostic Tool (Optional)
6.5 Setting Bluetooth by Diagnostic Tool (Optional) 1. Make sure the media is already installed and media cover is closed. (Please refer to section 3.4) 2. Turn on the printer power switch. 3. Open Diagnostic tool and set interface. (The default setting is USB) The default interface setting is USB interface. -
Page 40: Troubleshooting
7. Troubleshooting 7.1 Common Problems The following guide lists the most common problems that may be encountered when operating this bar code printer. If the printer still does not function after all suggested solutions have been invoked, please contact the Customer Service Department of your purchased reseller or distributor for assistance. - Page 41 Missing printing on the left or * Wrong label size setup. * Set the correct label size. right side of label * The print head is dirty. * Clean the print head. Gray line on the blank label * The platen roller is dirty. * Clean the platen roller.
-
Page 42: Maintenance
8. Maintenance This session presents the clean tools and methods to maintain your printer. 1. Please use one of following material to clean the printer. ◼ Cotton swab ◼ Lint-free cloth ◼ Vacuum / Blower brush ◼ 100% Ethanol or Isopropyl Alcohol 2. - Page 43 About the ISG The Identification Systems Group (ISG) is a nationwide network of local experts in identification, security, tracking and card personalization technologies, providing high quality, cost-effective solutions backed by local support and the strength of our Professional Services Certification program. Each member company works together to provide seamless support and collaboration in the identification and issuance www.IdentificationSystemsGroup.com...
Need help?
Do you have a question about the S200 and is the answer not in the manual?
Questions and answers