Table of Contents
Advertisement
Quick Links
Advertisement
Table of Contents

Related Manuals for eMachines eOne


Summary of Contents for eMachines eOne
- Page 1 Version 1.1...
- Page 2 ......................Important Safety Instructions The following instructions pertain to the risk of fire, electric shock or bodily injury.
- Page 3 ......................Maintenance If the product does not operate normally, adjust only those controls that are covered by the operating instructions.
- Page 4 ......................Wichtige Sicherheitsvorschriften Unbedingt Beachten Allgemeine Sicherheit...
- Page 5 ......................Wartung Des Computers Wenn der Computer nicht ordnungsgemäß...
- Page 6 Before You Reading The information in this user’s guide is subject to change without notice. Emachines shall not be liable for technical or editorial errors or omissions contained herein; nor for incidental or consequential damages resulting from the furnishing, performance, or use of this material.
- Page 7 ......................Blank .
-
Page 8: Table Of Contents
CONTENTS Chapter 1 Introduction System Features ................1-1 System Overview ................1-2 Front View ................1-2 Rear View ................1-6 Side View ................. 1-7 Chapter 2 Setting Up Your System 1. Selecting a Location ..............2-1 2. Connecting Your Peripheral Devices .......... 2-2 Connecting a Power Cord ............ - Page 9 ......................Chapter 3 Using Your Computer Using a Floppy Disk Drive .............
- Page 10 ......................Chapter 5 Using Restore CD Restoring Your Original Software ........... 5-1 Installing Drivers or Application Programs ........5-4 Appendix A Specifications Specifications .................. A-1 Appendix B Solving Common Problems Power ....................B-1 Suspend (Sleep) & Wake up ............B-1 Hard Disk Drive ................
- Page 11 ......................Blank ...........................................
-
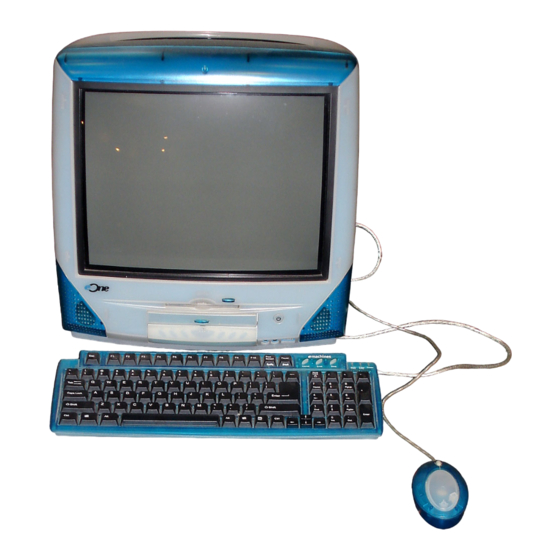
Page 12: Introduction
Chapter 1 Chapter 1 Chapter 1 Chapter 1 Chapter 1 Introduction Introduction This chapter describes the major features of your computer. System Features Your computer offers the following features: This all-in-one system was designed for simple setup and operation Intel Celeron processor in a PPGA package Built-in 64MB SDRAM main memory ATI RAGE XL video controller and 8MB SDRAM of video memory for 3D graphics... -
Page 13: System Overview
......................System Overview Front View NOTE... - Page 14 ......................3.
- Page 15 ......................9.
- Page 16 ......................14.
-
Page 17: Rear View
......................Rear View 1. -
Page 18: Side View
......................Side View Cables can be extended beneath closed door. - Page 19 ......................7.
- Page 20 ......................10.
- Page 21 ......................Blank .
-
Page 22: Setting Up Your System
Chapter 2 Chapter 2 Chapter 2 Chapter 2 Chapter 2 Setting Up Your System Setting Up Your System This chapter describes how to set up and turn on/off your system. Just follow the steps in this chapter. 1. Selecting a Location Before you set up your computer, it is important to choose a safe and convenient location that provides the following: A large, sturdy desk or table strong enough to support the weight of your system... -
Page 23: Connecting Your Peripheral Devices
......................2. -
Page 24: Connecting A Keyboard
......................Connecting a Keyboard Plug the keyboard cable connector into the keyboard connector on the right side of your system. -
Page 25: Connecting An Ethernet Cable
......................Connecting an Ethernet Cable Your system contains a RJ45 jack on the right side of your system for attaching an Ethernet cable, which is used in 10Base-T network. -
Page 26: Connecting Modem/Homepna Cables
......................Connecting Modem/HomePNA Cables Your system contains a modem/HomePNA connector on the right side. -
Page 27: Connecting External Audio Devices
......................Connecting External Audio Devices Your computer has three integrated audio jacks (headphone jack, speaker out jack, and microphone jack) and one MIDI/Game port connector. -
Page 28: Connecting An Audio/Video Input Device
......................Connecting an Audio/Video Input Device You can use an audio/video device as an input device by using the RCA jacks. -
Page 29: Connecting The Usb Devices
......................Connecting the USB Devices If you have the USB devices, you can connect these to the USB connectors on the front and side of your system. -
Page 30: Turning The Computer On And Off
......................3. -
Page 31: Turning Off The Computer
......................11. -
Page 32: Turning On The Computer
......................Turning On the Computer To turn on your computer, follow these steps: 1. - Page 33 ......................Blank .
-
Page 34: Using Your Computer
Chapter 3 Chapter 3 Chapter 3 Chapter 3 Chapter 3 Using Your Computer Using Your Computer Using a Floppy Disk Drive Insert the disk with the label facing up and the metal shutter leading into the drive and then slide the disk into the drive until it clicks into place. CAUTION Never remove a disk or turn off the computer while a disk drive reads or... -
Page 35: Using A Cd-Rom Drive
......................Using a CD-ROM Drive The CD-ROM drive is a read-only device that lets you play most commercially available sound and video CDs on the computer. -
Page 36: Removing A Disc
......................3. -
Page 37: Playing An Audio Cd On The Power Off Status
......................Playing an Audio CD on the Power Off Status You can play the audio CD on the power off Status, by using Audio CD subsystem. -
Page 38: Using Special Keys On The Keyboard
......................Using Special Keys on the Keyboard Keys on the keyboard, that are described in the following table serve special functions when your computer is running your operating system or application... - Page 39 ......................Purpose Internet Press this button to launch the Internet browser.
-
Page 40: Using A Mouse
......................Using a Mouse Scroll button Right mouse button... -
Page 41: Controlling The Display Settings
......................Controlling the Display Settings Changing the Display Resolution and Color Depth To change the display resolution and color depth, follow the next steps:... - Page 42 ......................Monitor Control Overview Contrast Slider: Used to adjust the picture contrast level.
- Page 43 ......................Pincushion: To correct the barrel distortion of the image, click it and adjust the above slider.
-
Page 44: Using Tv Composite Video Input (Ntsc)
......................Using TV Composite Video Input (NTSC) Your system has three RCA jacks (one video-in jack and two audio-in jacks) for video input. -
Page 45: Using The Button Manager
......................Using the Button Manager Your system provides a Button Manager program for using the Audio CD control and mapping a program to the Short-cut keys (Internet and Email) on the upper-right... -
Page 46: Using The Anypoint (Homepna)
1. Connect the telephone line, for using as the HomePNA line, to the wall or phone jack on the side panel of your system. 2. Turn on the system and press the Del key when you see the “emachines” logo to enter the Setup program. When you enter the Setup program, you will see the Setup menu. -
Page 47: Controlling The Audio Volume
......................CAUTIONS When you want to use the HomePNA, make sure the LAN cable is not connected to your system. -
Page 48: Using The Internal Microphone
......................NOTE The default setting of the Microphone Mute option in the Master window is the check, but has no effect on record and speaker volume. -
Page 49: Using The Built-In Lan
......................Using the Built-in LAN To use the built-in LAN, refer to the following: Connecting the LAN cable to your system. -
Page 50: Enabling The Onboard Lan Option
To enable the Onboard LAN option in the Setup program, follow these steps: 1. Turn on the system and press the Del key when you see the “emachines” logo to enter the Setup program. When you enter the Setup program, you will see the Setup menu. -
Page 51: Verifying The Setting
......................Verifying the Setting To verify that your LAN is properly set, follow these steps: 1. -
Page 52: Using A Pcmcia Card Socket
......................Using a PCMCIA Card Socket You can add external devices, such as TV tuner, memory, hard disk, and SCSI I/F, etc., by using the PCMCIA card. -
Page 53: Inserting Pcmcia Cards
......................Inserting PCMCIA Cards PCMCIA cards are generally marked with a symbol (such as a triangle or an arrow) to indicate which end should be inserted into the slot. -
Page 54: Removing Pcmcia Cards
......................CAUTIONS Your system takes more than 40 seconds recognizing the PCMCIA card. -
Page 55: Configuring Pcmcia Cards
......................Configuring PCMCIA Cards A PCMCIA card configuration utility: Notifies you whenever a PCMCIA card is inserted and tells you how the card is... -
Page 56: Using The Bios Setup Program
Chapter 4 Chapter 4 Chapter 4 Chapter 4 Chapter 4 Using the BIOS Setup Program Using the BIOS Setup Program This chapter explains how to use the BIOS Setup program. You can use the Setup program to change the computer’s configuration information and boot-up sequence, etc. -
Page 57: Entering The Setup Program
......................Entering the Setup Program To enter the Setup program, turn the computer on and press DEL as soon as you see the “emachines” logo. If you do not press the key quickly, the computer starts loading the operating system. -
Page 58: Help Window
......................The next table shows the function keys available for menu screens. -
Page 59: Bios Setup Program
......................BIOS Setup Program Main Menu This menu reports processor and memory information and is for configuring the... - Page 60 ......................IDE Device Configuration Submenus This submenu is for configuring IDE devices, including: Primary IDE master/slave...
-
Page 61: Advanced Menu
......................Advanced Menu This menu is for setting advanced features that are available through the chipset. - Page 62 ......................I/O Device Configuration Submenu This submenu is for the configuring the I/O devices.
-
Page 63: Security Menu
......................Security Menu This menu is for setting passwords and security features. - Page 64 ......................The table shows the effects of setting the Supervisor and User passwords.
-
Page 65: Power Menu
......................Power Menu This menu is for setting power management features. -
Page 66: Boot Menu
......................Boot Menu This menu is for setting the boot features and the boot sequence. - Page 67 ......................Blank .
-
Page 68: Using Restore Cd
Chapter 5 Chapter 5 Chapter 5 Chapter 5 Chapter 5 Using Restore CD Using Restore CD Use the Restore CD for the following: To restore all software including Windows 98. To restore lost or destroyed drivers or application programs. Restoring Your Original Software The Restore CD contains a copy of all software (e.g., Windows 98, drivers, and application programs) originally preinstalled on your hard disk. - Page 69 ......................Follow these steps to restore your original preinstalled software: 1.
- Page 70 ......................9.
-
Page 71: Installing Drivers Or Application Programs
......................Installing Drivers or Application Programs If you lose a driver or application program, install it by using the Restore CD that came with your system. -
Page 72: Specifications
Appendix A Appendix A Appendix A Appendix A Appendix A Specifications Specifications Feature Specifications Processor • Intel Celeron processor in a PPGA package • 66 MHz bus speed • The processor depends on the model of computer you purchased. System Memory •... -
Page 73: Specifications
......................Feature Specifications Power Supply... -
Page 74: Solving Common Problems
Appendix B Appendix B Appendix B Appendix B Appendix B Solving Common Problems Solving Common Problems This chapter instructs you how to deal with the problems you might experience when using your computer. The problem is listed first, followed by the solution. Read it before calling a technician if a problem occurs. -
Page 75: Hard Disk Drive
......................Cause Solution My computer Please, wait about 1 minute. makes no response It will take about 1 minute that your system awakes from suspend mode, to pressing any key in case you set the Onboard LAN option to Enabled in the Setup on the keyboard or program. -
Page 76: Display & Monitor
......................Display & Monitor Cause Solution The monitor doesn’t There are some interference between the hardware component and display properly the monitor. Unplug the power cord from your computer and wait about 5 seconds for discharge. Then plug the power cord and restart your computer. The brightness and contrast controls aren’t set properly. -
Page 77: Audio
......................Audio Cause Solution How do I control To control the audio volume level, use the volume control button. the audio volume For controlling the audio volume, there are two buttons (up and down) level behind the door on the front panel of your computer. Press the volume buttons to control the audio volume. -
Page 78: Floppy Disk Drive
......................Floppy Disk Drive Cause Solution Floppy disk drive Diskette is incorrectly inserted. light stays on Remove the diskette and reinsert it. Diskette is damaged. Use another diskette or check the diskette by running ScanDisk. (For detail information, refer to your Windows 98 manual.) Floppy disk drive Diskette is unformatted. -
Page 79: Game
......................Game Cause Solution The DOS game need to IRQ and DMA values for sound. The DOS game program requests To see the values, follow the next steps: IRQ and DMA 1. Click the Start button, point to Settings, click Control Panel, and then values for sound double-click the System icon. -
Page 80: Limitation
......................Limitation Refer to the following limitation: 1. Your system’s monitor supports only single frequency (fixed horizontal frequency), as it supports the next three resolutions in Windows 98: 640 × 480, 120Hz (V), and 63.7KHz (H) 800 × 600, 90Hz (V), and 56.6KHz (H) 1024 ×... - Page 81 ......................Blank ........................................... Solving Common Problems...
-
Page 82: Approval Statements
The equipment described in this manual generates, uses, and can radiate radio- frequency energy. If it is not installed and used properly-that is, in strict accordance with emachines's instructions-it may cause interference with radio and television reception. This equipment has been tested and found to comply with the limits for a Class B digital device in accordance with the specification in Part 15 of FCC rules. -
Page 83: Battery Warning Instruction
(That is make certain the computer and the television or radio are on circuits controlled by different circuit breakers or fuses) If necessary, consult an emachines-authorized service provider or emachines. See the service and support information that came with your emachines product. Or, consult an experienced radio/television technician for additional suggestions. Important Changes or modifications to this product not authorized by emachines, Inc., could... -
Page 84: Fuse Warning Instruction
......................Vorsicht Explosionsgefahr bei unsachgemäß em Austausch der Batterie. Ersatz nur durch denselben oder einen vom Hersteller empfohlenen ähnlichen Typ. Entsorgung gebraushter Batterien nach Angaben des Herstellers. Fuse Warning Instruction Caution For continued protection against risk of fire, replace only with same type and rating of fuse. - Page 85 ......................Use of controls or adjustments or performance of procedures other than those specified herein may result in hazardous radiation exposure. Do not open the top cover of the drive and never touch the internal parts in order to avoid EXPOSURE TO INVISIBLE LASER RADIATION. When the power switch is On, do not place your eyes close to the font panel opening door and other openings to look into the inside of the drive.
- Page 86 ......................PRODUCT COMPLIES WITH DHHS RULES 21 C.F.R. SUB-CHAPTER J, IN EFFECT AT THE DATE OF MANUFACTURE. CLASS 1 LASER PRODUCT LASER KLASSE 1 LUOKAN 1 LASERLAITE KLASS 1 LASER APPARAT APPAREIL A LASER DE CLASSE 1 EN60825 VORSICHT - UNSICHTBARE CAUTION - INVISIBLE LASERSTRAHLUNG, WENN ABDECKUNG...
-
Page 87: Notification To The Telephone Company
......................Notification to the telephone company This equipment complies with Part 68 of the FCC rules, you will find FCC Label located on the rear side of the enclosure. This label contains the FCC registration Number and Ringer Equivalence Number (REN) for this equipment. If requested, provide this information to your telephone company. -
Page 88: Malfunction Of The Equipment
......................Malfunction of the equipment Repairs to the machine should only be made by authorized service center agency. This applies at any time during or after the service warranty period is null and void. If you find the telephone line is damaged or the telephone company notifies you that your machine is causing damage, disconnect the machine from the telephone line and call for service. - Page 89 ......................Blank ........................................... Approval Statements...
Need help?
Do you have a question about the eOne and is the answer not in the manual?
Questions and answers