
Related Manuals for COOSPO BC26


Summary of Contents for COOSPO BC26
- Page 1 USER MANUAL SCAN for more 詳しくはこちら Nach mehr SUCHEN SCANNEZ pour plus ESCANEAR para más Cerca altro A l l A b o u t P a s s i o n...
-
Page 2: Button Function
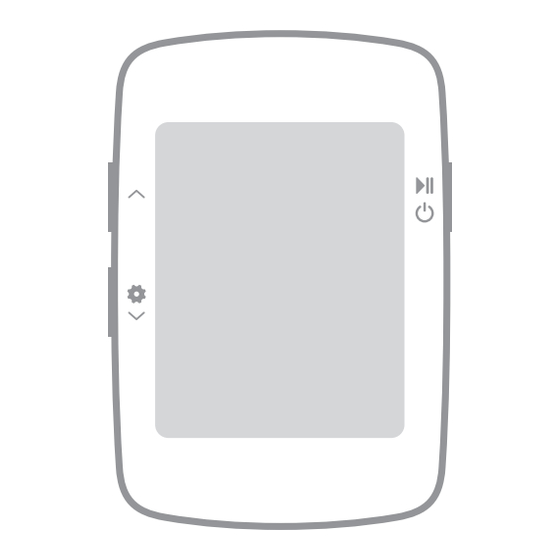
Button function Up Left Short Press: Switch Data Type / Numerical Value Left Down Short Press: Switch Data Type / Numerical Value Long Press: Enter / Exit Setting Mode Right Button Short Press: Power on / Start Riding / Switch Settings Long Press: Power off... -
Page 3: Status Icons
Status Icons Time Total riding time No satellite signal Time zone Satellite signal level Hour Alert sound on / off Unit Ft / Km / m / mi Riding Manual pause /Auto pause Bluetooth connected Battery level Average speed Maximum speed Miles per hour Kilometers per hour TIME DSTALTODO TOTUTChFtKMi... -
Page 4: Standard Accessories
Standard accessories TIME DSTALTODO TOTUTChFtKMi Main Device x 1 Charging Cable x 1 User Manual x 1 Standard bike Rubber pad for Big size rubber ring x 2 mount x 1 standard bike mount x 1 Small size rubber ring x 2 - 4 -... -
Page 5: How To Install
How to Install Standard Mount Installation 1. Install the rubber pad 2. Tie the mount onto the 3. Tie up the mount onto the mount bar with the rubber rings 4. Install the main device 5. Rotate the main device for 6. - Page 6 Charging Please charge the device before first time use. Please use DC 5V power adaptor for charging. During the charging, the battery icon will flash until fully charged. USB DC 5V power adaptor / Computer Open the rubber cover, connect the device with usb cable to charge The product has a built-in battery.
- Page 7 Time Setting and Auto Backlight Acquiring Satellite Signals BC26 uses GPS for speed tracking, and please make sure the device is outdoor and under a clear view of sky when using it. Usually it may take 15~90 seconds for the bike computer to locate satellite signals, remain stationary when acquiring satellite signals.
-
Page 8: Time Zone Setting
Time Zone Setting Long press to enter the setting mode (P1~P3), P1 time zone setting, the currently set numerical value flicker display; Short press to switch numerical value; Short press to confirm the current setting, and enter the next digit or the next setting (P2 metric / imperial setting);... - Page 9 Setting Metric and Imperial Units Long press to enter setting mode (P1~P3), short press to enter P2 metric / imperial setting; Short press to switch between metric (KMH) / imperial (MPH); Short press to confirm the current setting and enter the next setting (P3 speed alert setting).
- Page 10 Maximum Speed Alert Setting Long press to enter the setting mode (P1~P3), short press to enter the P3 maximum speed alert setting, the currently set numerical value flicker display; Short press to switch numerical value; Short press to confirm the current setting and enter the next digit setting or the next setting;...
-
Page 11: Gps Positioning
GPS Positioning Auto GPS positioning after the bike computer is power on. Please start cycling after the GPS positioning is successful. Please make sure you are outdoor when positioning. Bad weather and dense forest may affect GPS signal. You can stand still 3-5 minutes to get more connections with satellites for better GPS signal. - Page 12 Cycling Turn on the device, short press to start riding, short press to pause / start; Long press to end riding (when the speed is 0 or there is no data during riding, or when the speed is too low, the bike computer will automatic pause / automatic start ;...
- Page 13 Riding Data Display Short press cycle to switch real-time speed, maximum speed, and average speed. Short press cycle to switch time, distance, altitude and time & distance display mode automatically switch data. Real-time Speed Maximum Speed Average Speed Short press cycle switch 3 seconds automatic cycle switching display TIME...
- Page 14 * Bluetooth Connection Download CoospoRide in Google Play or App Store * Compatible with iOS 9.0 version and above, iphone 4s and above Any Bluetooth 4.0 enabled Android device with Android 4.3 and above - 14 -...
- Page 15 Power on the bike computer; Open the CoospoRide App, enter the binding cycling computer step, select the BC26 bike computer in the device list to bind the device, (the phone needs to turn on Bluetooth and allow Bluetooth permissions); Bind device...
- Page 16 In the activity page of the App, click on the connected device to enter the record synchronization operation page (through the authorization to Strava in the App more settings, the computer data can be synchronized to the Strava platform at the same time); Select the record to be synchronized and click Sync, and the record on the bike computer will be deleted automatically after...
-
Page 17: Basic Parameters
Basic Parameters Wireless Bluetooth Display FSTN Screen, 2.3 inch Auto Backlight Locate mode GPS & BDS Storage Format .fit Water Resistance IPX7 Weight Language English Battery Capacity 600mAh Battery Life 20 hours for a single use after fully charged Material PC+ABS Dimension 72.26x50x21.55 mm... -
Page 18: Fcc Statement
Responsibility Disclaimer The information contained in this manual just for reference. The product described above may be subject to alteration owing to the manufacturer's continuing research and development plans, without making an announcement in advance. We shall not bare any legal responsibility for any direct or indirect, accidental or special damages, losses and expenses arising from or in connection with this manual or the contained product. - Page 19 tions. However, there is no guarantee that interference will not occur in a particular installation. If this equipment does cause harmful interference to radio or television reception, which can be determined by turning the equipment off and on, the user is encouraged to try to correct the interference by one or more of the following measures: Reorient or relocate the receiving antenna.
- Page 20 Do not disassemble or attempt to service this product. This product is safe under normal and reasonably foreseeable operating conditions. If product is operating improperly, call COOSPO support. Product must be returned to the manufacturer for any service or repair. - 20 -...
Need help?
Do you have a question about the BC26 and is the answer not in the manual?
Questions and answers