Advertisement
Advertisement
Table of Contents

Related Manuals for COOSPO BC107


Summary of Contents for COOSPO BC107
- Page 1 USER MANUAL Scan to Get More Languages A l l A b o u t P a s s i o n...
-
Page 2: Button Function
Button function Left Button Short Press: Mark a new lap Hold for 2 seconds: Power off (Power on: short press the button) (Short press in setting mode: exit / return and save the setting) Mid Button Short Press: Pause / Continue (Short press to start recording after power on) Hold for 2 seconds: save the exercise record and exit the exercise... -
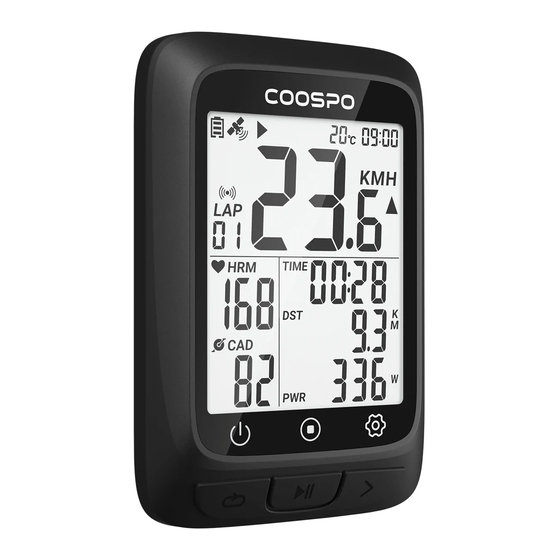
Page 3: Status Icons
Status Icons Sport time Time TIME Altitude No satellite signal Satellite signal level Odometer (Total distance) Accessory connecting status Distance Under exercising Ascend Distance Manual pause Calories Connected with App by BLE Temperature Power Battery level Time zone Average Maximum Miles per hour Kilometers per hour Increased &... -
Page 4: Standard Accessories
Standard accessories Main Device x 1 Charging Cable x 1 User Manual x 1 Standard bike Rubber pad for Big size rubber ring x 2 mount x 1 standard bike mount x 1 Small size rubber ring x 2 - 4 -... -
Page 5: How To Install
How to Install Standard Mount Installation 1. Install the rubber pad onto 2. Tie the mount onto the bar 3. Tie up the mount the mount with the rubber rings 4. Install the main device onto 5. Rotate the main device for 6. - Page 6 Charging Please charge the device before first time use. Please use DC 5V power adaptor for charging. During the charging, the battery icon will flash until fully charged. USB DC 5V power adaptor / Computer Open the rubber cover, connect the device with usb cable to charge - 6 -...
- Page 7 Acquiring Satellite Signals, Time Setting and Auto Backlight Auto Backlight This device will automatically calculate the sun rise and sun set time, from the time half an hour before sun set to half an hour after sun rise, the backlight will be automatically lighten up, in the rest of the time, the backlight will be turned off...
-
Page 8: Connecting With Ant+ Sensors
Connecting with ANT+ Sensors Please make sure the sensors are in wake-up mode(For example, the heart rate monitor should be worn on properly, and the speed cadence and power meter should be awakened by turning the pedals or wheels). Wear it correctly, The speed cadence and power meter are wake up the heart rate belt awakened by turning the pedals or wheels... - Page 9 2.1 Hold the to get into setting mode; 2.2 There are 5 settings pages available (P1 ~ P5), press the to switch to P1; 2.3 Press to select to enter; 2.4 The computer automatically searches for ANT+ peripherals, and automatically connects after searching for ANT+ peripherals;...
- Page 10 Setting the Wheel Size 1.1 Hold the to get into setting mode; 1.2 There are 5 settings pages available (P1 ~ P5), press the to switch to P2; 1.3 Press to select to enter; 1.4 Press to select the setting digit, press the to set the numbers;...
- Page 11 Common wheel size and circumference(Wheel Size L (mm) 12 × 1.75 935mm 24 × 1.75 1890mm 26 × 1-3/8 2068mm 650× 35A 2090mm 14 × 1.5 1020mm 24 × 2.00 1925mm 26 × 1-1/2 2100mm 650 × 38A 2125mm 14 × 1.75 1055mm 24 ×...
-
Page 12: Time Zone Setting
Time Zone Setting 1.1 Hold the to get into setting mode; 1.2 There are 5 settings pages available (P1 ~ P5), press the to switch to P3; 1.3 Press to select to enter (Default time zone: UTC/GMT + 08:00); 1.4 Press to select the setting digit, press the to set the numbers;... - Page 13 Setting Metric and Imperial Units Hold the to get into setting mode. There are 5 settings pages available (P1 ~ P5), press the to switch to P4. Press to enter(Default: KMH). press the to switch. Press to save and exit (Automatically exit in 6 seconds if no operation detected). Press Set the KMH/MPH Save and get back (Automatically exit if...
-
Page 14: Power Calibration
Power calibration 1.1 Hold the to get into setting mode; 2.1 There are 5 settings pages available (P1 ~ P5), press the to switch to P5, it will automatically calibrate; 2.2 Short press to recalibrate, the value flashes during the calibration, the value does not flash after the calibration is successful;... -
Page 15: Gps Positioning
GPS Positioning GPS searching is Auto after power on. Please start cycling after the GPS positioning is successful. If you start riding when the GPS is not positioned successfully (speed sensor not connected), the speed data(real-time, average, maximum) will be displayed as'' '', and the rest of the data remains the same. - Page 16 Cycling Turn on the device, press to start an exercise and recording(During the cycling, when the cycling speed is 0, the device will pause automatically, if no data get for speed, cadence and heart rate in 15 minutes the device will turn into sleep mode, press to resume).
- Page 17 * Bluetooth Connection Download CoospoRide in Google Play or App Store * Compatible with iOS 9.0 version and above, iphone 4s and above Any Bluetooth 4.0 enabled Android device with Android 4.3 and above - 17 -...
- Page 18 Power on the bike computer; Open the CoospoRide App, enter the binding computer step, select the BC107 computerin the device list to bind the device, (the phone needs to turn on Bluetooth and allow Bluetooth permissions); Bind BC107 - 18 -...
- Page 19 In the activity page of the App, click on the connected device to enter the record synchronization operation page (through the authorization to Strava in the App more settings, the computer data can be synchronized to the Strava platform at the same time);...
-
Page 20: Basic Parameters
Basic Parameters Wireless English ANT+ & Bluetooth Language Display FSTN Screen, 2.3 inch Battery Capacity 1000mAh Backlight Battery Life 28 hours for a single use after fully charged Locate mode GPS & BDS Material PC+ABS+TPU Lap Count Dimension 81x54x20.6 mm ANT+ peripherals (Heart Rate Monitor, Storage Format .fit... -
Page 21: Fcc Statement
FCC statement This equipment has been tested and found to comply with the limits for a Class B digital device, pursuant to part 15 of the FCC Rules. These limits are designed to provide reasonable protection against harmful interference in a residential installation. This equipment generates uses and can radiate radio frequency energy and, if not installed and used in accordance with the instructions, may cause harmful interference to radio communications. - Page 22 Changes or modifications not expressly approved by the party responsible for compliance could void the user's authority to operate the equipment. This device complies with Part 15 of the FCC Rules. Operation is subject to the following two conditions: this device may not cause harmful interference, and . this device must accept any interference received, including interference that may cause undesired operation.
- Page 23 L'émetteur/récepteur exempt de licence contenu dans le présent appareil est conforme aux CNR d'Innovation, Sciences et Développement économique Canada applicables aux appareils radio exempts de licence. L'exploitation est autorisée aux deux conditions suivantes : L' appareil ne doit pas produire de brouillage; L' appareil doit accepter tout brouillage radioélectrique subi, même si le brouillage est susceptible d' en compromettre le fonctionnement.
- Page 24 Do not disassemble or attempt to service this product. This product is safe under normal and reasonably foreseeable operating conditions. If product is operating improperly, call COOSPO support. Product must be returned to the manufacturer for any service or repair.
Need help?
Do you have a question about the BC107 and is the answer not in the manual?
Questions and answers
can the time be set in 12 hour time instead of 24
No, the COOSPO BC107 cannot set the time in 12-hour format; it only supports a 24-hour clock.
This answer is automatically generated