Table of Contents
Advertisement
Quick Links
Advertisement
Table of Contents

Related Manuals for iOptron iEQ45 Pro


Summary of Contents for iOptron iEQ45 Pro
- Page 1 ® ® iOptron iEQ45 Pro Equatorial Mount Instruction Manual Product #8000E...
- Page 2 Looking at or near the Sun will cause instant and irreversible damage to your eye. Children should always have adult supervision while observing. Rev. 2.1 2018.05 iOptron reserves the rights to revise this instruction without notice. Actual color/contents/design may differ from those described in this instruction.
-
Page 3: Table Of Contents
Mount Assembly ....................... 6 2.1. Parts List ............................6 2.2. Identification of Parts ........................7 2.3. iEQ45 Pro Mount Ports ........................8 ® 2.4. Go2Nova 8407+ Hand Controller ....................9 2.4.1. Key Description ........................9 ... - Page 4 ® Appendix B. iEQ45 Pro Go2Nova 8407+ HC MENU STRUCTURE ........... 34 Appendix C. Firmware Upgrade ....................... 37 Appendix D. Computer Control an iEQ45 Pro Mount ................38 ® Appendix E. Go2Nova Star List ......................39 ...
-
Page 5: Ieq45 Pro Tm German Equatorial Mount Overview
GOTO German equatorial mount is one of the next generation premium astro- imaging mounts from iOptron. Based on the success of iEQ45 mount, the iEQ45 Pro mount uses high resolution, low noise stepper motor with higher gear ration to offer better GOTO and tracking accuracy. -
Page 6: Ieq45 Pro Tm Mount Assembly
Mount Assembly 2.1. Parts List There are three shipping boxes for an iEQ45 Pro mount (#8000E). One box contains an EQ mount, an 8407+ hand controller and a Vixen/Losmandy dual dovetail saddle (attached to the mount). One Box for 2” tripod. One box contains two 11lb (5kg) counterweights (CWs) and accessories. There will be a forth box for an iEQ45 Pro AZ mount. -
Page 7: Identification Of Parts
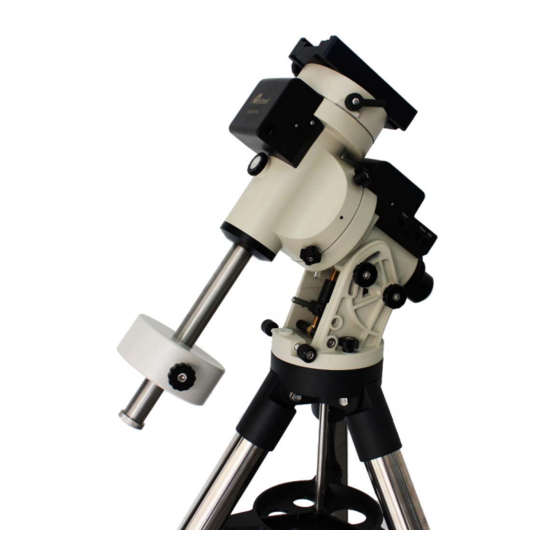
CW Locking Screw Lat. Locking Screw Lat. Adjust. Knob CW Saf ety Screw Azi. Locking Screw Azi. Adjust Knob Bubble Level Indicator Alignment Peg Tripod Head Tripod Spreader Tripod Lock Tripod Leg Leg Lock Lever Figure 1. iEQ45 Pro mount assembly... -
Page 8: Ieq45 Pro Mount Ports
Dec: For connecting to DEC driver unit Port: Auxiliary port for connecting to other iOptron accessories, such as an electronic focuser or for observatory dome control. DO NOT plug your ST-4 guiding camera cable into this port as it may damage the mount or guide camera electronics. -
Page 9: Go2Nova 8407+ Hand Controller
8407+ hand controller (HC) shown in Figure 4 is the standard controllers that used for the iEQ45 Pro mount. It has an integrated temperature controller that ensures it can be operated as low as -20ºC (-4ºF). It has a large LCD screen, function, direction and number keys on the front;... -
Page 10: The Lcd Screen
Serial port (i.e., RS232 port): connect the HC to a Computer for HC firmware upgrade via a RS232-RJ9 cable. The pin-out of the serial port is shown in Figure 5. Figure 5. Serial port pin-out on an 8407+ hand controller 2.4.2. - Page 11 9. Mount Status: Display current operation status of the mount. Stop: mount is not moving; Slew: mount is moving with an arrow key is pressed or a GOTO command, such as “Select and Slew” or “Goto Zero Position”; ...
-
Page 12: Ieq45 Pro Tm Mount Assembly
In order to get the most out of your equatorial mount it is essential to understand the concept of polar alignment and how the equatorial mount helps you establish and maintain a true Polar Axis alignment. Now you are ready to set up the GOTO functionality of the iEQ45 Pro mount – which... -
Page 13: Ieq45 Pro Mount Assembly
The iEQ45 Pro mount is a next-generation equatorial mount that provides the precision alignment capabilities required for today’s complete astronomy solution. The following sections of this manual provide the detailed steps required to successfully set up and operate the iEQ45 Pro mount. 3.2. iEQ45 Pro Mount Assembly NOTE: The iEQ45 Pro is a precision astronomical instrument. -
Page 14: Step 3. Setting The Latitude
the mount by adjusting individual tripod leg (or pier foot). You may use the build-in Bubble Level Indicator or an external level to check leveling. 3.2.3. STEP 3. Setting the Latitude Unlock the four R.A. Clutch Screws and rotate the mount 180º around the R.A. axis (Figure 10) to move the dovetail face upside. -
Page 15: Step 5. Installing Counterweight(S)
3.2.5. STEP 5. Installing Counterweight(s) iEQ45 Pro mount comes with two 11lb (5kg) counterweights (CWs). Use one or both CWs as required for your particular OTA. Additional CW(s) or shaft extension bar may be needed to balance a heavier OTA. -
Page 16: Step 7. Connecting Cables
LED will be on when the power switch is turned on. 3.2.8. STEP 8. Setup Hand Controller The iEQ45 Pro mount is equipped with a GPS receiver which will receive the time, longitude and latitude information for your current location from satellites after a link is established. However, there are still some parameters which need to be entered to reflect your location, such as time zone information and whether daylight saving time is currently in effect. - Page 17 Press ENTER and select “Set Time and Site” Set Time & Site Set Beep Set Display Set Guiding Rate Set Tracking Rate Set Parking Position Meridian Treatment Set Altitude Limit Press ENTER. A time and site information screen will be displayed: Daylight Saving Time UTC -300 Minute(s) 2014-03-09 10:19:18...
-
Page 18: Step 9. Polar Alignment
3.2.9. STEP 9. Polar Alignment In order for an equatorial mount to track properly, it has to be accurately polar aligned. With iOptron innovative Polar Scope and Quick Polar Alignment procedure, you can do a fast and accurate polar axis alignment. - Page 19 Quick Polar Alignment (1) Level the iEQ45 Pro mount. Make sure the telescope optical axis is parallel to the polar axis (R.A. axis) of the mount. If using a finder scope, adjust it to be parallel to the telescope optical axis.
-
Page 20: Step 9. Returning The Mount To Zero Position
NOTE: Thread the polar scope eyepiece all the way in after polar alignment, before put the Polar Scope Cover back on. Otherwise, the polar scope eyepiece could be stuck inside the Polar Scope Cover to cause R.A. axis jamming. NOTE: If you are located in the Southern Hemisphere, Sigma Octantis will be chosen for Polar Alignment. -
Page 21: Getting Started
4.1. Setup the Mount and Polar Alignment Assemble your iEQ45 Pro mount according to Section 3.2. Make sure the mount is leveled. Turn the mount power switch on. When the GPS receiver is connected to satellites, the hand controller LCD will display GPS OK and the mount will have the correct time and site information (this can also be entered manually as previously described). -
Page 22: Star Identifying Function
4.6. Power-Down Memorization The iEQ45 pro mount can memorize its R.A. and DEC positions if the mount loses its power by accident, even during high speed slewing. After the power is back, just do a Select and Slew to the same star when the power is lost. -
Page 23: Complete Functions Of Go2Nova ® Hand Controller
® 5. Complete Functions of Go2Nova Hand Controller The function described here is for an 8407 V2 hand controller with latest hardware. If you have an 8407 V1 hand controller, all the functions are the same, except some star catalogs. NOTE: Not all functions are available for altazimuth (AA) mode. -
Page 24: Constellations
5.3.1. Position of Polaris/SigmaOct This function displays the position of the Pole Star for Quick Polar Alignment using the ® iOptron AccuAlign polar scope. In the Northern Hemisphere the position of Polaris is displayed, while in the Southern Hemisphere the position of Sigma Octantis is shown. -
Page 25: Two Star Alignment
5.3.3. Two Star Alignment Two Star Alignment can be used to improve the accuracy of the mount’s polar alignment. Press MENU => “Alignment” => “Two Star Alignment” A list of alignment stars that are above the horizon is computed based on your local time and location. With the mount at the Zero Position, use the ▲... -
Page 26: Clear Alignment Data
5.3.8. Clear Alignment Data This will clear all alignment data created during star alignment process. If you are controlling the mount using planetarium software via ASCOM, and the software has its own alignment function, please clear the alignment data. 5.4. Settings 5.4.1. -
Page 27: Set Tracking Rate
Meade/ Losmandy/ Takahashi/ Vixen, make sure a proper guiding cable is used. Refer to your guiding camera and guiding software for detailed operation. WARNING: DO NOT plug your ST-4 guiding camera cable into the iOptron port or HBX port. It may damage the mount or guiding camera electronics. -
Page 28: Polar Scope Bright
Select one of supported language. 5.4.13. Enter Alt-Azi Mode (or Enter EQ Mode) Switch the iEQ45 Pro operation between EQ and AA modes. 5.5. Test RA Balance This function provides a visual indication and assistance balancing of R.A. axis. Before performing the balance test, make sure the mount latitude is set correctly. -
Page 29: Pec Data Integrity
1. Setup the mount with a telescope in autoguiding configuration by connecting a guiding camera via the mount’s Guide Port or using the ASCOM protocol; 2. Use MENU=>”Select and Slew” to a bright star and start tracking; 3. Select MENU=> “Settings” => “Set Guiding Rates”. Set a guiding speed from 0.10X to 0.90X. -
Page 30: Enter Other Objects Or Observation List
The hand controller will display the parameter entry screen: Enter Comet Parameter Date: 0000-00-00.0000 q: 0.000000 e: 0.000000 ω: 000.0000 Ω: 000.0000 i: 000.0000 Enter the parameters using the arrow buttons and number keys. Press ENTER and a confirmation screen will be displayed. Press ENTER again to store the object under the assigned user object number, or press BACK button to cancel. -
Page 31: Zero Position
5.11. Zero Position 5.11.1. Goto Zero Position This moves your telescope to its Zero Position. 5.11.2. Set Zero Position This set the Zero Position for the firmware. The Zero Position reference may be an undefined value after firmware upgrade, or it may be lost after HC battery replacement. -
Page 32: Maintenance And Servicing
6. Maintenance and Servicing 6.1. Maintenance The iEQ45 Pro mount is designed to be maintenance free. Do not overload the mount. Do not drop the mount as this will damage the mount and / or permanently degrade GOTO performance and tracking accuracy. -
Page 33: Appendix A. Technical Specifications
Appendix A. Technical Specifications Mount German Equatorial Mount Payload 45 lb (20kg) Mount weight 20 lb (11.4kg) Payload/Mount weight 1.75 Right Ascension worm wheel Φ130mm, 256 teeth aluminum Declination worm wheel Φ116mm, 228 teeth aluminum Right Ascension axis shaft Φ50mm steel Declination axis shaft Φ40mm steel Right Ascension bearing... -
Page 34: 8407+ Hc Menu Structure
® Appendix B. iEQ45 Pro Go2Nova 8407+ HC MENU STRUCTURE MENU Select and Slew Solar System Mercury Venus Mars Jupiter Saturn Uranus Neptune Moon Deep Sky Objects Named Object Messier Catalog NGC Catalog IC Catalog PGC Catalog Caldwell Catalog Abell Catalog... - Page 35 Alignment Position of Pole Star One Star Alignment Two Star Alignment Three Star Alignment Solar System Align Polar Interate Align View Model Error Clear Alignment Data Settings Set Time and Site Set Beep Set Display Set Guiding Rate Set Tracking Rate Sidereal Rate Lunar Rate SolarRate...
- Page 36 Test RA Balance Electric Focuser PEC Options PEC Playback Record PEC PEC Data Integrity Park Telescope Edit User Objects User Def ined Comet Add a New Comet Browse Comets Delete a Comet Clear All Comets Other Objects Add a New Object Browse Objects Delete an Object Clear All Objects...
-
Page 37: Appendix C. Firmware Upgrade
Appendix C. Firmware Upgrade The firmware in the 8407+ Hand Controller and control boards can be upgraded by the customer. Please check iOptron’s website, www.iOptron.com, under Support/”Firmware/Software”, select “iEQ 30 Pro and iEQ45 Pro” for details. -
Page 38: Appendix D. Computer Control An Ieq45 Pro Mount
Appendix D. Computer Control an iEQ45 Pro Mount The iEQ45 Pro mount can be controlled by a SmartPhone, a tablet or a computer. It is supported by two types of computer connections: Connect to a computer via RS232 serial port. An optional RS232 to USB adapter (iOptron part #8435) is needed if your computer does not have a serial port, like most of the laptops on the market today. -
Page 39: Appendix E. Go2Nova ® Star List
® Appendix E. Go2Nova Star List Messier Catalog This table is licensed under the GNU Free Documentation License. It uses material from the Wikipedia article List of Messier objects... - Page 40 Named Deep Sky Object ID No. OBJECT NGC # Messier# IC# A(Abell) U(UGC) Andromeda Galaxy Barnards Galaxy 6822 Beehive Cluster 2632 Blackeye Galaxy 4926 Blinking Planetary Nebula 6826 Blue Flash Nebula 6905 Blue Planetary 3918 Blue Snowball Nebula 7662 Box Nebula 6309 Bubble Nebula 7635...
- Page 41 Named Stars Acamar Alrescha Deneb el Okab Lalande 21185 Achernar Alshain Deneb Kaitos Lesath Achird Altair Denebakrab Mahasim Acrab Altais Denebola Maia Acrux A Alterf Dschubba Marfik Acrux B Aludra Dubhe Marfikent Acubens Alula Australis Edasich Markab Adhafera Alula Borealis El Rehla Markeb Adhara...
- Page 42 Proxima Centauri Sadalbari Sulafat Vindemiatrix Rasalas Sadalmelik Syrma Vrischika Rasalgethi Sadalsuud Talitha Wasat Rasalhague Sadr Tania Australis Wazn Rastaban Saiph Tania Borealis Regor Sargas Tarazed Wezen Regulus Scheat Taygeta Yed Posterior Rigel Schedar Tejat Posterior Yed Prior Rigel Kentaurus A Seginus Thuban Zaniah...
- Page 43 Modern Constellations Constellation Abbreviation Constellation Abbreviation Andromeda Lacerta Antlia Apus Leo Minor Aquarius Lepus Aquila Libra Lupus Aries Lynx Auriga Lyra Boötes Mensa Caelum Microscopium Camelopardalis Monoceros Cancer Musca Canes Venatici Norma Canis Major Octans Canis Minor Ophiuchus Capricornus Orion Carina Pavo Cassiopeia...
- Page 44 Double/Multi Stars RigelKentaurus A HIP 95771 105 HIP 40167 157 HIP 28790 Rigel HIP 30867 106 HIP 40817 158 HIP 4675 Gacrux HIP 35363 107 HIP 81292 159 HIP 31676 Sargas HIP 94761 108 HIP 80197 160 HIP 10176 Castor A HIP 21683 109 HIP 88060 161 HIP 25950...
- Page 45 As a condition to the obligation of iOptron to repair or replace such product, the product must be returned to iOptron together with proof-of-purchase satisfactory to iOptron.
Need help?
Do you have a question about the iEQ45 Pro and is the answer not in the manual?
Questions and answers