Table of Contents
Advertisement
Quick Links
Advertisement
Table of Contents

Related Manuals for Aram ASW-200


Summary of Contents for Aram ASW-200
- Page 1 -200 User Manual...
-
Page 2: Table Of Contents
Contents A. Components B. H/W Parts ⅰ . Both Sides ⅱ. Settings C. System Settings ⅰ . Download & Install ⅱ. How to connect with the program ⅲ.USB Connection D. Program Settings E. Application ⅰ . Start Analysis ⅱ.CRM ⅲ.One Stop Capture Mode ⅳ.Step by Step Capture &... -
Page 3: Components
Components Main body with camera Lens x1 Lens x60 Lens x200 Lens x500 Charger set Air blower Cleaning cloth Manual... -
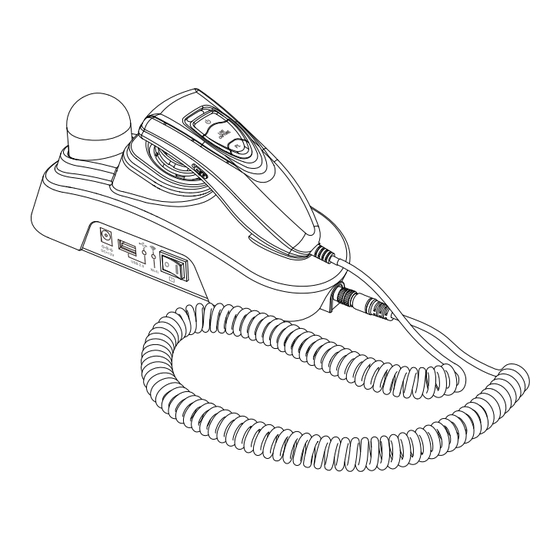
Page 4: H/W Parts
H/W Parts Both Sides Wi-Fi Initial deco LED Adaptor 12V DC Power LED USB 2.0 Port Start / Result USB connection indicator lamp Mode up Wi-Fi connection indicator lamp Mode down Power on/o S/W Optical LED AF single Lens change knob MF + MF - LED &... -
Page 5: Ⅱ. Settings
H/W Parts Settings To turn on & o the power Switch on the power. LED will be turned in blue light. While the wi-fi is turning on, the light twinkles and once it stops, the device is ready to use. To replace lens Press the button. -
Page 6: System Settings
System Settings Download & Install PC User Go to link on the browser as below. http://www.aramhuvis.com/download Install "Wizard" program. Tablet device or Smartphone user iOS : Go to "App Store" and search "aramhuvis" then download "Wizard-AramHuvis" application. Android : Go to "Google Play Store" and search "aramhuvis" then download "Wizard-AramHuvis"... -
Page 7: Ⅱ. How To Connect With The Program
System Settings How to connect with the program SSID : ASW_XXXX PW : SSID : ASW_XXXX PW : First of all, check the Wi-Fi name and password which is described at back side of camera. Wi-Fi name is "ASW_XXXX". Turn on the device. While turning on the device, prepare PC, Tablet to run the S/W. - Page 8 System Settings How to connect with the program Once “ASW” device is turned on, please go to network setting to set up the Wi-Fi connection. Among Wi-Fi lists, find “ASW-XXXX” and select it. C. System Settings - How to connect with the program...
- Page 9 System Settings How to connect with the program When above code is connected, run the program "Wizard". To check working properly, please check the program and see the le below side. If it is correctly set up, you can see the gray light of Wi-Fi singal. C.
-
Page 10: Ⅲ.usb Connection
System Settings USB Connection - PC: Wi-Fi & USB simultaneous support - For PC, you can use the program by connecting the cable to wifi or usb port. C. System Settings - USB Connection... -
Page 11: Program Settings
Program Settings General settings Change the language, analysis mode and etc. Analysis settings Set up the skin type and analysis parameter. Recommended products Available for each analysis result. Color filter Color filter It is a function that calibrates the screen color according to the user's convenience. Device activation With the model name and serial code, you can activate your device and download recommended products. - Page 12 Program Settings Analysis Setting - One Stop Capture Mode 1. One Stop Capture Mode This mode allows users to take pictures as much as they want. If users take pictures more than 3 times it will be sorted at the bottom of page. Among them users can select one image to analyze it by dragging to each parrameter’s name on right side of screen.
- Page 13 Program Settings Analysis Setting - One Stop Capture Mode Then all pictures the users chosen will appear in each section as below. In each section please select “Analysis” button to get the result. Other steps will be described as P16. (“Step by Step Mode) D.
- Page 14 Program Settings Analysis Setting - Step By Step Capture & Analysis Mode 2. Step By Step Capture & Analysis Mode As its names meaning, in each parameter you have to take pictures with hair lens. Then do analysis by selecting”Anaylsis” button on screen. D.
-
Page 15: Application Ⅰ . Start Analysis Ⅱ.crm
Application Start Analysis Select “Analysis” to start. Remote Control During analysis, you can control the device in "Wizard" program. You can make use of this function in all analysis pages. E. Application - Start Analysis... - Page 16 Application Input the information. - full name, email address, gender and age group Take picture of customer’s face with built-in camera or use the picture you already have in device. Among the customer lists, select the client to check or start analysis.
-
Page 17: Ⅲ.one Stop Capture Mode
Application One Stop Capture Mode Check the capture button to activate camera and take pictures of hair part. Then you could see there are images on the bottom of page. Select one and drag to the each parameter (marked in blue square) To move next parameter select PL button or select the each parameter. - Page 18 Application One Stop Capture Mode You can see all images are included in analysis page. Please select “Analysis” button per each parameter. Then select the type which is similar with your hair loss shape. Check the result. To analyze next step, select button or press "PL"...
-
Page 19: Hair Loss Status
Application Step By Step Capture & Analysis Mode - Hair Loss Status Check the capture button to activate the camera. Take picture of "front hair" and "temporal" part of hair and select "Analysis" button. Then select the type which is similar with your hair loss shape. -
Page 20: Scalp Status
Application Step By Step Capture & Analysis Mode - Scalp Status Check the capture button to activate the camera. Take picture of hair scalp and select "Analysis". Among the samples, choose the one which is similar with your image. Check the result. To analyze next step, select button or press "PL"... -
Page 21: Hair Density
Application Step By Step Capture & Analysis Mode - Hair Density Check the capture button to activate the camera. Take picture of hair scalp and select "Analysis". Count the hair numbers in the image. Check the result. To analyze next step, select button or press "PL"... -
Page 22: Keratin Of Scalp
Application Step By Step Capture & Analysis Mode - Keratin of Scalp Check the capture button to activate the camera. Take picture of hair scalp and select "Analysis". Among the samples, choose the one which is similar with your image. Check the result. -
Page 23: Scalp Sensitivity
Application Step By Step Capture & Analysis Mode - Scalp Sensitivity Check the capture button to activate the camera. Take picture of hair scalp and select "Analysis". Among the samples, choose the one which is similar with your image. Check the result. To analyze next step, select button or press "PL"... -
Page 24: Scalp Sebum
Application Step By Step Capture & Analysis Mode - Scalp Sebum Check the capture button to activate the camera. Take picture of hair scalp and select "Analysis". Among the samples, choose the one which is similar with your image. Check the result. To analyze next step, select button or press "PL"... -
Page 25: Hair Thickness
Application Step By Step Capture & Analysis Mode - Hair Thickness Check the capture button to activate the camera. Take picture of hair part and select "Analysis". Select the hair you want to analysis. The value is automatically calculated. Check the result. To analyze next step, select button or press "PL"... -
Page 26: Hair Pore Status
Application Step By Step Capture & Analysis Mode - Hair Pore Status Check the capture button to activate the camera. Take picture of hair part and select "Analysis". Among the samples, choose the one which is similar with your image. Check the result. -
Page 27: Cuticle Status
Application Step By Step Capture & Analysis Mode - Cuticle Status Check the capture button to activate the camera. Take picture of hair part and select "Analysis". Among the samples, choose the one which is similar with your image. To check the overall result, select "Show All Result" button. E. -
Page 28: Summary
Application Summary The diagnostic icon in the pentagon or the name of each diagnostic select to see the results below. If you select a recommended product, you can see the product. Available to check product image. E. Application - Summary... -
Page 29: View Mode
Application View Mode In view mode, it is able to take pictures with capture button in many times. The user can select analysis parameter to take picture. In one screen, you can see 4 di erent images maximum. The user can mark the defect or concern according to the image with note function. -
Page 30: Warranty
Within warranty : Sending delivery(Buyer), repair cost and returning delivery(Aram) - If the product is broken by user's fault, repair cost could be charged. A er warranty : Sending delivery and repair cost(Buyer), returning delivery(Aram) How to send : - As sending a present from person to person by EMS or FEDEX. - Page 31 Warranty Service request form Date of Company purchase Contact person Address : Tel : Product name, serial no : Problems : Shipping address: 801-ho , 560 Dunchon-daero, Jungwon-gu Seongnam-si Gyeonggi-do 13230 KOREA. E-mail : support@aramhuvis.com Tel : +82 70 4687 1712 / Fax : +82 31 732 6330 F.
- Page 32 HEAD OFFICE #401~402 Bundang Seoul National University Hospital Health Care Innovation Park, 172, Dolma-ro, Bundang-gu, Seongnam-si, Gyeonggi-do, 13605 Rep. Korea PRODUCTION DIVISION & FACTORY #909 Byucksan Technopia, 560, Dunchon-daero, Jungwon-gu, Seongnam-si, Gyeonggi-do, 13230 Rep. Korea Tel: 070-4687-1712 / Fax: 031-732-6330 / Email: info@aramhuvis.com http://www.aramhuvis.com...
Need help?
Do you have a question about the ASW-200 and is the answer not in the manual?
Questions and answers