Advertisement
Quick Links
DHC-500 Gen 2
Quick Cal & Troubleshooting Guide
General
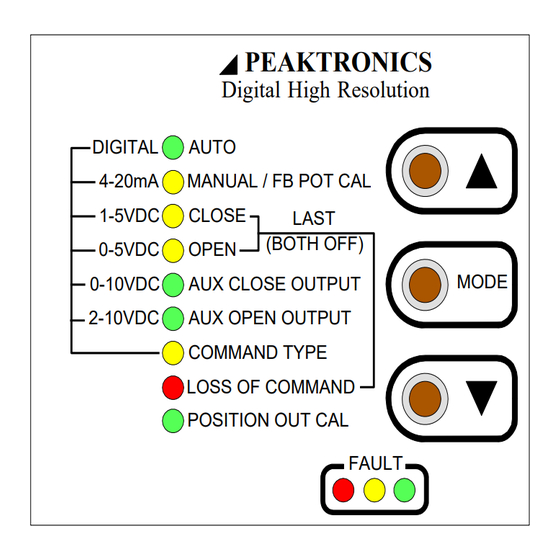
The MODE button selects a particular function, or mode, and the indicator for the selected mode turns on solid. Pushing
the MODE button saves any new setting of the current mode before switching to the next mode. The adjust up (▲) and
adjust down (▼) buttons are used to make adjustments to current mode. For more details regarding calibration and fea-
tures refer to the manual.
1. Use the mechanical override to move the actuator to a mid-stroke position to allow for safe electrical operation of
the actuator while determining actuator rotation. If the actuator is outfitted with a local/remote station, select the
remote mode. CAUTION! Incorrect actuator rotation can cause damage to the actuator and/or valve.
2. To test the actuator rotation, apply 3-phase power with earth ground and verify that the DHC-500 is in the "Manual
Mode", and that the yellow "MANUAL/FB POT CAL" LED is illuminated. If not, immediately push the mode
button as required until the LED is illuminated (actuator will stop rotation in this mode). The LED may be flashing
(at different speeds) through the next several steps. This is expected and be will be explained.
3. Press the adjust up (▲) button to confirm that the actuator moves toward open as shown in "Direct Acting" above. If
not, turn all power off, reverse L1 and L2 power connections, and retest for correct actuator rotation.
4. Use the adjust buttons (▲ and ▼) to move the actuator and verify that the limit switches are set past the desired
open and closed positions, but not so far as to interfere with the mechanical end stops, if the actuator has this fea-
ture. Then move the actuator to mid stroke.
5. If LED is solid, proceed to step 7.
6. If LED is flashing, loosen the gear on the actuator shaft and rotate the potentiometer gear until the LED is no longer
flashing, but on solid - this indicates the center of the potentiometer's travel. Note that the LED will flash at a
slower rate the farther away from the mid position it gets. Once the LED is on solid tighten the actuator shaft gear
and ensure that the gear engagement is tight and properly meshed.
PEAKTRONICS, Inc.
Quick Calibration Procedure
PEAKTRONICS
Digital High Resolution
DIGITAL
AUTO
4-20mA
MANUAL / FB POT CAL
1-5VDC
CLOSE
LAST
(BOTH OFF)
0-5VDC
OPEN
0-10VDC
AUX CLOSE OUTPUT
2-10VDC
AUX OPEN OUTPUT
COMMAND TYPE
LOSS OF COMMAND
POSITION OUT CAL
www.peaktronics.com
1363 Anderson
Clawson, MI 48017
MODE
FAULT
Phone (248) 542-5640
REFERENCE ROTATIONS
OPEN
actuator motion
DIRECT ACTING
OPEN
actuator motion
REVERSE ACTING
sales@peaktronics.com
page
1 of 4
800-220A
Advertisement

Related Manuals for Peaktronics DHC-500 Gen 2


Summary of Contents for Peaktronics DHC-500 Gen 2
- Page 1 DHC-500 Gen 2 page 1 of 4 Quick Cal & Troubleshooting Guide Quick Calibration Procedure General The MODE button selects a particular function, or mode, and the indicator for the selected mode turns on solid. Pushing the MODE button saves any new setting of the current mode before switching to the next mode. The adjust up (▲) and adjust down (▼) buttons are used to make adjustments to current mode.
- Page 2 DHC-500 Gen 2 page 2 of 4 Quick Cal & Troubleshooting Guide 7. Push the MODE button until the “CLOSE” LED is lit solid. Use the adjust down (▼) button to drive the actuator completely closed so that the associated limit switch trips. Then tap the adjust up (▲) button to move the actuator just off the limit switch to the desired valve closed position.
- Page 3 DHC-500 Gen 2 page 3 of 4 Quick Cal & Troubleshooting Guide FAULT INDICATORS The DHC-500 detects various fault conditions that The table below provides a summary of the Fault indications. prohibit the unit from controlling the actuator. A combination...
- Page 4 DHC-500 Gen 2 page 4 of 4 Quick Cal & Troubleshooting Guide PROBLEM POSSIBLE CAUSES REMEDIES Actuator or valve is mounted incor- Remount actuator as necessary. rectly on coupling. Actuator rotates valve backwards. Actuator needs to be reverse acting. Refer to "Close" and "Open" modes in manual.
Need help?
Do you have a question about the DHC-500 Gen 2 and is the answer not in the manual?
Questions and answers