Table of Contents
Advertisement
Quick Links
Advertisement
Table of Contents

Related Manuals for Nexgrill 720-0125-FM


Summary of Contents for Nexgrill 720-0125-FM
- Page 1 This Owner's Manual is provided and hosted by Appliance Factory Parts. Nexgrill 720-0125-FM Owner's Manual Shop genuine replacement parts for Nexgrill 720-0125-FM Find Your Nexgrill Grill Parts - Select From 922 Models -------- Manual continues below --------...
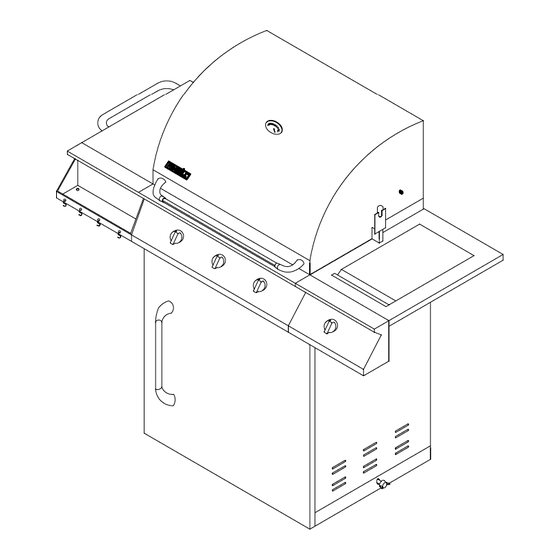
- Page 2 STAINLESS STEEL GAS GRILL USE AND CARE GUIDE ® MODEL NO.:720-0125-LP FOR OUTDOOR USE ONLY PLEASE CONTACT 1-800-913-8999 FOR ASSISTANCE DO NOT RETURN TO PLACE OF PURCHASE.
- Page 3 IMPORTANCE WARNING * * * * * * FOR YOUR SAFETY If you smell gas: 1. Shut off gas to the appliance. 2. Extinguish any open flame. 3. Open lid 4. If odor continues, immediately call you gas supplier or your fire department.
-
Page 4: Table Of Contents
TABLETABLE OF CONTENTS SECTION TWO: SECTION ONE: Assembly instruction………………4-11 Precaution…………………………1-2 Gas hook-Up ………………………. 12 Placement of the grill ……………...3 Leak testing ….……………………. 12 Installer final ….…………………… .13 Propane tank Assemble ……………14 Operating instruction……………….15 SECTION THREE: SECTION FOUR Lighting instruction ……………………………..16 Explodedview ………………………………22 Using the side burner …………………………..17 Partslist…………………………………..….23... -
Page 5: Precaution
PRECAUTIONS Do not repair or replace any part of the grill unless WARNING specifically recommended in this manual. All other Do not try lighting this appliance without reading the service should be referred to a qualified technician. “LIGHTING INSTRUCTIONS” section of this manual. CHILDREN SHOULD NOT BE LEFT ALONE OR TESTED IN ACCORDANCE WITH ANSI Z21.58a- UNATTENDED IN AN AREA WHERE THE GRILL... -
Page 6: Placement Of The Grill
GRILL. only operate in one position and must be mounted correctly for safe operation. The 720-0125-FM Grill is designed for optimum performance without the use of briquettes. Do not place Clean the grill with caution. Avoid steam burns; do not briquettes on the radiant as this will block off the area for use a wet sponge or cloth to clean the grill while it is hot. -
Page 7: Assembly Instruction
ASSEMBLY INSTRUCTIONS PLEASE READ THE INSTRUCTIONS CAREFULLY AND FOLLOW STEP BY STEP. Attention: Please lock the caster during the process of installation of the grill. TOOLS REQUIRED: Philips head screwdriver(not provide),monkey wrench(not provide) Step1:. Assemble two regular casters to the right side panels and caster with brakes on the left side panel as shown figure below.. - Page 8 Step 2: : Assemble bottom panel to side panels,back panel and transom panel with eight( 14) 1/4’ *15 mm screws as shown figure below Remove the head unit of grill from carton. Insert Step 3: Assemble the head part to the bobywork part. the upper portion of the grill onto the cart from the top with four (4)1/4*13mm screws.
- Page 9 Step 4: First assemble handle of side shelf,then assemble sprice tray and control panel of side burner as the figure show below: : Remove the head unit of screws with four (8)1/4’*13mm screws. Step5...
- Page 10 : Assemble the fortified steel to the main with (8)1/4’*13. Step 6 : Assemble side shelf and side burner with four(8) 1/4*13mm screws as figure show below . Step7...
- Page 11 ASSEMBLY INSTRUCTIONS Side burner valve assembly: Step 1: Insert valve assembly through side Step 2: Remove 4(four) screws & washers panel from the “U” brackets on the side burner Valve (#22) (Side panel, right #29) Step 3: Insert valve stem assembly into burner Step 4: Insert valve stem assembly through knob venturi hole to the control panel...
- Page 12 Assemble the door to the grill as the figure show below: Step 8: Assemble the motor bracket to the fire box with four (4) 1/4*10mm screws. Step9...
- Page 13 How to install a gas tank Opening the front door and place gas tank into the gas tank holes. Secure the gas tank by turning the retention screw at the right of the grill clockwise until it is tight.
- Page 14 Your gas grill is ready to use...
-
Page 15: Gas Hook-Up
GAS HOOK-UP Only the pressure regulator and hose assembly L.P. GAS HOOK-UP: supplied with the grill should be used. Any Ensure that the black plastic grommets on the LP replacement pressure regulator and hose assembly cylinder valve are in place and that the hose does must be specified by the grill manufacturer. -
Page 16: Installer Final
local gas supply may make it necessary to adjust BEFORE TESTING the burners. The flames of the burners should be Make sure that all packing material is removed from visually checked. the grill including the burner tie-down straps. Flames should be blue and stable with no yellow DO NOT SMOKE WHILE LEAK TESTING. -
Page 17: Propane Tank Assemble
PROPANE TANK ASSEMBLE Attach propane gas tank to regulator inlet fitting by turning the regulator clockwise as shown in figure below. LP gas cylinder must be fitted with a listed overfill prevention device (OPD) -
Page 18: Operating Instruction
OPERATING INSTRUCTION General use of the grill Each main burner is rated at 12,000 Btu/hr. The The rotisserie motor is capable of turning up to a main grill burners encompass the entire cooking 12lb. cut of meat or poultry. The motor slides onto area and are side ported to minimize blockage from the stainless steel motor mount. -
Page 19: Section Three: Lighting Instruction
LIGHTING INSTRUCTIONS WARNING: IMPORTANT! variations in the local gas supply may take minor adjustments necessary. BEFORE LIGHTING… Inspect the gas supply hose prior to turning the gas Burner flames should be blue and stable with no “ON”. If there is evidence of cuts, wear, or abrasion, yellow tips, excessive noise, or lifting. -
Page 20: Using The Side Burner
USING THE SIDE BURNER control knob counterclockwise to the “HI” position. If WARNING: IMPORTANT! the burner does not light, turn the control knob to USING THE SIDE BURNER: “OFF”. If the smell of gas is detected and the igniter Inspect the gas supply hose prior to turning the gas is not functioning, immediately turn the control knob “ON”. -
Page 21: Care & Maintenance
LIGHTING ILLUSTRATIONS Step1. Make sure the lid is open Step 2. Push and turn one of main or side burner knobs to HI position Step 3. You may need 3 or 4 trials to light the burner. After the burner is lit, adjust the knob as desired... -
Page 22: Lighting Illustrations
Approximate 1 1/2 “ Flame Height... -
Page 23: To Match Light The Grill
TO MATCH LIGHT THE GRILL If the burner will not light after several attempts then the burner can be match lit. If you’ve just attempted to light the burner with the igniter, allow 5 minutes for any accumulated gas to dissipate. Keep your face and hands as far away from the grill as possible. -
Page 24: Care & Maintenance Of Side Burner
CARE & MAINTENANCE OF SIDE BURNER BURNER CLEANING: Clean the exterior of the burner with a wire brush. Clear any clogged burner ports with a straightened paper clip. Never enlarge the burner ports. Never use a wooden toothpick as it may break off the clog the port. STAINLESS STEEL: There are many different stainless steel cleaners available. -
Page 25: Explodedview
EXPLODED VIEW... -
Page 26: Partslist
PARTS LIST REF# DESCRIPTION Q’TY REF# DESCRIPTION Lid, Front Side Burner Body Heat Indicator Bowl Assembly, Side Burner Handle Assembly, Lid Lid, Side Burner Warming Rack Orifice Base Cooking Grid With Hole Gas Pipe, Side Burner Flame Tamer Gas Valve, Side Burner Main Burner Gas Hose Connector Grease Tray... -
Page 27: Ordering Parts
Different orifices must be installed when dealer service is not available, contact: converting from one type of gas to another. Nexgrill Industries, Inc. customer service You will also need a data plate indicating what 1-800-913-8999 or fax 909-598-7699. type of gas is used by the grill. -
Page 28: Grillcooking Chart
GRILL COOKING CHART... - Page 29 GRILL COOKING CHART...
- Page 30 GRILL COOKING CHART...
- Page 31 GRILL COOKING CHART BBQ SALMON TANGY SEAFOOD KABOBS Half hour before cooking, turn the burner to the grill on full. Drain 1 lb. Large shrimp, shelled & 2 large salmon steaks deveined seafood reserving marinade. On 2 tbs. Oil each of twelve 10” skewers, thread ¾...
- Page 32 GRILL COOKING CHART Preheat grill. Combine cheese, Pound flank steak to ¼ inch In blender, process 1/3 c. water, condensed soup, milk, BBQ sauce, thickness or flatten chicken breasts. onion, soy sauce, 2 tsp. oil and the oregano, salt and pepper in a large Mix oil, lime juice and seasonings in next 8 ingredients until smooth.
- Page 33 GRILL COOKING CHART CHICKEN TANDOORI STYLE the rack and to its center, penetrate minutes. Cook for approximately 3 the second rib with the pointed end hours. The basting sauce combined 8 large chicken thighs or drumsticks of the spit and push it between the with turkey drippings makes a 1 c.
-
Page 34: Warranty
Our obligation under this warranty is limited to repair or replacement, at our option, of the product during the warranty period. The extent of any liability of Nexgrill Industries, Inc. under this warranty is limited to repair or replacement. This warranty does not cover normal wear of parts, damage resulting from any of the following: negligent use or misuse of the product, use on improper fuel/gas supply, use contrary to operating instructions, or alteration by any person other than our factory service center.
Need help?
Do you have a question about the 720-0125-FM and is the answer not in the manual?
Questions and answers