Table of Contents
Advertisement
Quick Links
Advertisement
Table of Contents

Related Manuals for milleteknik FLX L


Summary of Contents for milleteknik FLX L
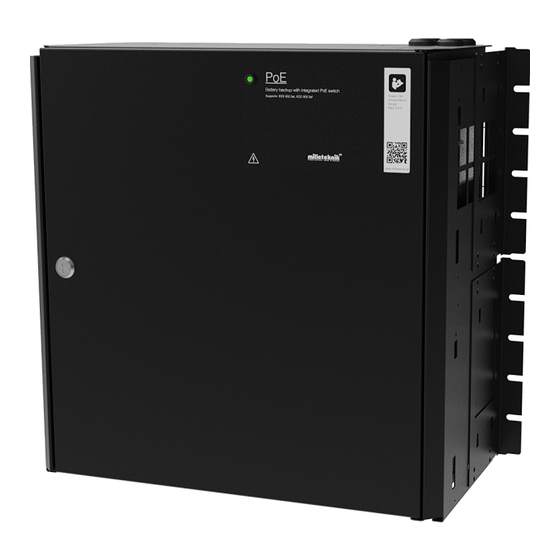
- Page 1 PoE Switch Managed 8p FLX L PoE switch and powersupply with battery backup...
- Page 2 350-272 Publication date 2024-07-10...
-
Page 3: Table Of Contents
5. Console for FLX M and FLX L ..................... 7 6. Batteries - placement and connection ..................7 6.1. Connection of batteries in FLX S, FLX M and FLX L ............7 6.2. Connecting batteries ....................... 8 7. Motherboard description ......................9 7.1. -
Page 4: Before You Begin
14.1.1. PoE ......................... 41 14.1.2. Name, article number and e-number ..............41 14.1.3. Description ....................... 41 14.1.4. Area of use ...................... 41 14.1.5. Technical description ..................41 14.1.6. Voltage, current and power ................42 14.1.7. Load outputs ....................42 14.1.8. Alarm ....................... 42 14.1.9. -
Page 5: Link To The Latest Information
You will find answers to many questions at: www.milleteknik.se go to your product to read more, download manuals and other product information. Telephone: +46 31- 340 02 30, e-mail: support@milleteknik.se. Support is open: Monday-Thursday 08:00-16:00, Fridays 08:00-15:00. Closed 11:30-13:15. 1.1.2. Link to the latest information Products and software are subject to updates, you will always find the latest information on our website. -
Page 6: Component Overviews
4. COMPONENT OVERVIEWS 4.1. Component overview Table 1. Component overview Number Explanation B1 -, B2 - Battery cable - Indicator diode Power board. [sv] D1-D2 Motherboard Battery fuse Connection Load. If there are optional cards in the unit, the load must be connected there, see 8. Weather protection. -
Page 7: Console For Flx M And Flx L
Bracket is reversible and can be mounted in two ways. It comes with brackets in to the device. 6. BATTERIES - PLACEMENT AND CONNECTION 6.1. Connection of batteries in FLX S, FLX M and FLX L Battery wiring is mounted on the circuit board upon delivery. Pictures below only show how to connect wiring. -
Page 8: Connecting Batteries
Figure 1. Wiring diagram for batteries in battery backup Connect the terminals correctly so that you do not damage the equipment. 6.2. Connecting batteries Note that configuration may differ by product. Table 2. Connecting batteries. Explanation Plus terminal to battery fuse. Minus terminal to motherboard. -
Page 9: Motherboard Description
Explanation Minus terminal to battery fuse. Plus terminal to motherboard. 7. MOTHERBOARD DESCRIPTION 7.1. Connect in this order To minimize the risk of errors that may occur in connection with a short circuit, connections to the motherboard must be made in this order. Table 3. ... -
Page 10: Connect Alarm On P3
Figure 2. 7.2. Connect alarm on P3 Alarm is connected to terminal P3... -
Page 11: Connect Mains
Table 4. Connect alarm P3 P3:1-6 Explanation Sum alarm P3:1 P3:2 P3:3 Sum-alarm* P3:4 P3:5 P3:6 Total alarm: Broken fuse on load, broken fuse from external distribution board, broken battery fuse, low battery voltage in battery operation, batteries not connected, overvoltage. DANGER Mains voltage must be disconnected when working with stripped cables. -
Page 12: The Differences Between Poe Switches
ELECTRICAL MAINS CONNECTION 230 V AC ON CIRCUIT BOARD Check that the marking on the circuit board matches the cable arrangement on the terminal block. 8. THE DIFFERENCES BETWEEN POE SWITCHES Product PoE switch installed Can additional PoE switches be installed? ... -
Page 13: Commissioning - How To Start The Unit
10. COMMISSIONING - HOW TO START THE UNIT 10.1. Connect in this order To minimize the risk of errors that may occur in connection with a short circuit, connections to the motherboard must be made in this order. Table 7. ... - Page 14 NOTE The settings shown are settings for PC, (Windows 7 - Windows 11). Windows and names may vary between different versions of Windows. Unfortunately, we cannot provide support for settings of your computer. NOTE IP address of the switch (factory setting): 192.168.2.1 Password (factory setting): admin NOTICE The address of the PoE switch is: 192.168.2.1 and username and password are: ad-...
- Page 15 Ethernet status window appears. click the button Characteristics as shown in the figure below. Double-click: Internet Protocol Version 4 (TCP / IPv4). Set the computer's IP address and subnet mask as shown in the figure below. By default, the product's IP address be 192.168.2.1. You can set any IP address as long as it is not the same as your switch's IP address and is in the same network segment as your switch's IP address.
-
Page 16: Log In To The Poe Switch
11.2. Log in to the PoE switch NOTE IP address of the switch (factory setting): 192.168.2.1 Password (factory setting): admin NOTE If you get a warning that the page is not secure/the connection is not private, click "advanced" and then "continue". Start the browser on your computer. - Page 17 Table 8. Log in to the switch. Number Explanation IP address of the PoE switch: 192.168.2.1 Password: admin Apply = Ok Menu in the PoE switch...
-
Page 18: Configuration
11.3. Configuration 11.3.1. System, configuration Table 9. System, configuration. Letter, number Explanation PoE switch system configuration page Tick here if you are going to use DHCP, see warning below. Changes the factory default password, (admin). If you have made any changes, you need to click "Apply" to save the changes. -
Page 19: Ports, Configuration
WARNING The settings on this page normally do not need to be changed. Only change the settings if you absolutely know what you are doing. Factory reset the PoE device if it does not behave as expected after adjusting settings on this page. - Page 20 Table 10. Ports, configuration. Letter, number Explanation Gates This setting normally does not need to be changed. Select the speed of the PoE switch's ports. This setting normally does not need to be changed.
-
Page 21: Vlan Configuration
11.3.3. VLAN configuration WARNING The settings on this page normally do not need to be changed. Only change the settings if you absolutely know what you are doing. Factory reset the PoE device if it does not behave as expected after adjusting settings on this page. -
Page 22: Igmp Snooping, Configuration
D: Load balancing between the ports. 11.3.5. IGMP Snooping, configuration WARNING The settings on this page normally do not need to be changed. Only change the settings if you absolutely know what you are doing. Factory reset the PoE device if it does not behave as expected after adjusting settings on this page. -
Page 23: Mirroring, Configuration
E: Switch that controls reception. 11.3.6. Mirroring, configuration WARNING The settings on this page normally do not need to be changed. Only change the settings if you absolutely know what you are doing. Factory reset the PoE device if it does not behave as expected after adjusting settings on this page. -
Page 24: Lldp Configuration
F: Mirroring of ports. 11.3.7. LLDP configuration WARNING The settings on this page normally do not need to be changed. Only change the settings if you absolutely know what you are doing. Factory reset the PoE device if it does not behave as expected after adjusting settings on this page. - Page 25 Table 11. LLDP configuration. Letter, Explanation num- LLDP stands for "Link Layer Discovery Protocol", which is a network protocol standard used to discover and com- municate information about network devices connected to the same Ethernet network. The protocol allows devices such as switches and routers to send and receive messages containing information about the device's identification, capabilities, and connection topology.
-
Page 26: Qos, Configuration
11.3.8. QoS, configuration WARNING The settings on this page normally do not need to be changed. Only change the settings if you absolutely know what you are doing. Factory reset the PoE device if it does not behave as expected after adjusting settings on this page. -
Page 27: Poe, Configuration
Table 12. QoS, configuration. Letter, num- Explanation QoS gives different network traffic different priority depending on its importance and requirements, helping to ensure that important services are delivered with sufficient bandwidth and minimal delay even when the network is under load. Sets whether QoS is active. -
Page 28: Monitoring
Table 13. PoE, configuration Letter, number Explanation Power over Ehternet Turns PoE function/port on or off. Remember to press "Apply" to save changes. 11.4. Monitoring 11.4.1. Statistics, overview Table 14. Statistics, overview. Letter, number Explanation Statistics, overview Traffic per port. -
Page 29: Statistics, Detailed
11.4.2. Statistics, detailed Table 15. Statistics, detailed. Letter, number Explanation Detailed statistics Select the port for which you want statistics. -
Page 30: Igmp Status
11.4.3. IGMP status L: Status of IGMP... -
Page 31: Lldp Statistics
11.4.4. LLDP statistics M: LLDP statistics... -
Page 32: Lldp Table
11.4.5. LLDP table N: LLDP overview. -
Page 33: Ping
11.4.6. Ping Table 16. Ping. Letter, number Explanation Ping [sv] O.1 Input address to test the connection and response time. -
Page 34: Maintenance
11.5. Maintenance 11.5.1. Reboot WARNING Restart is done by PoE switch, battery backup is not restarted. Upon reboot, connected devices will lose connection. Alarm can be set to battery backup, but it disappears when the PoE switch is back on. -
Page 35: Factory Reset
Table 17. Restarting the PoE switch. Letter, number Explanation Rebooting the PoE switch. Select "Yes" to reboot the switch. 11.5.2. Factory reset WARNING Factory reset is done by PoE switch. Battery backup is not restored. On reset, connec- ted devices will lose connection. Alarm can be set to battery backup, but it disappears when the PoE switch is back on. -
Page 36: Upload New Software
11.5.3. Upload new software WARNING Only use software you received from Milleteknik's support. Milleteknik assumes no re- sponsibility for software or consequences such as damage to the device or peripherals or other damage that may arise from uploading unapproved software. - Page 37 Table 19. Upload new software. Letter, number Explanation Upload new software to the Switch. Navigate to the computer where you saved the file. Click "Upload" to upload the software.
-
Page 38: Load And Save Configuration File
11.5.4. Load and save configuration file Table 20. Load and save configuration file. Letter, number Explanation Upload or download the switch's configuration. Select new configuration file. Upload new configuration file. Download configuration file to computer Newer Windows computers do not allow *.cfg files to be downloaded without additional approval in the browser when download- ing. -
Page 39: Log Out
11.5.5. Log out T: Log out of the switch. This does not affect the operation of the switch. 12. ALARM DISPLAYED ON CABINET DOOR In normal mode, the indicator LED shows a solid green light. -
Page 40: Maintenance
Table 21. The indicator diode shows. The indicator diode shows Explanation Solid green light Normal operation. Solid yellow glow Mains failure. Solid red light Battery not connected / blown fuse. When operating system: If the indicator LED is off, deep discharge protection has come into force. 13. MAINTENANCE The system with the exception of batteries is maintenance-free when installed in an indoor environment. -
Page 41: Product Sheet - Power Supply / Battery Backup
14. PRODUCT SHEET - POWER SUPPLY / BATTERY BACKUP 14.1. Product sheet - power supply from Milleteknik 14.1.1. PoE 14.1.2. Name, article number and e-number Table 22. Name, article number and email number. Name Article number E-number (SV) PoE Switch Managed 8p FLX L... - Page 42 The reserve operating time in battery operation depends on how large a load is connected to the power supply. If the load varies, as with frequent opening of door locks, the time that batteries can continue to power the security system decreases. To get an estimate of reserve operating times see: www.milleteknik.se/Manualer/FaQ/Reservdrifttider/...
- Page 43 14.1.14. Weight Table 25. Weight. Name Net weight Weight incl. packaging PoE Switch Managed 8p FLX L 14 kg 15 kg 14.1.15. Installation requirements The device is intended for fixed installation. The unit must be installed indoors, environmental class 1, ambient temperature: +5°C to +40°C. Recommended ambient temperature is +15°C to +25°C (for optimal battery life).
- Page 44 Products and software are subject to updates, you will always find the latest information on our website. 14.1.21. About this information All information is published subject to possible errors. Information is updated without prior notice. 15. ADDRESS AND CONTACT DETAILS Milleteknik AB Ögärdesvägen 8 B S-433 30 Partille Sweden +46 31 340 02 30 info@milleteknik.se...
Need help?
Do you have a question about the FLX L and is the answer not in the manual?
Questions and answers