Table of Contents
Advertisement
Available languages
Available languages
Quick Links
Advertisement
Table of Contents

Related Manuals for LEXIBOOK ThermoClock RL551


Summary of Contents for LEXIBOOK ThermoClock RL551
- Page 1 Instruction Manual ThermoClock ® ® RL551...
- Page 2 ---------- English ---------- Français ---------- Español ---------- Português ---------- Italiano ---------- Deutsch ---------- Nederlands...
- Page 3 11 - Up Timer and Down Timer Setting 12 - Normal Time Display 11 10 WARNING Before switching the unit on, remove the protective battery strip. Should the unit not switch on, remove and replace the batteries, this will reset the machine. Batterie Changing Batterie: Open the cover of the battery compartment at the back of the unit.
-
Page 4: Functions And Settings
Press on MODE to set the hours, minutes, year, month and date: The parameter to be modified will blink on the display, use the UP or DOWN buttons to increase or decrease the value of the parameter. The day of the week it automatically identified. -
Page 5: Warranty
This product is covered by our standard 2-year manufacturer warranty. In the case of any fault, please return the unit to your original place of purchase or the address below for replacement or repair. A copy of your sales receipt or other proof of purchase must be provided. - Page 6 11 - Réglage du chronomètre et du compte à rebours 12 - Positionnement mode Normal 11 10 ATTENTION Avant la première mise en marche de l'appareil, retirer la languette de protection des piles. Si l'appareil ne s'allume pas, enlever puis remettre les piles pour effectuer sa réinitialisation. Pile Changement des piles : Ouvrir le couvercle du compartiment à...
- Page 7 B : Réglage de l’heure Positionnez le sélecteur au dos de l’appareil sur T.SET. Appuyez sur MODE pour régler les heures, les minutes, l’année, le mois, la date : la donnée à modifier clignote et utilisez les touches UP ou DOWN pour augmenter ou diminuer la valeur de la donnée.
-
Page 8: Garantie
Garantie Ce produit est couvert par notre garantie de deux ans. Pour toute mise en œuvre de la garantie ou de service après-vente, vous devez vous adresser à votre revendeur muni de votre preuve d'achat. Notre garantie couvre les vices de matériel ou de montage imputables au constructeur à l'exclusion de toute détérioration provenant du non-respect de la notice d'utilisation ou de toute... - Page 9 12 - Modo Normal 11 10 ATENCIÓN Antes de poner en marcha el aparato, retire la lengüeta de protección de las pilas. Si el aparato no se enciende, quite las pilas para realizar una reinicialización. Pilas Cambio de las pilas: Abra la tapa del compartimento de pilas situado en el dorso del aparato.
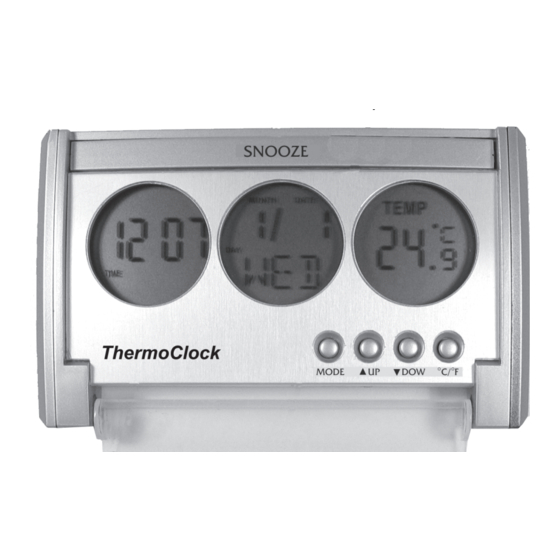
- Page 10 La hora actual se muestra en la pantalla superior, la pantalla central muestra el mes, la fecha, el día de la semana y en la pantalla inferior se muestra temperatura. Mantenga pulsado el botón MODE para visualizar la hora fijada para la alarma.
- Page 11 TIMER, la palabra TIMER aparecerá en la pantalla superior. La cuenta máxima hacia delante o hacia atrás es de 29:59:59. Pulse en MODE y a continuación en UP o DOWN para configurar la hora, los minutos y los segundos. Pulse dos veces en SNOOZE para activar la función de cuenta atrás y una sola vez para iniciar el cronómetro.
- Page 12 11 10 CUIDADO Antes da primeira utilização do aparelho, retire a patilha de protecção das pilhas. Se o aparelho não se acender, retire e volte a colocar as pilhas para efectuar o seu reinício. Pilas Troca das pilhas: Abra a tampa do compartimento das pilhas situado na parte posterior do aparelho.
- Page 13 Funções e características A: Apresentação do equipamento As horas em vigor são apresentadas no ecrã superior, o mês, data e dia da semana é apresentado no ecrã central e a temperatura é apresentada no ecrã inferior. Mantenha premido o botão MODE para ver as horas do despertador.
- Page 14 Para validação da garantia ou da assistência após venda, deve dirigir-se ao seu revendedor munido da sua prova de compra. A nossa garantia cobre os defeitos de material ou de montagem imputáveis ao construtor com exclusão de toda a deterioração proveniente do não respeito das instruções de utilização ou de qualquer intervenção intempestiva sobre o artigo...
- Page 15 1 - Snooze On. SNOOZE 2 - ºC / ºF Modo 3 - 12/24 Hours Modo. Down Modo (per diminuire il valore del ore, minuti, anno, mese e giorno) 4 - Up Modo (per aumentare il valore del ore, minuti, anno, mese...
-
Page 16: Funzioni E Impostazioni
Funzioni e impostazioni A: Presentazione dell’apparecchio Il display superiore mostra l’ora attuale, il display centrale mostra la data ed il giorno della settimana, mentre il display inferiore mostra la temperatura. Mantenere la pressione sul tasto MODE per visualizzare l’ora impostata per la sveglia. -
Page 17: Garanzia
TIMER. La lunghezza massima del conteggio, sia alla rovescia che in avanti è di 29:59:59. Premere MODE, quindi UP o DOWN per impostare le ore, i minuti e i secondi. Premere due volte SNOOZE per innestare la funzione di conto alla rovescia, una sola volta per avviare la funzione cronometro. - Page 18 11 - Stoppuhreinstellung 12 - Normal Position 11 10 ACHTUNG V or der ersten Inbetriebnahme des Gerätes die Schutzfolie von den Batterien entfernen. Wenn das Gerät sich nicht einschaltet, die Batterien erst entnehmen und dann wieder einlegen um es zurückzusetzen. Batterie Batteriewechsel: Deckel des Batteriegehäuses auf der Rückseite des Weckers öffnen.
-
Page 19: Funktionen Und Einstellungen
Drücken Sie auf MODE, um Stunden, Minuten und Dauer der Snooze-Funktion (Schlaffunktion) einzustellen: Drücken Sie auf den UP oder DOWN Knopf, um die Werte höher oder niedriger einzustellen; die Wiederholung der Schlaffunktion liegt zwischen 1 und 60 Minuten. Stellen Sie den Select-Knopf wieder auf NORMAL zurück. - Page 20 D: Stoppuhr- und Countdown-Funktion. Bringen Sie den Select-Knopf in die TIMER Position. Daraufhin erscheint das Wort TIMER auf dem unteren Teil des oberen Displays. Der höchste Messwert, sei es nach oben oder nach unten, beträgt 29:59:59. Drücken Sie auf MODE, dann auf UP oder DOWN, um Stunden, Minuten und Sekunden einzustellen.
- Page 21 11 10 OPGELET Verwijder het beschermingsklepje van de batterijen voordat u het toestel voor het eerst in gebruik neemt. Als het toestel niet werkt, verwijder dan de batterijen en plaats ze vervolgens opnieuw om een reset uit te voeren. Batterijen Batterijen vervangen: Open het batterijvak op de rug van het apparaat.
-
Page 22: Functies En Instellingen
Plaats de selectietoets aan de achterkant van het toestel op T.SET Druk op MODE om de uren, minuten, jaar, maand en datum in te stellen: De aan te passen parameter zal op het scherm flikkeren, gebruik de UP of DOWN-toetsen om de waarde van de parameter te verhogen of te verlagen. - Page 23 Garantie Dit product is gedekt door onze tweejarige garantie. Om een beroep te doen op de garantie of de dienst na verkoop moet u zich met uw aankoopbewijs wenden tot de verkoper. Onze garantie dekt materiële gebreken of constructiefouten die toe te schrijven zijn aan de fabrikant, met uitzondering van om het even welke beschadiging die voortvloeit uit het niet naleven van de gebruiksaanwijzing of uit foutief gebruik (zoals demontering, blootstelling aan warmte of vocht, ...)
Need help?
Do you have a question about the ThermoClock RL551 and is the answer not in the manual?
Questions and answers