Advertisement
USA office: Fontana
AUS office: Truganina
GBR office: FDS Corporation Limited,Unit 4, Blackacre Road, Great Blakenham,Ipswich, Ip6 0FL,United Kingdom
If you're having difficulty, our friendly
customer team is always here to help.
FRA office: Saint Vigor d'Ymonville
THIS INSTRUCTION BOOKLET CONTAINS IMPORTANT SAFETY INFORMATION.
USA:cs.us@costway.com
AUS:cs.au@costway.com
PLEASE READ AND KEEP FOR FUTURE REFERENCE.
GBR:cs.uk@costway.com
FRA:cs.f r @costway.com
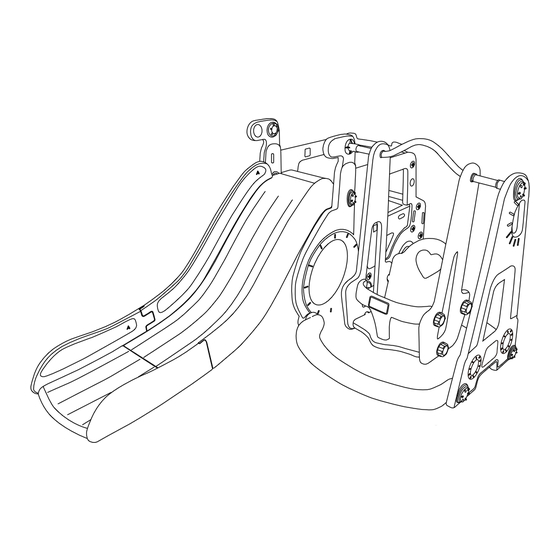
Toddler Slide and Swing Set
Ensemble Toboggan et Balançoire pour Enfants
Advertisement
Table of Contents

Related Manuals for Costway Toddler Slide and Swing Set


Summary of Contents for Costway Toddler Slide and Swing Set
- Page 1 Toddler Slide and Swing Set Ensemble Toboggan et Balançoire pour Enfants USA office: Fontana AUS office: Truganina FRA office: Saint Vigor d'Ymonville GBR office: FDS Corporation Limited,Unit 4, Blackacre Road, Great Blakenham,Ipswich, Ip6 0FL,United Kingdom THIS INSTRUCTION BOOKLET CONTAINS IMPORTANT SAFETY INFORMATION.
- Page 2 Before You Start Please read all instructions carefully. Retain instructions for future reference. Separate and count all parts and hardware. Read through each step carefully and follow the proper order. We recommend that, where possible, all items are assembled near to the area in which they will be placed in use, to avoid moving the product unnecessarily once assembled.
-
Page 3: Maintenance And Care
WARNING: AVERTISSEMENT : 1. L'installation n'est autorisée qu'aux adultes, 1. Only allowed for adults to install, keep tenez les enfants à l'écart. children away. 2. À utiliser sous la supervision directe d'un 2. To be used under the direct supervision of adulte. - Page 4 PARTS/PIÈCES PARTS/PIÈCES...
- Page 5 PARTS/PIÈCES (spare) According to the markings A and B on the slide guardrails (C and D), clamp and splice the two ends of the long and short A (long and short B) with grooves and connect them together. En fonction des marquages A et B sur les +1(spare /de rechange) +1(spare /de rechange) garde-corps de la glissière (C et D), serrez et joignez les deux extrémités du long et du court...
- Page 6 Splice the upper and lower sections A and B of Use a plastic screwdriver to lock the screws on the slide together, then connect to the both sides of C and D separately. corresponding screw posts and holes of the already spliced C and D guardrails together, and then lock the nuts on both sides.
- Page 7 Find two pieces of E J, align E with J through Turn the front of R towards the front of the car, insert the two screw holes into the two holes on the set interface, thread g through the inside, J, and ensure that the convex parts in the secure on the outside with d, and then lay one middle of R is inserted into the groove in the...
- Page 8 With the plane of H facing upwards, insert the Move the front of P forward, insert the screw screw column on one side into the hole of E, column on one side into the hole at the front of while ensuring that the convex parts in the the car, and ensure that the convex parts on P middle of H is inserted into the groove below R.
- Page 9 Insert the screw column of G into the indicated Insert Y into the positions indicated on both hole position, while ensuring that the convex parts on G is inserted into the E groove, and sides, while ensuring that the protrusions are lock it on the outer side with d.
- Page 10 Insérez Y dans les positions indiquées des deux côtés, en veillant à ce que les saillies soient insérées dans les rainures, et verrouillez avec d. Insérez S dans la position indiquée et verrouillez-la avec z. Insérer les composants de l'étape 3 dans les trous de vis à...
- Page 11 Placez le plan M vers le bas dans la direction indiquée sur le schéma. Insérez la colonne de vis à une extrémité dans la position du trou correspondant. Bloquez le côté intérieur de J avec l'écrou z. Le composant du trou du côté M peut être injecté...
- Page 12 Ensure that the swing seat is in the same direction as the exit of the slide as shown in the diagram. Insert one end of I into the front hole at the top of the slide side panel and lock it with z.
- Page 13 Fixez la boucle de la balançoire dans les trous WARNING des deux côtés du panneau latéral de la Only for domestic use. balançoire de la traverse, et serrez les écrous For indoor use To place the activity toy on a level surface at sur l'autre panneau latéral fixé...
-
Page 14: Maintenance
Maintenance AVERTISSEMENT Activity toys need of carrying out checks and maintenance of the main parts (crossbeams, Uniquement pour un usage domestique. suspensions, anchors, etc.) at regular intervals, Pour une utilisation à l'intérieur. Placez le jouet d'activité sur une surface plane pointing out that if these checks are not carried à... -
Page 15: Entretien
Entretien Les jouets d'activité doivent faire l'objet de contrôles et d'un entretien des principales Return / Damage Claim Instructions pièces (traverses, suspensions, ancrages, etc.) DO NOT discard the box / original packaging. à intervalles réguliers, en soulignant que si ces In case a return is required, the item must be returned in original box.
Need help?
Do you have a question about the Toddler Slide and Swing Set and is the answer not in the manual?
Questions and answers