
Related Manuals for alchemy RB700-MKIV


Summary of Contents for alchemy RB700-MKIV
- Page 1 Installation & User Manual Models: Alchemy RB700-MKIV & RB1000-MKIV Version 001: May-2024...
- Page 2 Please read this manual carefully for the correct installation, use and maintenance of the appliance. Operate the appliance only in accordance with the instructions provided. IMPORTANT SAFETY NOTICE: BIO-ETHANOL FUEL MUST BE BETWEEN 85% - 96.6% ALCOHOL...
-
Page 3: Table Of Contents
Contents 1. Supplied Parts..................... 4 2. Safety Information ..................5 3. Installation ..................7 4. Operating the Appliance ................15 5. Safety Systems ..................18 6. Maintenance ....................19 7. Technical Information ................19 8. Troubleshooting ..................20 9. Appendices Appendix 1 –... -
Page 4: Supplied Parts
1. Supplied Parts 1. Appliance 2. Remote Control 3. RC Handset 4 x AAA Batteries 5. Fuel Filling Funnel 4. AC 220V -240V Mains Power Cable... -
Page 5: Safety Information
• Alchemy Ltd is not liable for any damage caused by using the incorrect type of fuel. • Do not refuel while the appliance is still hot. Allow at least 30 minutes before refuelling. - Page 6 NON-COMBUSTIBLE pebbles, logs or other refractory decorative fire accessories should not be used. • Do not use fittings or spare parts, other than those available from or recommended by Alchemy Ltd. • Always isolate the power to the appliance before moving, cleaning or servicing.
-
Page 7: Installation
3. Installation • While installing the appliance according to the instruction manual ensure local and national guidelines are observed. • The elements of construction within a 1m radius of the appliance must be A1 classified non- combustible materials. • Do not design or install the fireplace which involves covering the burner plate. Access to fuel tank is required by removing the burner top plate. - Page 8 MINIMUM ROOM SIZES: Model Minimum Room Size (m The appliance requires the exchange of RB700-MKIV one room volume of air per hour The appliance requires the exchange of RB1000-MKIV one room volume of air per hour To calculate the room size, measure the Length (L), Width (W) and Height (H), and multiply all measurements: e.g.
- Page 9 The air to the enclosure must be from the same room that the appliance is installed and not directly from outside. Model Ventilation* RB700-MKIV 50cm RB1000-MKIV 75cm * Please note - this relates to the minimum amount of continuous free flowing air required and not the size of the ventilation duct.
- Page 10 METHODS OF INSTALLATION • The construction of the chamber, enclosure and any stud work introduced must be from non-combustible materials. • Use only fasteners and adhesives that are resistant to high temperature. • Any voids within a chimney breast are recommended to be ventilated to prevent heat build-up with continuous use.
- Page 11 TV INSTALLATION METHODS • If installing a TV above the appliance, the TV must be recessed or have a non- combustible shelf installed to act as a heat shield. • The depth of the recess for the TV must ensure that the front face of the TV is a minimum of 100m from the front face of the chimney breast –...
- Page 12 RECESSED TV INSTALLATION Any voids within the chimney breast may require ventilation to prevent heat building up Front face of TV must be a minimum of 100mm from the front face of the chimney breast TV and entertainment cables to be insulated in heat-resistant conduit Any studwork for the chimney breast area must be in non-combustible materials...
- Page 13 INSTALLING THE APPLIANCE • A 13A switched mains socket is required to power the appliance. • The socket must be accessible at all times. • If there are access issues to the socket an external switched spur can be introduced, which must be accessible at all times.
-
Page 14: Operating The Appliance
4. Operating the Appliance FUELLING THE TANK - Always ensure the appliance is cold before fuelling the tank and use the correct fuel. For first use fill the tank to full capacity. Remove the front metal top plate and unscrew the fuel tank cap. Insert the funnel into the fuel tank neck and carefully pour bioethanol fuel into the tank until the level of fuel reaches the top of the tank window. - Page 15 OPERATING THE REMOTE CONTROL 1. Touch power button to awaken handset. 2. To turn on, hold power button until bar fills. The screen will display PRIMING for about 45 seconds. 3. When the flame has established the screen will display the level of heating.
- Page 16 FUEL NOTIFICATION When the tank is empty or does not have enough fuel, there will be an audible beep and a message of NO FUEL will appear on the display screen. It is possible to check the fuel level using the tank window. MINIMUM FUEL QUANTITY: RB700 1 Litre...
-
Page 17: Safety Systems
5. Safety Systems LEAK DETECTION SENSOR The appliance has a leak detection sensor located underneath the burner on the lowest part of the sump as per image showing the sensor location. Thus, if there is a leak the fire will turn off itself. -
Page 18: Maintenance
Turn the appliance off and isolate the mains supply. Ensure the appliance is cold before attempting any maintenance of the appliance. No liability can be accepted by Alchemy Ltd for injury caused by burning or scolding by a hot appliance. -
Page 19: Troubleshooting
8. Troubleshooting 8.1 There is smoke or a foreign smell coming from the appliance when burning a. There may be waste burning that should not be in the burner channel. b. You are using the wrong fuel (it is essential that you ONLY use Bioethanol). c. - Page 20 8.5 Handset Fault Finding The software installed will give an error/ stop coded if the bioethanol fire stopped or did not start from any reason. If the appliance stops a code is generated, and can be read on the handset. The code number will help to see at which stage in the ignition process or operating the fault has happened.
- Page 21 Low level sensor not reached, pump timed out Reason: The fuel has not reached the low level sensor in the burner during operation due to fuel running out, blockage in the fuel lines, debris in the burner or faulty pump. Solution: Check for leaks, around fuel tank.
- Page 22 B. Flame out (THERMOCOUPLE TEMP. DROP) Reason: Strong draught could have put the flame out or the thermocouple could be faulty. Solution: Remove source of draught and try relighting fire (after waiting for the safety sequence to finish). If fire still does not light, contact engineer/ dealer to check thermocouple.
-
Page 23: Appendices
9. Appendices Appendix 1 - Remote Control The appliance is in Standby mode when the power is switched on. You must have the power supply ON (—) before using the handset. The remote control works by radio signal which is configured at the factory with a unique signal code. - Page 24 1. Remote Control Functions Press both Menu buttons until a menu appears at top of screen. Three screen options will appear. To select options rotate dial until highlighted in RED and press select. • SET CLOCK • DEVICE • ADVANCED SET CLOCK I.
- Page 25 1.1.1 DELETING DEVICE F. Scroll to DEVICE on the MENU and press select. G. This gives details of the appliance and also gives the option to delete the appliance from the remote handset. Press and hold the delete option to remove appliance. H.
- Page 26 1.2 ADVANCED 1.2.1 SCREEN DIMMER I. Scroll to ADVANCE menu and press select. II. This function dims the screen of the remote. To switch dimmer on or off press SET option to toggle between ON and OFF.
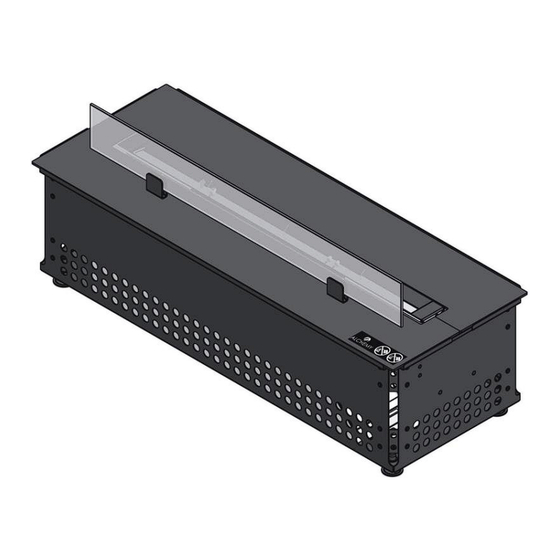
- Page 27 Appendix 2 - DIMENSIONS AND SPARE PARTS RB700-MKIV...
- Page 28 RB700-MKIV SPARE PARTS ITEM NO. PART NUMBER DESCRIPTION QTY. RB700-003 TOP PLATE WITH HOLES RB700-004 GLASS VISOR PANEL RB700-005 TOP PLATE PLAIN RBIO-007 GLASS BRACKET ASSEMBLY RBIO-009 CERAMIC BOARD RBIO-010 RC HANDSET...
-
Page 29: Appendix 2 - Dimensions And Spare Parts
DIMENSIONS AND SPARE PARTS RB1000-MKIV... - Page 30 RB1000-MKIV SPARE PARTS ITEM NO. PART NUMBER DESCRIPTION QTY. RB1000-003 TOP PLATE WITH HOLES RB1000-004 GLASS VISOR PANEL RB1000-005 TOP PLATE PLAIN RBIO-007 GLASS BRACKET ASSEMBLY RBIO-009 CERAMIC BOARD RBIO-010 RC HANDSET...
-
Page 31: Installer Checklist
10. Installer Checklist THE BELOW FORM MUST BE COMPLETED BY THE INSTALLER ON COMPLETION AND IS REQUIRED IN THE EVENT OF A WARRANTY CLAIM... -
Page 32: Warranty Registration
11. Warranty Registration The appliance is covered by a 2-year warranty. The warranty must be registered within 28 days of installing the appliance. Failure to register within this time period will result in the warranty reverting to void from date of installation. Please complete the online form at the below website to register your warranty: https://chesneys.co.uk/warranty-registration In the event of a breakdown or claim you are required to contact the installer/dealer. - Page 33 Electrical (Fan kits etc Dispose of at a local recycling centre in accordance with the WEEE directive. components if applicable) Alchemy Fires Ltd 194-196 Battersea Park Road, London, SW11 4N...
Need help?
Do you have a question about the RB700-MKIV and is the answer not in the manual?
Questions and answers