Advertisement
Quick Links
Fitting Instructions
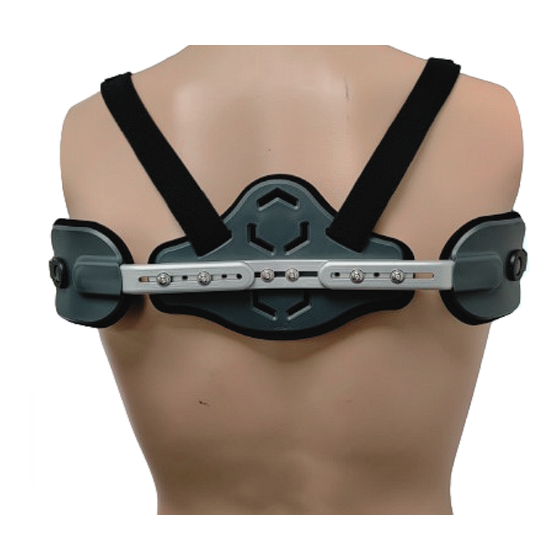
FRONT
Slide adjustment bars and screws.
1. Loosen the sternal and posterior adjustment screws to increase or decrease the
circumference, and/or to adjust the front panel for asymmetric Pectus Carinatum.
2. Slide the components to the desired circumference/position and re-tighten using the
included hex key.
3. The metal parts can be contoured with the use of bending irons. Care should be taken not
to make sharp bends in slotted areas.
4. Fit the orthosis and tighten to the desired tension using the ratchet buckles. If needed, the
included optional shoulder straps can be used to prevent slippage of the orthosis. Feed
the straps through the front and back panel slots, fasten using the hook and loop
fasteners, and check fit.
Optional, soft, shoulder straps included for
additional stabilization during wear
FRONT
5. To remove the orthosis, push down on the release button in the centre of the
buckle and remove the strap. It is recommended to only remove the orthosis by loosening
one side.
Ratchet Buckles.
~2.5" of lateral adjustment for
asymmetric Pectus Carinatum
PECTUS PRO
Pectus Carinatum Orthosis
Installation Guide
XST-021/01/24
Removeable Pads.
Ratchet Straps.
BACK
BACK
Page 1 of 2
Advertisement

Related Manuals for Trulife PECTUS PRO


Summary of Contents for Trulife PECTUS PRO
- Page 1 PECTUS PRO Pectus Carinatum Orthosis Installation Guide XST-021/01/24 Fitting Instructions Removeable Pads. FRONT BACK Slide adjustment bars and screws. Ratchet Buckles. Ratchet Straps. 1. Loosen the sternal and posterior adjustment screws to increase or decrease the circumference, and/or to adjust the front panel for asymmetric Pectus Carinatum.
- Page 2 Discontinue use immediately if you notice any excessive redness, abrasions, or irritation, and contact your medical practitioner. Disposal Please dispose of your Pectus Pro orthosis in accordance with local and national laws and regulations. The device does not contain any hazardous materials. Warranty...
Need help?
Do you have a question about the PECTUS PRO and is the answer not in the manual?
Questions and answers